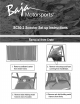
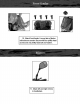
. Remove cardboardcarton from metal frame. 3. Remove bolts holding metal frame to rear of scooter. 2. Remove wire straps and foam covering from handlebars. 4. Remove axle bolt holding metal frame to front forks.
5. Removemetal frame and parts includedfor assembly.
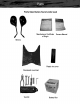
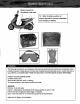
Partslistedbelowfoundunderseat ManufacturerCertificate OwnersManual of Origin Mirrors Plastic vin cover Floorboardcover/mat Tool Kit Battery Box
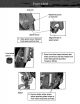
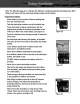
Axle bolt Alignment groove on front fork Speed sensor . Alignmenttab on speed sensor Align speed sensor between front wheel and front fork. Front wheel . spacer Place front wheel spacer betweendisc brake and fork on axle bolt. Attach front wheel with axle bolt provided. Torqueto 33ft.lbs. Spacer . Removebrake caliper spacer beforeattaching brake caliper to front wheel using bolts provided.
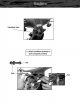
Handlebar stem 9. Attach handlebar assembly to stem using bolt provided.
10. Attach front fender. Line up tabs of fender with slots on scooter. Securewith four phillip head screws and one phillip head bolt and washer. 11. Attach left and right mirrors to handlebars.
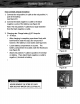
Battery located in floorboard under mat. 12. Refer to battery section of owners manual for correct installation and charging of battery. The following procedure is very dangerous and should be performedwith utmost care and attention. Wear protective eyewear, rubber gloves, and have water available should electrolyte come in contact with skin or eyes. KEEPALL CHILDREN AWAYFROM THEAREA WHILE THIS PROCEDURE IS BEING PERFORMED. POISON - CAUSES SEVERE BURNS Contains sulfuric acid.
Note:The following page is for vehicles with battery'scontainingseparate electrolytepack. Most battery'swill comewith the electrolytealreadysealed into the battery. Preparingthe battery: Place battery on level surface. Remove sealingtape from top. (see figure 20) Takethe electrolytecontainerout of the plastic bag. Place electrolytecontainerupside down with the sealed silver mouths of the electrolytebottles in line with the six filler holes of the battery.
How to InitiallyCharge the battery: 1. Connectthe red positive(+) cable to the red positive (+) pole of the battery. (see figure 23) 2. Connectthe black negative (-) cable to the black negative (-) pole of the battery.(seefigure 24) Note: The red positive(+) cable has a largerdiameter than the black negative(-) cable. . Figure 23 Charging rate: Charge battery@ 0.7 Amps for 5 ~ 10 hours. • After charging is complete,press down firmly with both hands to seat the caps. (Do not pound or hammer.
13. Fill engine with correct amount of oil. Refer to owners manual for oil types and quantity. 14. Fill gas tank as specified in owners manual. I !!WARNING!! Oil Plug. 15. Refer to owners manualfor proper starting instructions. ATTENTION:Side kick stand must be placed in uprightposition in order to start engine. This engine may be shippedwith packing oil in it. This oil should be drainedand replaced with new oil as described in the owners manual.