Electric Pressure Fryer MODELS FKM, FKM-F, & FKM-FC Service Manual Serial Numbers 137733 and higher
Warranty Information LIMITED ONE YEAR WARRANTY BKI (The "Company") warrants to the original purchaser that at time of shipment from the Company factory, this equipment will be free from defect in materials and workmanship. Written notice of a claim under this warranty must be received by the Company within ONE YEAR from the date of installation, but no longer than ONE YEAR AND THREE MONTHS from date of shipment from the factory.
Table of Contents Table of Contents........................................................................................................................................ 1 Introduction ................................................................................................................................................. 2 Safety Precautions....................................................................................................................................
Electric Pressure Fryer Introduction Introduction The FKM Pressure Fryer is compact, attractive and functional in design. It is constructed of a stainless steel fryer pot for cleaning ease. Exclusive BKI patented features and safety devices offer flexibility, efficiency and reliability plus PERFECTION IN PRESSURE FRYING! The BKI name and trademark on this unit assures you of the finest in design and engineering -- that it has been built with care and dedication -- using the best materials available.
Electric Pressure Fryer Introduction Specific Precautions Lids for FKM Pressure Fryers manufactured prior to May 27, 1980 (or units with serial numbers lower than 3613) could be manually opened while under pressure resulting in serious injury or death. If you have one of these units, please contact the BKI Technical Services Department toll-free at 1-800-927-6887 for urgent update information. Risk of fire exists if the oil level drops below 5mm of the maximum oil level.
Electric Pressure Fryer Introduction Safe Work Practices Noncombustible Floors Only Make sure your floor is noncombustible. Do not operate your fryer on floors that are wood, carpeted or have rubber mats. • Placing your fryer on a combustible floor could cause a fire. Serious injury could result. • Examples of noncombustible floors where you can safely place your fryer are concrete, tile, and ceramic.
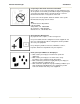
Electric Pressure Fryer Introduction Do Not Overfill The Fryer With Shortening Hot shortening and steam may escape and burn you if you put too much shortening in the fryer. Fill the fryer to approximately one inch below the fill marks that are inside the fryer pot. Heat the shortening. If needed, carefully add more shortening to bring the level to the fill marks. Do Not Let Any Water Get Into The Fryer Always remove excess moisture from food before placing it into the fryer basket.
Electric Pressure Fryer Introduction Wear Safe Clothing Appropriate To Your Job Always wear your insulated mitts when handling the fryer basket or touch any hot metal surfaces. You received a pair of insulated mitts with your fryer. If you lose or damage your mitts, you can buy new ones at your local restaurant equipment supply store or from your local BKI Distributor. Always wear non-skid shoes when working around the fryer or any other equipment that uses shortening.
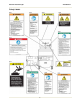
Electric Pressure Fryer Introduction Keep Safety Labels Clean and in Good Condition Do not remove or cover any safety labels on your equipment. Keep all safety labels clean and in good condition. Replace any damaged or missing safety labels. Refer to the Safety Labels section for illustration and location of safety labels on this unit. If you need a new safety label, obtain the number of the specific label illustrated on page 8, then contact: BKI Technical Services Department P.O.
Electric Pressure Fryer Introduction Safety Labels 8
Electric Pressure Fryer Introduction 9
Electric Pressure Fryer Installation Installation For installation information refer to Electric Pressure Fryer, MODELS FKM, FKM-F, & FKM-FC, Installation and Operation Manual LI0102.
Electric Pressure Fryer Operation Operation Controls and Indicators Refer to the figure and table below for an explanation of the fryer’s controls and indicators.
Electric Pressure Fryer Item # Operation Description Function 1 Spin Handle Used to tighten the lid to the pot once it is latched. 2 Pop Safety Valve lever Used to release pressure periodically to prevent the seat from sticking. 3 Pressure Gauge Indicates the pressure inside the pot. 4 Computer Used to program the cooking computer and activate the programs.
Electric Pressure Fryer Item # 8 Description Operation Function ALARM button This button allows the user to set an elapsed time at which the internal alarm will sound during a cycle. The time is set by pressing and holding the ALARM button while using the UP and DOWN arrows to change the time. The controller will limit the alarm time to be less than the currently programmed interval cycle time. The default alarm time is 0:00 which disables it.
Electric Pressure Fryer Operation Care of the Shortening Solid shortening should always be returned to the filter vat while in the liquid state. If this is not done, it will have to be heated to a liquid state. When using solid shortening, the fryer must be equipped with a pump heater. After filtering with solid shortening, the filter lines must be completely emptied of shortening.
Electric Pressure Fryer Operation Use only high-quality shortening that has low moisture content, a high smoke point and no additives. 3. The digital timer has a STIR OIL function that operates in one of four reconfigurable modes. If the timer needs to be reconfigured, follow step a. If the timer does not need to be reconfigured, follow step b. a. Press and hold the ALARM button and at the same time place the FILTER/OFF/FRY switch in the FRY position.
Electric Pressure Fryer Operation Cooking (FKM and FKM-F) Do not open the drain valve or the fill valve while the fryer is under pressure. Serious burns may result. 1. Ensure that the Start-Up procedures have been performed. 2. When frying chicken, lower the basket into the shortening in the fryer pot. Hot shortening may splash out of the pot causing severe injury when dropping chicken into pot. Carefully drop pieces of chicken into pot to prevent shortening splashes. 3.
Electric Pressure Fryer Operation 14. Remember to filter the shortening at least every third frying cycle load. Refer to the procedure in this manual. Also filter the shortening and clean the fryer at the end of each day. If you do not plan to use the fryer for an hour or more, turn the thermostat down to 150 and close the lid. 15. When you have finished frying for the day, turn the FILTER/OFF/FRY switch to the OFF position.
Electric Pressure Fryer Operation Table 1. System Programming Procedure STEP ACTION DISPLAY COMMENTS 1 Press the FILTER/OFF/FRY switch to FRY. LOW 2 Press PROG on the keypad. PROGRAM CODE 3 Input 1712 and ENTER. 4 Press ENTER. PROGRAM DEGREES °F This command allows you to choose the temperature scale option you want to use. The display will show either show °F or °C. 5 Press TOGGLE/CLEAR until the desired option is displayed.
Electric Pressure Fryer Operation Product Programming Use the following figure and table to set a maximum of eight product programs. The product programs must be set before cooking can begin. Figure 2.
Electric Pressure Fryer Operation Table 2. Product Programming Procedure STEP 1 2 3 4 5 6 7 8 9 ACTION Press the FILTER/OFF/FRY switch to FRY. Press PROG on the keypad. Input 1724 and press ENTER. Select the program product number (1-8). Press ENTER. DISPLAY LOW PROGRAM CODE PROGRAM PRODUCT # PROGRAM PRODUCT X PROGRAM TIME1 00:00 Press TOGGLE/CLEAR and input the number of minutes you want to cook. Press ENTER. Press TOGGLE/CLEAR and input the cooking temperature for product to be cooked.
Electric Pressure Fryer STEP 12 ACTION Press TOGGLE/CLEAR until the desired option is displayed. 13 Repeat steps 5-12 when programming stages 2, 3, 4 and 5 for Electric and Gas appliance types. 14 Repeat steps 5-10 when programming stages 2, 3, 4 and 5 for an ALF appliance type. Press ENTER. Operation DISPLAY PROGRAM VALVE1 X COMMENTS X refers to the solenoid valve option selected. OPEN is used for Models ALF and BLF Automatic Lift fryers.
Electric Pressure Fryer Operation Start-Up (FKM-FC) 1. Make sure the main drain valve is closed. 2. Fill pot with shortening to about one inch below the mark. Risk of fire exists if the oil level drops below the minimum oil level. The level of oil within the pot must not fall below 5mm of the maximum oil level. Use of oil/shortening older than the manufacturers recommendations for life of the oil is prone to surge boiling and flash fires.
Electric Pressure Fryer Operation 4. Carefully drop the chicken in the shortening one piece at a time starting with thighs and drumsticks. The fryer is designed to accommodate 48-50 pieces of chicken. Failure to use the insulated mitts will result in severe injury. Always use the insulated mitts when handling the hot fry basket. 5. Lift the basket and shake it. This keeps the food from sticking together and causing white spots on the cooked food.
Electric Pressure Fryer Maintenance Maintenance For maintenance information refer to Electric Pressure Fryer, MODELS FKM, FKM-F, & FKM-FC, Installation and Operation Manual LI0102.
Electric Pressure Fryer Replacement Parts Replacement Parts Use the information in this section to identify replacement parts. To order replacement parts, call your local BKI sales and service representative. Before calling, please note the serial number, model number and voltage on the rating tag affixed to the unit.
Electric Pressure Fryer Replacement Parts Figure 3. Dead Weight Assembly Table 3.
Electric Pressure Fryer Replacement Parts Figure 4. Door Assembly Table 4.
Electric Pressure Fryer Replacement Parts Figure 5.
Electric Pressure Fryer Replacement Parts Table 5.
Electric Pressure Fryer Replacement Parts Figure 6. Drain Valve & Plugs Table 6.
Electric Pressure Fryer Replacement Parts Figure 7. Domestic/European Front Panel FKM/FKM-F Table 7.
Electric Pressure Fryer Replacement Parts Figure 8. Front Panel FKM-FC Table 8.
Electric Pressure Fryer Replacement Parts Figure 9.
Electric Pressure Fryer Replacement Parts Figure 9.
Electric Pressure Fryer Replacement Parts Figure 9.
Electric Pressure Fryer Replacement Parts Figure 9.
Electric Pressure Fryer Replacement Parts Table 9. Lid/Top Parts ITEM # PART # QTY DESCRIPTION Figure 9 (sheet 1) SB1992S LID/TOP Figure 9 (sheet 2) SB3481 1 HANDLE ASSY, SPIN 1 FT0332 3 STUD, 5.
Electric Pressure Fryer Replacement Parts Figure 10.
Electric Pressure Fryer Replacement Parts Table 10.
Electric Pressure Fryer Replacement Parts Figure 12. Domestic/European Rear Panel FKM/FKM-F Table 12.
Electric Pressure Fryer Replacement Parts Figure 13. Rear Panel FKM-FC Table 13.
Electric Pressure Fryer Replacement Parts Figure 14. Solenoid Valve Assembly Table 14.
Electric Pressure Fryer Replacement Parts Accessories Description BASKET, LARGE FKM BAIL HANDLE BRUSH, DRAIN (LONG WHITE) BRUSH, L TIPPED 40152 BRUSH, LONG #5702 BRUSH, POT SCRUBBER, WHITE BRUSH, SHORT #6175 CORD SET, FKM-FC 7' FILTER HOSE, FEMALE SOCKET FILTER VAT DOLLY FKM-F INSULATED MITT 13" Accessory # B0114 B0075 B0063 B0051 B0049 B0052 SB7655 SB2332 SB7650 G0052 Figure # Figure 15 Figure 15 Figure 15 Figure 15 Figure 15 Figure 15 Figure 15 Figure 15 Figure 15 Figure 15 Figure 15.
Electric Pressure Fryer Replacement Parts Components Description ARM ADJUSTABLE STOP /FKM BAFFLE BOX ASSEMBLY BRACKET, CALROD FKMA258 CALROD, 208V 5675W FKM-F CALROD, 240V 5675W FKM-F CASTER, W/TOP PLATE 5" CLAMP, HOSE #6207 #4 COLLAR, 1/2" SET BRIGHT CONDENSATION PAN WELDMENT DRAIN PIPE, CONDENSATE FKM FILTER, FKM-F 13.5 X 20.5 OUTLET BOX, (ON FKM ONLY FOR POWERING FKF) PROBE ASSEMBLY KIT, COMPUTER SEMI AUTOMATIC HOSE ASSEMBLY (FKM only) SIDE CABINET, L&R FKM/DNF SLIDE, UHMW U-SHAPE .
Electric Pressure Fryer Replacement Parts 7 8 9 10 11 12 13 14 15 16 17 18 19 20 21 45
Electric Pressure Fryer Wiring Diagrams Wiring Diagrams Figure 17.
Electric Pressure Fryer Wiring Diagrams Figure 18.
Electric Pressure Fryer Wiring Diagrams Figure 19.
Electric Pressure Fryer Wiring Diagrams Figure 19.
Electric Pressure Fryer Wiring Diagrams Figure 19.
Electric Pressure Fryer Wiring Diagrams Figure 19.
Electric Pressure Fryer Wiring Diagrams Figure 20.
Electric Pressure Fryer Wiring Diagrams Figure 20.
Electric Pressure Fryer Wiring Diagrams Figure 20.
Electric Pressure Fryer Wiring Diagrams Figure 20.
Electric Pressure Fryer Notes Notes 56
Electric Pressure Fryer 57
P.O. Box 80400, Simpsonville, S.C. 29680-0400, USA http://www.bkideas.com Made and printed in the U.S.