
Installation Instructions
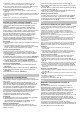


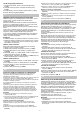


Table Of Contents
- Auszugsschienen ein- und aushängen
- Auszugsschienen einhängen
- 1. Die Schiene muss zwischen den beiden Stäben sitzen. (Bild 1)
- 2. Halterung hinten zwischen dem unteren und oberen Stab einführen. (Bild 2)
- 3. “PUSH” drücken und Schiene nach innen schwenken, so dass der Halter sich zwischen den beiden Stäben befindet. (Bild 3)
- 4. “PUSH” loslassen, die Halterung rastet ein. (Bild 4) Anschließend Schiene bis Anschlag herausziehen und wieder einschieben.
- Auszugsschienen aushängen
- 1. Hinter der Schiene auf “PUSH” drücken und Schiene nach hinten schieben. (Bild 5)
- 2. “PUSH” gedrückt halten und Schiene nach außen schwenken. (Bild 6)
- 3. Schiene nach vorne ziehen bis die Halterung hinten ausgehängt ist. (Bild 7)
- 4. Auszugsschiene entfernen. (Bild 8)
- Fitting and removing the pull-out rails
- Fitting the pull-out rails
- 1. The rail must sit between the two bars. (Fig. 1)
- 2. Push the retainer at the back in between the lower and the upper bar. (Fig. 2)
- 3. Push on the "PUSH" tab and swing the rail in so that the retainer ends up between the two bars. (Fig. 3)
- 4. Release the "PUSH" tab; the retainer will hook into place. (Fig. 4) Then pull the rail out as far as it will go and slide it back in.
- Removing the pull-out rails
- 1. Push on the tab marked "PUSH" behind the end of the rail, and push the rail away from you. (Fig. 5)
- 2. Keep the "PUSH" tab pushed back and swing the rail out. (Fig. 6)
- 3. Pull the rail out towards you until the retainer at the back unhooks. (Fig. 7)
- 4. Remove the pull-out rail. (Fig. 8)
- Закачане и откачане на телескопични релси
- Закачане на телескопични релси
- 1. Релсата трябва да е между двете пръчки. (фиг. 1)
- 2. Вкарайте държача отзад между долната и горната пръчка. (фиг. 2)
- 3. Натиснете “PUSH” и наклонете релсата навътре, така че държачът да се намира между двете пръчки. (фиг. 3)
- 4. Отпуснете “PUSH”, фиксаторът се застопорява. (фиг. 4) След това изтеглете релсата до упор и вкарайте отново.
- Откачане на телескопичните релси
- Zavěšení výsuvných kolejnic
- 1. Teleskopický výsuv musí být umístěn mezi oběma vodicími tyčemi. (obrázek 1)
- 2. Nasaďte držák vzadu mezi dolní a horní vodicí tyč. (obrázek 2)
- 3. Zmáčkněte „PUSH“ a teleskopický výsuv posuňte dovnitř tak, aby se držák nacházel mezi oběma tyčemi. (obrázek 3)
- 4. Uvolněte „PUSH“, držák zaskočí. (obrázek 4) Následně vytáhněte teleskopické výsuvy až nadoraz a znovu je zasuňte.
- Vysazení výsuvných kolejnic
- Montage af udtræksskinne
- 1. Skinnen skal være placeret mellem de to ribber. (fig. 1)
- 2. Før holderen ind bagerst mellem den underste og den øverste ribbe. (fig. 2)
- 3. Tryk på “PUSH”, og drej skinnen indad, til holderen befinder sig mellem de to ribber. (fig. 3)
- 4. Slip “PUSH”, og holderen går i indgreb. (fig. 4) Træk derefter skinnen ud til anslag, og skyd den ind igen.
- Afmontage af udtræksskinner
- Ανάρτηση των ραγών εξόδου
- 1. Η ράγα πρέπει να κάθεται μεταξύ των δύο ράβδων. (Εικ. 1)
- 2. Περάστε το στήριγμα πίσω μεταξύ της κάτω και της επάνω ράβδου. (Εικ. 2)
- 3. Πιέστε στο "PUSH" και στρέψτε τη ράγα προς τα μέσα, έτσι ώστε το στήριγμα να βρίσκεται ανάμεσα στις δύο ράβδους. (Εικ. 3)
- 4. Αφήστε το "PUSH" ελεύθερο, το στήριγμα ασφαλίζεται. (Εικ. 4) Στη συνέχεια τραβήξτε έξω τη ράγα μέχρι τέρμα και σπρώξτε την ξανά μέσα.
- Αφαίρεση των ραγών εξόδου
- 1. Πιέστε πίσω από τη ράγα στο "PUSH" και σπρώξτε τη ράγα προς τα πίσω. (Εικ. 5)
- 2. Κρατήστε πατημένο το "PUSH" και στρέψτε τη ράγα προς τα έξω. (Εικ. 6)
- 3. Τραβήξτε τη ράγα προς τα εμπρός, μέχρι να ελευθερωθεί το στήριγμα πίσω. (Εικ. 7)
- 4. Αφαιρέστε τη ράγα εξόδου. (Εικ. 8)
- Enganchar y desenganchar los rieles de extracción
- Enganchar los rieles de extracción
- 1. El riel debe quedar situado entre las dos barras. (Fig. 1)
- 2. Introducir la sujeción posterior entre las barras inferior y superior. (Fig. 2)
- 3. Presionar «PUSH» e inclinar los rieles hacia dentro, de forma que el soporte quede situado entre ambas barras. (Fig. 3)
- 4. Soltar «PUSH»; la sujeción queda encajada. (Fig. 4) A continuación, extraer el riel hasta el tope y volver a introducirlo.
- Desenganchar los rieles de extracción
- 1. Presionar «PUSH» en la parte posterior de los rieles y desplazarlos hacia atrás. (Fig. 5)
- 2. Mantener «PUSH» presionado e inclinar el riel hacia fuera. (Fig. 6)
- 3. Tirar del riel hacia delante hasta que la sujeción se desenganche. (Fig. 7)
- 4. Retirar el riel de extracción. (Fig. 8)
- Väljatõmbesiinide väljavõtmine ja sissepanek
- Väljatõmbesiinide sissepanek
- 1. Siin peab paiknema kahe toe vahel. (joonis 1)
- 2. Asetage hoidik alumise ja ülemise toe vahele. (joonis 2)
- 3. Vajutage “PUSH” nupule ja keerake siin sisse, nii et hoidik on kahe toe vahel. (joonis 3)
- 4. Vabastage “PUSH” nupp, hoidik fikseerub. (joonis 4) Seejärel tõmmake siin lõpuni välja ja lükake uuesti sisse.
- Väljatõmbesiinide väljavõtmine
- Kannatinkiskojen asennus
- 1. Kiskon pitää olla kahden listan välissä. (kuva 1)
- 2. Vie pidike takana alemman ja ylemmän listan väliin. (kuva 2)
- 3. Paina painiketta “PUSH” ja käännä kiskoa sisäänpäin siten, että pidike on molempien listojen välissä. (kuva 3)
- 4. Vapauta painike “PUSH”, pidike lukittuu paikalleen. (kuva 4) Vedä sitten kisko vasteeseen asti ulos ja työnnä taas sisään.
- Kannatinkiskojen irrotus
- 1. Paina kiskon takana olevaa painiketta “PUSH” ja työnnä kiskoa taaksepäin. (kuva 5)
- 2. Pidä painike “PUSH” painettuna ja käännä kisko ulospäin. (kuva 6)
- 3. Vedä kiskoa eteenpäin, kunnes takana oleva pidike irtoaa. (kuva 7)
- 4. Ota kannatinkisko pois paikaltaan. (kuva 8)
- Accrocher et décrocher les rails télescopiques
- Accrocher les rails télescopiques
- 1. Le rail doit être placé entre les deux barres. (fig. 1)
- 2. Introduisez la fixation à l'arrière entre la barre inférieure et la barre supérieure. (fig. 2)
- 3. Appuyez sur « PUSH » et basculez le rail vers l'intérieur de manière à ce que la fixation se trouve entre les deux barres. (fig. 3)
- 4. Relâchez « PUSH », la fixation s'enclenche. (fig. 4) Ensuite, tirez le rail jusqu'à la butée et insérez-le à nouveau.
- Décrocher les rails télescopiques
- 1. Appuyez sur l'inscription « PUSH » derrière le rail et poussez le rail vers l'arrière. (fig. 5)
- 2. Continuez d'appuyer sur « PUSH » et faites pivoter le rail vers l'extérieur. (fig. 6)
- 3. Tirez le rail vers l'avant jusqu'à ce que la fixation de derrière soit décrochée. (fig. 7)
- 4. Retirez le rail télescopique. (fig. 8)
- à Upute za montažu
- Stavljanje izvlačnih vodilica
- 1. Vodilica mora nasjesti između dvije šipke. (slika 1)
- 2. Stražnji držač uvucite između donje i gornje šipke. (slika 2)
- 3. Pritisnite “PUSH” i zakrenite vodilicu prema unutra tako da se držač nalazi između obje šipke. (slika 3)
- 4. Otpustite “PUSH”, držač će uskočiti u ležište. (slika 4) Zatim vodilicu izvucite do graničnika i ponovno je stavite.
- Vađenje izvlačnih vodilica
- 1. Iza vodilice pritisnite “PUSH” i pomaknite vodilicu prema natrag. (slika 5)
- 2. Držite pritisnut “PUSH” i zakrenite vodilicu prema van. (slika 6)
- 3. Vodilicu izvlačite prema naprijed sve dok je ne izvučete iz stražnjeg držača. (slika 7)
- 4. Izvadite izvlačnu vodilicu. (slika 8)
- Kihúzósínek be- és kiakasztása
- Kihúzósínek beakasztása
- 1. A sínnek a két rúd között kell elhelyezkednie. (1 ábra)
- 2. Vezesse be a tartót hátul az alsó és a felső rúd között. (2 ábra)
- 3. Nyomja meg a „PUSH” feliratot, és hajtsa be a sínt úgy, hogy a tartó a két rúd között legyen. (3 ábra)
- 4. Engedje el a „PUSH” feliratot, a tartó bepattan. (4 ábra) Végül húzza ki a sínt ütközésig, majd tolja vissza.
- Kihúzósínek kiakasztása
- Agganciare le guide di estrazione
- 1. La guida deve trovarsi tra le due aste. (fig. 1)
- 2. Introdurre il supporto posteriormente tra l'asta inferiore e quella superiore. (fig. 2)
- 3. Premere “PUSH” e spostare la guida verso l'interno, in modo che il supporto si trovi tra entrambe le aste. (fig. 3)
- 4. Rilasciare “PUSH”, il supporto si innesta in posizione. (fig. 4) Infine estrarre la guida finché non si innesta in posizione e inserirla nuovamente.
- Sganciare le guide di estrazione
- 1. Premere su “PUSH” dietro la guida e spingere la guida all'indietro. (fig. 5)
- 2. Tenere premuto “PUSH” e spostare la guida verso l'esterno. (fig. 6)
- 3. Tirare in avanti la guida finché non si sgancia da dietro il supporto. (fig. 7)
- 4. Rimuovere la guida di estrazione. (fig. 8)
- Ištraukiami bėgeliai ir jų kabinimas
- Ištraukiamųjų bėgelių įkabinimas
- 1. Bėgeliai turi būti įstatyti tarp dviejų strypelių. (1 pav.)
- 2. Gale tarp apatinio ir viršutinio strypelio įstumkite laikiklį. (2 pav.)
- 3. Spustelkite „PUSH“ ir bėgelį pakreipkite į vidų taip, kad lakiklis atsidurtų tarp abiejų strypelių. (3 pav.)
- 4. Atleiskite „PUSH“, laikiklis užsifiksuoja. (4 pav.) Paskui bėgelį ištraukite iki atramos ir vėl įstumkite.
- Ištraukiamųjų bėgelių iškabinimas
- Izbīdāmo sliežu ievietošana
- 1. Sliedēm jābūt ievietotām starp abiem stieņiem. (1 attēls)
- 2. Ievietojiet stiprinājumus starp apakšējo un augšējo stieni. (2 attēls)
- 3. Nospiediet "PUSH" un un bīdiet sliedes uz iekšu, lai stiprinājums atrastos starp abiem stieņiem. (3 attēls)
- 4. Atlaidiet "PUSH", stiprinājums tiek nofiksēts. (4 attēls) Pēc tam izvelciet sliedi līdz galam un iebīdiet atpakaļ.
- Izbīdāmo sliežu izņemšana
- 1. Aiz sliedēm nospiediet uz "PUSH" un virziet sliedes uz aizmuguri. (5 attēls)
- 2. Turiet nospiestu "PUSH" un izbīdiet sliedes uz āru. (6 attēls)
- 3. Pavelciet sliedes uz priekšu, līdz stiprinājumi aizmugurē ir izņemti. (7 attēls)
- 4. Izbīdāmo sliežu atvienošana. (8 attēls)
- Ставање и вадење од шините на извлекување
- Ставање на шините на извлекување
- 1. Шината мора да легне помеѓу двете прачки. (Слика 1)
- 2. Вметнете го држачот одзади меѓу долната и горната прачка. (Слика 2)
- 3. Притиснете на “PUSH” и навалете ја шината навнатре, така што држачот ќе се наоѓа меѓу двете прачки. (Слика 3)
- 4. Пуштете го “PUSH”, држачот ќе се вклопи. (Слика 4) Потоа извлечете ја шината до крај и повторно вметнете ја.
- Вадење на шините на извлекување
- 1. Притиснете на “PUSH” зад шината и вметнете ја шината наназад. (Слика 5)
- 2. Држете го “PUSH” притиснато и навалете ја шината нанадвор. (Слика 6)
- 3. Повлечете ја шината нанапред додека не се извади држачот наназад. (Слика 7)
- 4. Отстранување на шината на извлекување. (Слика 8)
- Uitschuifrails bevestigen en verwijderen
- Uitschuifrails bevestigen
- 1. De rail moet tussen de beide stangen zitten. (Afb. 1)
- 2. De houder aan de achterkant inbrengen tussen de onderste en de bovenste stang. (Afb. 2)
- 3. “PUSH” indrukken en de rail naar binnen draaien, zodat de houder zich tussen de beide stangen bevindt. (Afb. 3)
- 4. “PUSH” loslaten, de houder klikt in. (Afb. 4) De rail vervolgens tot de aanslag naar buiten trekken en weer inschuiven.
- Uitschuifrails verwijderen
- 1. Achter de rail op “PUSH” drukken en hem naar achteren schuiven. (Afb. 5)
- 2. “PUSH” ingedrukt houden en de rail naar buiten draaien. (Afb. 6)
- 3. De rail naar voren trekken tot de houder aan de achterkant losgekomen is. (Afb. 7)
- 4. Uitschuifrail verwijderen. (Afb. 8)
- Sette inn og ta ut uttrekksskinnene
- Sette inn uttrekksskinnene
- 1. Skinnen må sitte mellom de to stengene. (bilde 1)
- 2. Før holderen inn bak mellom den nedre og øvre stangen. (bilde 2)
- 3. Trykk på "PUSH" og sving skinnen innover, slik at holderen befinner seg mellom de to stengene. (bilde 3)
- 4. Slipp "PUSH", og holderen klikker på plass. (bilde 4) Deretter trekker du skinnen helt ut og skyver den inn igjen.
- Ta ut uttrekksskinnene
- Zakładanie wysuwanych szyn
- 1. Szyna musi być osadzona między dwoma prętami. (rys. 1)
- 2. Mocowanie wsunąć z tyłu między dolny a górny pręt. (rys. 2)
- 3. Nacisnąć na “PUSH” i zawiesić szynę w kierunku ścianki piekarnika tak, aby mocowanie znajdowało się między dwoma prętami. (rys. 3)
- 4. Puścić “PUSH”, mocowanie zostanie zablokowane. (rys. 4) Następnie wysunąć szynę do oporu i ponownie wsunąć.
- Zdejmowanie wysuwanych szyn
- 1. Z tyłu szyny nacisnąć na "PUSH" i przesunąć szynę do tyłu. (rys. 5)
- 2. Przytrzymać wciśnięty przycisk “PUSH” i zdjąć szynę w kierunku na zewnątrz.(rys. 6)
- 3. Pociągnąć szynę do przodu, aż wyczepi się z mocowania z tyłu. (rys. 7)
- 4. Wyjąć wysuwaną szynę. (rys. 8)
- Engatar e desengatar as calhas extensíveis
- Engatar as calhas extensíveis
- 1. A calha deve assentar entre as duas barras. (Fig. 1)
- 2. Insira a parte traseira do suporte entre as barras inferior e superior. (Fig. 2)
- 3. Pressione "PUSH" (empurrar) e vire a calha para dentro, de modo que o suporte se encontre entre as duas barras. (Fig. 3)
- 4. Solte "PUSH" (empurrar), o suporte engata. (Fig. 4) Em seguida, extraia a calha até ao batente e volte a inseri-la.
- Desengatar as calhas extensíveis
- 1. Pressione "PUSH" atrás da calha e empurre-a para trás. (Fig. 5)
- 2. Mantenha "PUSH" pressionado e vire a calha para fora. (Fig. 6)
- 3. Puxe a calha para a frente até a parte traseira do suporte estar desengatada. (Fig. 7)
- 4. Remova a calha extensível. (Fig. 8)
- Montarea şi demontarea şinelor de deplasare
- Montarea şinelor de deplasare
- 1. Şina trebuie să fie poziţionată între cele două bare. (figura 1)
- 2. Introduceţi elementul de prindere din spate între bara inferioară şi cea superioară. (figura 2)
- 3. Apăsaţi clapeta „ÎMPINGERE” şi pivotaţi şina către interior, astfel încât suportul de prindere să se găsească între ambele bare. (figura 3)
- 4. Eliberaţi clapeta „ÎMPINGERE”, fixaţi elementul de prindere. (figura 4) Scoateţi în afară şina până la opritor şi apoi împingeţi- o înapoi.
- Demontarea şinelor de deplasare
- 1. Apăsaţi clapeta „ÎMPINGERE” din spatele şinei şi împingeţi-o din partea din spate. (figura 5)
- 2. Menţineţi apăsată clapeta „ÎMPINGERE” şi pivotaţi şina către exterior. (figura 6)
- 3. Trageţi şina în faţă până când elementul de prindere din spate este demontat. (figura 7)
- 4. Îndepărtaţi şina de deplasare. (figura 8)
- î Инструкция по монтажу
- Навешивание выдвижных направляющих
- 1. Направляющая должна располагаться между двумя стержнями. (рис. 1)
- 2. Вставьте заднее крепление между нижним и верхним стержнями. (рис. 2)
- 3. Нажмите зону «PUSH» и отведите направляющую наружу таким образом, чтобы держатель находился между двумя стержнями. (рис. 3)
- 4. При отпускании зоны «PUSH» крепление фиксируется. (рис. 4) Вытяните направляющую до упора и зафиксируйте.
- Снятие выдвижных направляющих
- 1. Нажмите на зону «PUSH» позади направляющей и сдвиньте направляющую назад. (рис. 5)
- 2. Удерживая нажатой зону «PUSH», отведите направляющую наружу. (рис. 6)
- 3. Оттяните направляющую вперед, так чтобы заднее крепление освободилось. (рис. 7)
- 4. Снимите выдвижную направляющую. (рис. 8)
- Zavesenie a vyvesenie vyťahovacích koľajničiek
- Zavesenie vyťahovacích koľajničiek
- 1. Teleskopický výsuv musí sedieť medzi obidvomi tyčami. (obrázok 1)
- 2. Uchytenie vzadu zaveďte medzi dolnú a hornú tyč. (obrázok 2)
- 3. Stlačte „PUSH“ a teleskopický výsuv otočte dovnútra tak, aby sa uchytenie nachádzalo medzi obidvomi tyčami. (obrázok 3)
- 4. Uvoľnite „PUSH“, uchytenie zacvakne. (obrázok 4) Nakoniec teleskopický výsuv vytiahnite až po zarážku a opäť ho zasuňte.
- Vyvesenie vyťahovacích koľajničiek
- 1. Zatlačte za koľajničkou na „PUSH“ a koľajničku potlačte dozadu. (obrázok 5)
- 2. „PUSH“ podržte stlačené a koľajničku otočte smerom von. (obrázok 6)
- 3. Koľajničku ťahajte dopredu, kým sa uchytenie vzadu nevyvesí. (obrázok 7)
- 4. Odstráňte vyťahovaciu koľajničku. (obrázok 8)
- Namestitev in odstranitev izvlečnih vodil
- Namestitev izvlečnih vodil
- 1. Vodilo mora biti nameščeno med palicama ogrodja. (slika 1)
- 2. Držalo zadaj vstavite med spodnjo in zgornjo palico ogrodja. (slika 2)
- 3. Pritisnite „PUSH“ in obrnite vodilo navznoter, tako da bo držalo med palicama ogrodja. (slika 3)
- 4. Spustite „PUSH“, držalo se zaskoči. (slika 4) Nato izvlecite vodilo do prislona in ga ponovno potisnite noter.
- Odstranitev izvlečnih vodil
- Vini shinën rrëshqitëse
- 1. Shina duhet të qëndrojë midis dy shufrave. (Figura 1)
- 2. Vendoseni mbajtësen e pasme midis shufrës së poshtme dhe të sipërme. (Figura 2)
- 3. Shtypni “PUSH” dhe kthejeni shinën nga brenda, në mënyrë që mbajtësi të ndodhet midis dy shufrave. (Figura 3)
- 4. Lëshojeni “PUSH”, mbajtësi do të mbërthehet. (Figura 4) Në përfundim, zgjatni shinën deri në fund duke e tërhequr jashtë dhe pastaj shtyjeni sërish brenda.
- Hiqni shinën rrëshqitëse
- Kačenje šina za izvlačenje
- 1. Šina mora da leži između dve šipke. (slika 1)
- 2. Zadnji držač uvedite između donje i gornje šipke. (slika 2)
- 3. Pritisnite jezičak „PUSH“ i zakrenite šinu ka unutra, tako da držač dođe između obe šipke. (slika 3)
- 4. Otpustite jezičak „PUSH“, držač ulazi na svoje mesto. (slika 4) Zatim izvucite šinu do graničnika i vratite je nazad.
- Otkačivanje šine za izvlačenje
- Sätta i utdragsskenorna
- Ta ur utdragsskenorna
- Çekme raylarının takılması
- 1. Ray her iki çubuğun arasına oturmalıdır. (Resim 1)
- 2. Tutucuyu arkadan alt ve üst çubuğun arasına sürünüz. (Resim 2)
- 3. "PUSH" düğmesine basınız ve rayı içeri döndürerek tutucunun her iki çubuk arasında bulunduğundan emin olunuz. (Resim 3)
- 4. “PUSH” düğmesini bırakınız, tutucu yerine oturur. (Resim 4) Ardından rayı dayanak noktasına kadar dışarı çekiniz ve tekrar içeri itiniz.
- Çekme raylarının sökülmesi
- Підвішування висувних рейок
- 1. Шини мають фіксуватися між двома виступами. (мал. 1)
- 2. Введіть кріплення всередину між верхнім і нижнім виступами. (мал. 2)
- 3. Натисніть на «PUSH» і оберніть шину всередину так, щоб кріплення знаходилося між обома виступами. (мал. 3)
- 4. Відпустіть «PUSH», кріплення зафіксується. (мал. 4) Потім витягніть рейки до упору та вставте знову.
- Знімання висувних рейок