lavavajillas es 6/7/04 14:19 Página 2 es Garantía para el sistema AQUA STOP (no procede para las máquinas no equipadas con el sistema AQUA STOP) Además de los derechos de garantía respecto al distribuidor derivados del contrato de compra y de la garantía del aparato otorgada por el Fabricante, concedemos una garantía adicional bajo las siguientes condiciones: 1. Resarciremos a los usuarios particulares de los daños producidos en sus hogares debidos a fallos o averías del sistema AQUA STOP. 2.
.
en Index Safety instructions . . . . . . . . . . . . . Getting to know your appliance . . Water softener . . . . . . . . . . . . . . . . Filling the special salt container . . Filling the rinse-aid container . . . . Unsuitable dishes . . . . . . . . . . . . . Arranging crockery, glasses, etc. in the dishwasher . . . . . . . . . . Detergents . . . . . . . . . . . . . . . . . . . 4 6 7 8 9 10 11 15 auto 3in1 . . . . . . . . . . . . . . . . . . . . . Programme overview . . . . . . . . . . Washing dishes .
en Safety instructions Delivery Immediately check the packaging and dishwasher for any damage which may have been caused in transit. Do not use a damaged appliance, but consult your supplier. Please dispose of packaging material properly. The corrugated cardboard consists mainly of waste paper. The polystyrene moulded parts have been foamed without any CFCs. The polyethylene film (PE) consists partly of secondary raw material. The wooden frames (if fitted) are made of residual wood and are untreated.
en In daily use Warning Knives and other utensils with sharp points must be placed in the baskets either flat or with the points downwards. Use the dishwasher only in the household and only for its designed purpose, i.e. for washing domestic dishes. Do not lean or sit on the open door. The appliance could tip. The water in the appliance is not drinking water. Do not add any solvents to the washing chamber. Danger of explosion! Open the door carefully when the programme is still running.
en Getting to know your appliance Diagrams of the control panel and the interior of the appliance can be found in the envelope at the front. Individual positions are referred to in the text.
en Water softener In order to rinse dishes and glasses satisfactorily, the dishwasher requires soft water, i.e. containing little or no lime, otherwise water stains will be left behind on crockery and glasses, etc. If the tap water exceeds a certain level of hardness, it must be softened, i.e. decalcified, so that it can be used in the dishwasher. This is achieved by adding a special salt to the water softener inside the dishwasher.
en Filling the special salt container How the salt works While washing is taking place, salt is automatically rinsed out of the salt container into the water softener where it dissolves the lime in the water. The dissolved lime is pumped out of the dishwasher. The water softening system is then ready for the next load. This process of regeneration can only function when the salt is dissolved in water. Unscrew the lid on the salt container 24 .
en Filling the rinse-aid container The purpose of a rinse-aid is to prevent the formation of water marks on tableware and utensils, and to ensure that glasses are clean and sparkling. The rinse-aid is consumed during the washing process. Fold back the lid on the rinse-aid container 29 . on To open the lid, press the mark the rinse-aid lid and simultaneously lift .
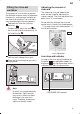
en Switching the rinse-aid indicator on or off You can switch the rinse-aid indicator 9 on or off. This function can be changed as follows: Close the door. Hold down programme button 4 and press main switch 1 until the digital display illuminates, then release the buttons. is On the digital display 3 indicated (rinse-aid indicator on). By pressing the programme button 4 you can switch the rinse-aid indicator off or on . Switch off the main switch 1 ; the chosen setting has now been stored.
en Damage to glassware and other dishes Possible causes: type of glass or manufacturing process chemical composition of detergent water temperature and duration of dishwasher programme. Suggested remedy: Use glassware or porcelain dishes that have been marked ’dishwasher–proof’ by the manufacturer. Use a mild detergent that is described as ’kind to dishes’. If necessary, seek further information from detergent manufacturers. Select a programme with as low a temperature and as short a duration as possible.
en Pots and pans Baking sheet spray head * Lower basket * some models You can clean large baking sheets or grilles with the baking sheet spray head. To do this, remove the top basket and insert the spray head as illustrated in the diagram. 27 Cutlery Cutlery should be placed in the dishwasher always unsorted and with the eating surface pointing downwards. The spray jet is then better able to reach the individual parts.
en Shelf * Adjusting position of basket * * not on all models Lean tall glasses and those with long stems against the shelf – not against other items to be washed. * not on all models Ø max. 20/*25cm 86cm 81cm Ø max. 20/*25cm Ø max. 30/*25cm Long items, serving cutlery, salad servers or knives should be placed on the shelf so that they do not obstruct the rotation of the spray arms. The shelf can be folded back when not required for use.
en Top basket with side levers (Rackmatic) Pull out the top basket. To lower the basket, press in succession the two levers on the left and right sides of the basket. Always take hold of the side of the basket on the upper edge, otherwise the basket will not drop smoothly (and may damage the utensils). 14 To raise the basket, take hold of the basket on the upper edge and pull upwards. Before you re-insert the basket, ensure that it is at the same height on both sides.
en Detergents Information about detergents You can use any brand of liquid or powder detergent, as well as tablets, that have been specifically designed for use in domestic dishwashers. (Do not use normal washing-up liquid!) Detergent compartment with measuring marks The side of the detergent compartment is marked with lines to help you determine how much powder to add. The capacity of the detergent container is 15 ml up to the bottom line and 25 ml up to the middle line.
en auto 3in1 Reduce costs! If your dishes are only moderately dirty, you may be able to use less detergent than recommended. Close the lid on the detergent compartment. Press down the lid (1) until it clicks shut (2). The use of so-called combined detergent products may make the use of rinse aid and/or salt unnecessary. There are currently several types of combined detergent products available. 3in1: They contain detergent, rinse aid and salt function.
en Note Optimum rinsing and drying results can be obtained by using standard detergents in conjunction with separate application of salt and rinse aid. Observance of the operating instructions or information on the packaging of the combined detergents determines their effectiveness. Note Even if the rinse aid and/or salt refill indicator is lit, the rinse programme runs correctly when 3in1 products are used.
en Programme overview This overview lists the max. possible number of programmes. The programmes supplied with your appliance are indicated on the fascia. Type of crockery e.g.china, pots/pans, Nondelicate cutlery, glasses, etc.
en Washing dishes Switching the dishwasher ON Turn on the tap. Set main switch 1 to ON. Indicators light up according to the last programme that was selected. This same programme will run again if no other programme button 6 is pressed. The numerical display 3 shows the expected duration of the programme. The programme starts automatically.
en Interrupting the programme Set main switch 1 to OFF. Indicator lights extinguish. The programme is retained in the dishwasher memory. If the hot water was switched ON or the appliance has already heated up and then the appliance door opened, leave the door ajar for several minutes and then close. Otherwise, the appliance door may fly open due to expansion. In order to continue with the stored programme, set the main switch to ON again.
en Intensive drying By activating the ”Intensive drying” function, the final rinse will produce a higher temperature in all programmes resulting in an improved drying result (please note that higher temperatures might have an effect on delicate items). Close the door. Hold down programme button A and press main switch until 1 the digital display illuminates. Release both buttons.
en Maintenance and care You can help prevent faults by checking and maintaining your appliance regularly. This will save time and reduce problems. Therefore you should occasionally examine the inside of your dishwasher. Overall condition of the appliance Check the rinsing compartment for grease and limescale deposits. If you find any deposits: Fill the detergent dispenser with detergent. Start the empty appliance with the programme which has the highest rinsing temperature.
en Spray arms Lime and remnants of food in the washing water can block the nozzles in the spray arms 22 and 23 and the arm mountings . Inspect the nozzles in the spray arms for blocked holes due to remnants of food. If necessary, pull the lower arm 23 upwards and lift it off. Unscrew the upper spray arm 22 . Clean both spray arms under running water. Refit the spray arms. Ensure that the lower arm has locked into place and the upper one is screwed tight.
en Fault finding Resolving minor problems yourself Experience has shown that you can resolve most problems that arise during normal daily usage yourself, without having to call out a service engineer. Not only does this save costs, but it also means that the appliance is available for use again that much sooner. The following list of common occurrences and their remedies should help you identify the causes of most problems. Problems ... ... when the appliance is switched on The appliance does not start.
en Water remains inside appliance after programme has ended Blockage or kink in drainage hose. Pump is jammed. Filters are blocked. The programme is still running. Wait for the programme to end (numerical display will indicate 0). Perform “Reset” function. ... during washing Unusual amount of foam is created Normal washing up liquid has been poured into the rinse-aid container. Remove any spilled rinse aid with a cloth as it could otherwise lead to excessive foaming during the next washing cycle.
en Dishes, cutlery, etc. have not been dried Selected programme did not include drying function. Amount of rinse-aid was set too low. Items were removed from dishwasher too soon. Glasses have a dull appearance Amount of rinse-aid was set too low. Tea stains or traces of lipstick have not been completely removed Detergent does not have a sufficient bleaching effect. Washing temperature was set too low. Traces of rust on cutlery Cutlery is not sufficiently rustproof. Salt content in washing water is too high.
en Information Disposal Old appliances are not worthless rubbish. Valuable raw materials can be reclaimed by recycling old appliances. Pull out the mains plug of the redundant appliance. Cut off the power cord and discard with mains plug. To prevent children from locking themselves in the appliance and suffocating, destroy the door lock and childproof lock (if fitted). You received your new appliance in a protective shipping carton. All packaging materials are environmentally friendly and recyclable.
en Installation The dishwasher must be connected by a qualified technician to ensure correct operation. The specifications for supply, drainage and connected load must fulfil the required criteria as stated in the following paragraphs or in the installation instructions.
en Removing the appliance It is essential, when removing the appliance, to observe the following sequence: First, disconnect the appliance from the power supply. Pull out the mains plug. Turn off the water supply. Disconnect the waste water and fresh water connections. Loosen the fastening screws under the worktop. If fitted, remove the base panel. Pull out the appliance, carefully pulling the hose behind.
.
en 30
lavavajillas es 6/7/04 14:19 Página 2 en AQUA-STOP Warranty. (not applicable to appliances without Aqua-Stop) In addition to warranty claims against the seller based on the sales agreement and in addition to our appliance warranty we shall replace the appliance under the following conditions: 1. If damage is caused by water due to a malfunction of our Aqua-Stop system, we shall make good the damage in the case of private consumers. 2.