
Owner manual


88-4802 Rev A July 1, 2009
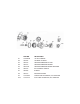
DRAINABLE MAGNA SERIES INSTALLATION INSTRUCTIONS
The correct hole size for Drainable Magna Series is 2 1/2”
Before drilling the hole(s) to install the jet(s), make sure the surface is flat. This will help assure the best 1.
seal.
Drill one 2 1/2” hole for each jet. 2.
The gasket (#2) can be placed on the inside or outside surface. Make sure surface is smooth enough to 3.
seal.
Before inserting the wall fitting (#3) thru the hole, apply silicone to threaded area of wall fitting only. This 4.
will help seal the wall fitting (#3) and jet (#1) together.
CAUTION: Do not apply any silicone inside the jet as this will interfere with the operation of the jet.
Tighten wall fitting (#3) into jet (#1) hand tight (10 foot pounds max) with gasket (#2) in place. It is not 5.
necessary to over tighten the wall fitting as the gasket and silicone will create a good seal.
After the jets are installed on whirlpool, you can connect the plumbing. Be sure air lines are placed in 6.
sockets marked “AIR” and waterlines are placed in sockets marked “WATER”. Use care when applying
cement inside slip socket of the jets. If too much cement is used, it may be pushed down into air and
water ports causing poor jet performance.
Be sure air lines do not sag. If air lines sag, the jets may not aerate properly. 7.
Run whirlpool for fifteen minutes to clear debris from water lines. 8.
Slip adjustment handle (#6) through wall fitting; (#3) lining up nozzle (#4) with cut-outs at base of 9.
adjustment handle (#6). Press adjustment handle (#6) firmly in place. Clips must snap into place.
NOTE: Adjustment handle (#6) may be removed by lifting both clips. Inside the adjustment handle (#6)
inward while pulling adjustment handle (#6) out of wall fitting (#3).
Insert therapy option (#7 & 8, #9, or #10) into adjustment handle (#6), pressing firmly to snap into place. 10.
To remove, pull on snout of eyeball (or flowpath spout). Note: It may be easier to remove therapy option
with pump running. Block outlet with index finger and pull on snout of eyeball or flowpath spout.
Rotate adjustment handle (#6) to control flow of water. 11.
(Over)