
Installation Guide


Lifetime Warranty
This product comes with a lifetime mechanical and finish warranty
to the original residential user against defects in material and
workmanship as long as the original user occupies the residential
premises upon which the product was originally installed. This
warranty DOES NOT COVER scratches; abrasions; deterioration due
to the use of paints, solvents, or other chemicals; abuse; misuse;
or product(s) used in commercial applications. Upon return of a
defective product to Baldwin Hardware Corporation, Baldwin may
repair or replace the product or refund the purchase price. Baldwin is
not liable for incidental or consequential damages. Some states do
not allow the exclusion or limitation of incidental or consequential
damages, so the above exclusion may not apply to you. This warranty
gives you specific legal rights and you may also have other rights
that vary from state to state. If a mechanical or finish defect occurs,
please call 1-877-315-7853 in the U.S. and Canada or return it to
Baldwin Hardware Corporation, Consumer Services, 19701 Da Vinci,
Lake Forest, California 92610.For customers outside of the U.S. and
Canada, claims under this warranty must be made only to either the
place of purchase or to the listed importer.
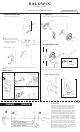
TEMPLATE PLANTILLA
MEASURE
BACKSET
1. Adjust and install latch
Measure your door backset as shown.
If backset of door measured 2-3/4”
(70mm), adjust latch shown by
grasping the spring pin and
moving it to the 2-3/4” slot.
4. Install and adjust strike.
Adjust tang as needed.
Install latch with 1/2” screws.
3. Install knobs / levers
Place lever or knob onto assembly and tighten set screw to secure.
Repeat for the knob or lever on the other side.
Make sure the slant of the latch bolt faces in the direction that the door closes.
1. Pry off plate with flat
blade screwdriver
For Drive In Latch
LATCH FACE OPTIONS
3. Install with 1/2” screws
2. Snap on collar 3. Drive in with hammer
For Square Corner Latch
2. Snap together front
and back plate
2. Install trim
Push and hold in latch bolt while inserting the stem side trim.
stem side
Knobs and Levers Installation Instructions
Presge Series
www.baldwinprestige.com