
Installation Guide
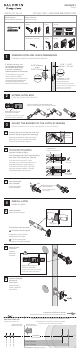

Parts in the box
Piezas en la caja
Required tools
Herramientas necesarias
Screws
Tornillos
Strike
Placa
Keys
Llaves
Deadbolt
Cerrojo
SmartKey
®
tool
Herramienta SmartKey
A B C
K L M N P
D
A
A
A
A
A
B
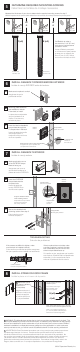
Hold the latch in front of the door hole, with
the latch case ush against the door edge.
Sostenga el pestillo en frente del oricio
de la puerta, con la cubierta del pestillo
al ras con el borde de la puerta.
Install backplate.
Instale la placa trasera.
latch case
cubierta
del pestillo
If the D-shaped hole is centered
in the door hole, no adjustment is
required. Proceed to step 4.
If the D-shaped hole is NOT centered, adjust
latch. See “Latch Adjustment” (step 3C).
Si el oricio en forma de “D” está
centrado con el oricio de la puerta, no
se requiere ajustarlo. Vaya al paso 4.
Si el oricio en forma de “D” NO está
centrado, ajuste el pestillo. Consulte
“Ajuste del pestillo” (el paso 3C).
Install the latch
in the door.
Instale el
pestillo en
la puerta.
Install the faceplate
and secure
with screws.
Instale la placa
frontal y jela con
los tornillos.
Latch Adjustment
(only if needed)
Ajuste del pestillo
(si es necesario)
180°
Rotate the front of the
latch to extend it.
Gire el pestillo frontal
para alargar.
C
J (x2)
Make sure the curve is on
the bottom of the latch.
Asegurarse de que la curva este
en la parte inferior del pestillo.
D-shaped hole
oricio en forma de “D”
Latch
Pestillo
DEADBOLT
Cerrojo
E
F
H
G
J
centered
centrado
not centered
no centrado
A
Ensure plate snaps into place.
Pull plate to test for tight t.
Asegúrese de que la placa
trasera esta en su lugar.
Tire de la placa para
comprobar un ajuste apretado.
2 tabs
2 lengüetas
B
C
If drilling a new door, use
the supplied template and
the complete door drilling
instructions available at
baldwinhardware.com/doorprep
Si va a perforar una puerta
nueva, utilice la plantilla
suministrada y las instrucciones
completas para la perforación
de la puerta disponibles en
baldwinhardware.com/doorprep
*Call Baldwin to order
a service kit for 2-1/4"
(57 mm) thick doors.
*Llame a Baldwin para pedir
un kit de servicio para puertas
gruesas con un espesor
de entre 57 mm (2-1/4").
1-3/8" — 2-1/4"*
35 mm — 57 mm*
2-1/8"
54 mm
1"
25 mm
Instructions continue on reverse
Las instrucciones continúan en el reverso de la hoja
2-3/8" (60 mm)
2-3/4" (70 mm)
Backset • Distancia al centro
Centerline
1-3/8" (35 mm)
1-3/4" (44 mm)
2-1/4" (57 mm)
Edge of the door
Borde de la puerta
Fold
Doble
Linea central
DRILLING TEMPLATE
Plantilla de perforación
Use a screwdriver to extend the latch bolt.
Utilice un destornillador para extender el pestillo.
Make sure the curve is on
the bottom of the latch.
Asegurarse de que la curva este
en la parte inferior del pestillo.
2-3/8" (60 mm)
or • o
2-3/4" (70 mm)
180°
Template is only needed if a new hole must be drilled in the door.
La plantilla solo se necesita en caso de que deba
perforarse un nuevo oricio en la puerta.
Face of the door
Frente de la puerta
A
B
800.566.1986 | BALDWINHARDWARE.COM
PREPARE DOOR AND CHECK DIMENSIONS
Prepare la puerta y revise las dimensiones
1
EXTEND LATCH BOLT
Extienda el perno de retención
2
ADJUST THE BACKSET OF THE LATCH (IF NEEDED)
Ajuste la distancia al centro del pestillo (si es necesario)
3
INSTALL LATCH
Instale el pestillo
4
69910-001 Rev 01
C