
Installation Sheet

Baldwin Hardware Corporation
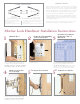
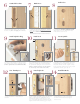
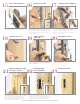
Mortise Lock Installation Instructions
TOOLS REQUIRED
1 Pencil
2 No. 2 and No. 3 Phillips Head
Screwdrivers
3 No. 1 and No. 2 Slotted Screwdrivers
4 1/8" Allen Head Wrench
5 3/4" Wood Chisel or Corner Chisel
6 Measuring Device
7 Lock Mortising Tool (Recommended)
8 Router and Lock Face Template
Note: In order to successfully install a mortise lock and trim, a minimum of average skill level is required with use of the above listed tools.
Read and understand the provided instructions BEFORE attempting to mark or cut the door and/or frame. If there are any questions
before you begin the installation, phone or visit your nearest Baldwin Distributor or contact the Technical Service Department at Baldwin
at 610.777.7811.
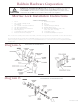
Diagram A
Diagram B
ENTRANCE HANDLESET
ENTRANCE LEVER/KNOB SET
9 Combination Square
10 Awl
11 Hacksaw
12 File (Wood Rasp and Metal)
13 Baldwin Aligning Tool
14 Drill and assorted Drill Bits (1/16", 1/8",
5/16", 3/8", 3/4", 1", 1-1/4")
15 Screw Wax or Soap
16 Powder Chalk, Graphite or Lipstick
CAUTION
Baldwin 2-1/2 and 2-3/4 backset Mortise locks are designed for residential use in UL-listed
fire-rated openings rated for 3-hour maximum. Meets U.S. UL10C (positive pressure) and
CANS-104M80. In the event of fire, lock will be permanently disabled when mechanism reaches
temperatures above 400˚F. Use in accordance with local fire code regulations.
PK 1076A 8/05