
Installation Sheet
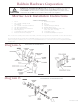

Mark the Door Double Check Compatibility
of Door Stile & Trim
2
Mortise Lock Pocket
For Lock Body
3
Prepare for Lock Front
4
Mark the door at 37-1/2"- 40" above finished
floor, or if retrofit, at appropriate location to
coordinate with existing strike preparations.
This will be center line of the lock and will put
the knob/lever at 36" - 39" above the floor.
Make sure that the door stile will accommodate
the intended lock.
Mortise the pocket in the door 1/8" deeper
than the lock being installed. Refer to the
Installation Template Guide Chart (blue
sheet) for exact size of mortise pocket.
Rout for the lock front.
Square the Corners.
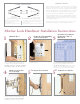
Determine Hole Pattern
Required for Trim on
Blue Sheet
Determine hole pattern required for trim
using Installation Template Guide Chart
(blue sheet shown). Mark the listed holes on
the yellow lock template (figure 7) enclosed
with the lock. Ensure trim will not interfere with
door stop or extend over door panel or glass.
5
1
A
Prepare for Lock Front
5
B
Mortise Lock Handleset Installation Instructions
DOOR CONDITIONS
Left Hand
Right Hand
Outside
Outside
Left Hand
Reverse Bevel
Right Hand
Reverse Bevel
HAND OF DOOR IS ALWAYS DETERMINED FROM THE OUTSIDE
Here are some rules to follow:
• The outside of an exterior door is the
street or entrance side.
• The outside of a room is the hall side.
• The outside of a single communicating door is the
side from which the hinges are not visible when
the door is closed.
• The outside of a closet door is the room or hall side.
GENERAL NOTES
Paper template is designed for 1-3/4" thick doors. For extra thick
doors, measure backset from center of door edge. Tape supplied
template to the door to locate fastener pattern for lock and trim.
When installing hardware on metal or fiberglass doors, ensure the
door was designed to accommodate mortise locks. If in doubt,
check with your local door distributor or door manufacturer.
Removal of hardware from doors is recommended before painting
and finishing of the door. Allow paint/stain to fully cure before
reinstalling hardware, usually ten days to two weeks. Check paint
manufacturer instructions.
Retain these instructions in a safe place should you need to
disassemble the lock trim or require Baldwin’s assistance.