
Installation Sheet
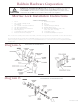

Size & Cut Thumbturn
15
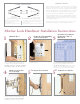
Install Interior Trim
16
Place the interior trim on the door. Slide the
aligning bushing onto the spindle so it fits into
the knob hole. Drill pilot holes and fasten interior
trim with supplied fasteners. Remove bushing
and discard.
Cut the thumbturn tailpiece so that it goes
halfway through the lock (as in step 12).
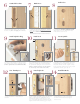
Complete Trim Installation
17
Start the set screw before sliding the knob or
lever onto the spindle. Slide knob or lever
onto the spindle and tighten securely. For
knob to knob and lever to lever sets - install
both sides - go to step 19.
Tighten Cylinder
Set Screw
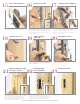
Install Armor Front
20
*Mark and Mortise Jamb
for Strike Location
21
Tighten the cylinder set screw by turning
clockwise. Do not over tighten. Do not use a
power screw driver.
Install the armor front with the small phillips
head screws supplied.
Mark the Jamb for the proper strike location.
Coat extended latch bolt with graphite, powdered
chalk or lipstick. Retract the bolt, close the
door and actuate the knob or lever several
times to mark the jamb. Add approximately
1/32" clearance from that mark.
Drill pilot holes for security strike and relief
holes for finished strike. Install dust box and
security strike with 1" and 3" screws on the
stop side of the plate.
Note: Security Strikes are
supplied only with locks which utilize cylinders.
Install strike plate with supplied machine
screws.
Install Strike Plate
23
Install Dust Box
& Security Strike
22
Thread decorative screw cover onto
threaded washer.
Install Screw Cover
18 19
* APPLY ANY WEATHERSTRIPPING BEFORE STRIKE HAS BEEN INSTALLED.
3"
1"
Door
Stop