
Installation Guide


5
10
extended (this is limited to the length of the Vinyl
Coated Cable, but you can not exceed 84” from the
Line on the wall below each end of the EasyShade
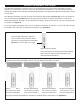
Figure 11
Figure 11
Horizontal Line
11
Figure 12
the Horizontal Line made in Step 10
Cable Guide Brackets must be mounted on the same
Figure 12
Horizontal Line
Vinyl Coated Cable
Cable Guide
12
13
as shown in Figure 13
Remove the Bracket and pre-drill both screw hole
Figure 13
Cable Guide
Bracket
14
17
Figure 16
15
Cables through the hole in the Cable Guide Bracket
Cable Guide Stops onto the Vinyl Coated Cable and
See Figure 14
16
See Figure 15
Note: Do not over ghten the Cable.
Figure 15
Adjust Cable Tension
by turning this Cable
Open End Wrench
Figure 14
Cable Guide
Bracket
Cable Guide
Stop
Wrench
Note:
The Cable Guide
Stop installs
underneath the
Cable Guide
Bracket, with threads
poinng up.
Figure 16
If trimming the
Vinyl Coated Cable,
leave one inch of
cable below the