
Installation Manual


7
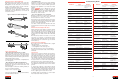
Problem Cause Solution Problem Cause Solution
Drive overtensioned Replace sheavesWorn sheave grooves,
belts bottom out
Sheave diameter too
small
Redesign driveDesign error
Bad bearings Check bearing design
and maintenance
Underdesigned or poor
maintenance
Drive undertensioned Retension driveBelts slip and cause
heat build-up
Sheaves too far out on
shaft
Place sheaves as close
to bearings as possible
Design error or obstruc-
tion
Hot Bearings
Install back side idler
on slack side, or use
timing belt
Arc of contact too small
Clean belts and
sheaves, shield drive
Oil or water on belt
Incorrect driveR to
driveN ratio
Redesign driveDesign error
Improper DriveN Speed
Belts too long or short
at installation
Check design and
selection
Design and/or belt
selection error
Belts mismatched at
installation
Replace all belts with
new belts
Mixed used and new
belts
Replace with belts
from the same manu-
facturer
Mixed belts from differ-
ent manufacturers
Replace sheavesWorn sheave grooves
Installation Problems
Combo (Banded) Belts
Tie band cut and/or
separated. Belts riding
out of sheave grooves
Replace sheavesWorn sheaves (Check
with groove gauge)
Realign sheavesSheave misalignment
Retension driveBelts undertensioned
Shield driveForeign object in drive
All belts separated
from tie band
Adjust guardDamage from belt guard
Replace idler sheaveWorn idler sheave
Frayed tie band Remove obstruction
and realign drive
Obstruction on machine
Blistered tie band Clean and shield driveForeign material
between belts
Cracked belt bottom Retension driveSlippage
Timing Belts
Broken belts Redesign driveUnderdesigned drive
Follow proper storage
and handling proce-
dures
Sharp bend damaged
tensile cord
Follow proper installa-
tion guidelines
Belt was pried or forced
on the drive
Shield driveForeign object in drive
Align pulleysBelt runs onto pulley
flange
Apparent belt stretch Replace pulleys.
Install cover if drive is
dusty
Reduction of center dis-
tance or non-rigid
mounting
Increase deceleration
time or redesign drive
Pulley teeth poorly
machined or worn
Increase deceleration
time or redesign drive
Sudden equipment
stops
Retension driveBelt doesn’t engage
pulley teeth
Tooth shear Redesign drive, install
back side idler, or use
next smaller pitch
Less than 6 teeth-in-
mesh
Redesign driveExcessive load
Tensile or tooth shear
failure
Increase pulley diame-
ter or use next smaller
pitch
Pulley diameter too
small
Protect drive or ask
Bando about special
construction belt
Exposure to acid or
caustic atmosphere
Excessive pulley tooth
wear (on pressure
face and/or O.D.)
Reduce installation
tension and/or
increase drive load
carrying capacity
Drive overload and/or
excess belt tension
Use harder material or
surface-harden pulley
Insufficient hardness of
pulley material
Excessive jacket wear
between teeth, expos-
ing tensile cord
Reduce installation
tension
Excessive installation
tension
Excessive noise Realign driveMisalignment
Reduce tensionExcessive installation
tension
Increase drive load
carrying capacity
Excessive load
Increase pulley diame-
ter
Pulley diameter too
small
Cracks in belt backing Improve ventilation,
remove heat source,
or check with Bando
for special construc-
tion belt
High temperatures
Softening of backing Lower ambient tem-
perature, protect from
oil, or ask Bando
about special belt con-
struction
Excess heat (over
200°F) and/or oil
Excessive edge wear Realign drive and/or
reinforce mounting
Misalignment or non-
rigid centers
Straighten flangeBent flange
Unmounting of flange
or flange wear
Install flange correctlyIncorrect flange installa-
tion
Realign driveMisalignment
Troubleshooting Guide
2
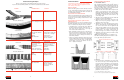
Check and correct sheave alignment
Misaligned sheaves will accelerate wear of belt side-
walls, which will shorten both belt and sheave life.
Misalignment can also cause belts to roll over in the
sheave, or throw all the load to one side of the belt –
breaking or stretching the tensile cord.
Check for the types of sheave and shaft misalignment
shown below. Correct alignment by placing a steel
straightedge across the sheave faces so it touches all
four points of contact.
Select replacement belts
• Don’t mix used and new belts on a drive
Used belts will ride lower in the sheave groove due to
sidewall wear and normal stretch. New belts will ride
higher in the sheave, travel faster, and operate at higher
tension. Running used and new belts together will over-
load and damage the new belts.
Used belts may be used elsewhere on a light duty drive,
or for emergencies.
• Don’t mix belts from different manufacturers
Because dimensions and constructions vary among
manufacturers, running such “mismatched belts” won’t
give full service life.
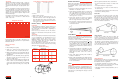
If the belt length is not known, the following formula can
be used to calculate belt length:
Length = 2CD + 1.57(D+d) + (D-d)
2
(4CD)
where CD=Center Distance, D=Large Sheave Diameter,
and d=Small Sheave Diameter.
• Use matched sets
A matched set of belts is necessary to assure equal dis-
tribution of the load. With some manufacturers, length
codes are necessary to match belts within a given size.
Observe proper guidelines if your belts have match
numbers.
Bando’s
®
process eliminates the need for
match numbers — all belts of a given size will match
with all others of that size. This system simplifies order-
ing, reduces inventory, and assures you’ll have a
matched sets of belts on hand.
• Use correct type and cross section belt
Match the correct belt cross section to the correspond-
ing sheave groove — A to A, 3V to 3V, etc. Don’t use a
B section belt in a 5V sheave, or vice versa.
Don’t replace A or B section belts with 4L or 5L fraction-
al horsepower (FHP) belts. The dimensions are similar,
but FHP belts can’t handle the horsepower require-
ments of a heavy duty application.
Use Bando Combo belts when vibration and shock
loads cause belts to turn over or jump out of the sheave
grooves.
Install new belts and adjust the slack
Always shorten the center distance of the drive until the
belts can be laid over the sheaves.
Never
pry or force a
belt on the drive with a pry bar or by cranking. This will
almost certainly damage the tensile cord and although
the injury may not be visible, belt life will be drastically
reduced.
Work the belts by hand to move slack so it is on the
same side — top or bottom — for all belts. This assures
all belts start under equal strain. Now, move the sheaves
apart until the belts are seated in the grooves and the
slack is taken up.
Check final sheave alignment
Once again, check sheave alignment with a straight-
edge and observe:
• parallel position of the sheave shafts
• correct alignment of the sheave grooves
Note: Mount sheaves as close to the bearings as
practical to avoid excessive loads on the bearings
and shafts.
Tension belts
The key to long, efficient, trouble-free belt operation is
proper tension. If belts are too loose, the result is slip-
page, rapid belt and sheave wear, and loss of productiv-
ity. Conversely, too much tension puts excess strain on
belts, bearings, and shafts, and causes premature wear
of these components. Follow this tensioning guideline:
the proper tension for a V-belt is the
lowest
tension at
which the belt won’t slip or squeal under peak load.
Note: Never use belt dressing to stop belts from slip-
ping. Tighten the belts and/or check for worn sheave
grooves.
To tension belts, adjust the center distance until the
belts appear fairly taut. Run the drive for about 15 min-
utes to seat the belts, and apply full load. If the belts slip
or squeal, apply more tension. When the drive is in
motion, a slight sag on the slack side is normal.
An alternate method of tensioning is to use the simpli-
fied force/deflection method, as follows:
Align with straightedge along sheave faces
Parallel
Vertical Angular
Horizontal Angular
Types of sheave and shaft misalignment