BeoCenter 6–26 Reference book
Tables of contents in the Reference book The contents of this Reference book is divided into sections. Each particular section starts with its own detailed table of contents provided with page references. Texts in black refers to the current section, whereas the remaining sections are described in general terms and written in grey.
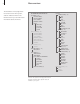
Menu overview 4 The illustration on this page shows the content of the menu system , and also indicates where in the Reference book you can find further information about the menus. PROGRAM AND STATION GROUPS TV TUNING (p. 26) EDIT PROGRAMS ADD PROGRAMS AUTO TUNING MANUAL TUNING EXTRA FINE TUNE DECODER TV SYSTEM SOUND RADIO TUNING (p. 26) OPTIONS CONNECTIONS (p. 47) AV1 AV2 AV3 SOUND (p. 31) VOLUME BALANCE BASS TREBLE LOUDNESS NO/YES PICTURE (p.
Advanced operation This chapter tells you how to operate your television beyond daily use. It also tells you how to operate a connected set-top box and other connected video equipment. • • • • • Wake-up Timer, 6 Set the television to switch itself on and off, 8 Set-top box operation, 10 Use your television as a computer monitor, 12 Surround sound, 13 Tuning and preference settings, 15 Find out how to set up your television for the first time and tune in programs.
Wake-up Timer 6 You can make the television wake you up in the morning. The Wake-up Timer is a once-only Timer, it lasts for one hour. Like an alarm clock, it is disabled once it has been executed. It applies only to the television it has been programmed on. Once you have made one Wake-up Timer, the television automatically suggests the time you entered for the latest Wake-up Timer when you enter a new one. Wake-up Timers can, of course, also be disabled again.
Check or delete a Wake-up Timer You can call up the settings for the Wake-up Timer to check the time or to disable the Wake-up Timer by setting it to OFF. To change settings for a Wake-up Timer or delete it … > Press MENU to bring up the TV SETUP menu and press to highlight PLAY TIMER. > Press GO to bring up the PLAY TIMER menu and press to highlight WAKE UP TIMER. > Press GO to bring up the WAKE UP TIMER menu. > Press or to move through the menu items.
Set the television to switch itself on and off 8 You can make your television switch itself on and off automatically via the timed play and timed standby functions, if, for example, there is a programme you do not want to miss. Enter as many as six Timer settings, and bring up an on-screen list of the Timer settings you have entered. From this list, you can edit or delete your Timer settings.
View, edit or delete a Timer Bring up an on-screen list of the settings you have entered. From this list, you can edit or delete your Timer settings. TV SETUP PROGRAM GROUPS TUNING TIMER RECORDING TIMER SETUP PLAY TIMER OPTIONS TIMER ON / OFF STAND POSITIONS TIMER INDEX ON PLAY TIMER PROGRAMMING TIMER ON / OFF TIMER INDEX WAKEUP TIMER OFF PLAY TIMER PROGRAMMING select 15:40-16:40 BBC GO TV 18 M . . TF . . select GO PLAY TIMER INDEX 15:40-16:40 BBC TV 18 M . . TF . .
Set-top box operation 10 The built-in Set-top Box Controller acts as an interpreter between a settop box of your choice and the Beo4 remote control. When a set-top box is connected, you can use the Beo4 remote control to gain access to the programs and functions offered by your set-top box. Some functions are immediately available via Beo4 when you switch on the set-top box. Additional functions are available through a Set-top Box Controller menu that you bring up on the screen.
Universal Beo4 operation Use the set-top box’s own menu Use a set-top box in a link room If you know which Beo4 button activates the function you want, you can activate the function without bringing up the Set-top Box Controller menu first. Once you have activated your set-top box, you can operate the set-top box’s own menus, such as the program guide, via Beo4. When your set-top box is connected to the television in the main room, you can operate the set-top box from the link room television.
Use your television as a computer monitor 12 If you connect your television to a computer, as described on page 41, you can use it as a monitor. IMPORTANT! If you wish to connect a computer to the television and use the television as a monitor, make sure that you disconnect the television, the computer, and all equipment connected to the computer from the mains before you connect the computer and the television to each other.
Surround sound If your television is equipped with the optional surround sound module, you can extend your system in to a surround sound system by adding four Bang & Olufsen loudspeakers and a BeoLab 2 subwoofer*. When you switch on one of the sources, speakers in a surround sound system can be cut in or out, depending on what kind of sound suits the source you are using.
Tuning and preference settings Find out how to perform the firsttime setup procedure and tune in all available programs automatically. In addition, you can find information about how to edit tuned programs and adjust other available settings, such as time, date, picture and sound. For information about how to place your television and connect additional video equipment, refer to the chapter ‘Placement, sockets and connections’ on page 35.
First-time setup of your television 16 The setup procedure described here is activated only when the television is connected to the mains and switched on for the first time. You must select the menu language, register any extra equipment you have connected, choose radio display, determine the centre position for the motorised stand – if you television is equipped with one – and start the automatic tuning of TV and radio programs.
Select radio display Store all programs and settings AUTO TUNE RADIO DISPLAY STYLE MAXIMUM CHECK AERIAL CONNECTION TV RADIO GERNO VERSI FOLLOW EPIUM RADIO 3 BBC CLASSIC BBC National DAB store GO Before tuning in programs, you are prompted to select the display type you want to appear on the television screen when you select radio as your source. When the DISPLAY SETUP menu appears … > Press or to switch between available settings.
>> First-time setup of your television Determine the centre position If your television is equipped with the optional motorised stand, the STAND ADJUSTMENT menu appears on the screen. Once the centre position is determined, select your favourite positions for when the television is switched on and in standby. When the STAND ADJUSTMENT menu appears … > Press GO to start stand adjustment. > If the adjustment is interrupted the text ‘ADJUSTMENT FAILED’ appears on the screen.
Edit tuned programs 20 You can only store a total of 99 radio programs, If automatic tuning of all radio programs results in more than 99 programs, the EDIT RADIO PROGRAMS menu appears automatically after tuning. You must then move the radio programs you want to a position within 1 and 99 in the list. You can at any time rearrange the order in which your radio and TV programs appear, just call up the EDIT RADIO PROGRAMS or EDIT TV PROGRAMS menus to do so.
Move or delete tuned programs At any time, you can move or delete any tuned TV or radio programs you do not want. Move programs … > Press TV to switch on the television, or RADIO to switch on the radio. > Press MENU to bring up the SETUP menu, and press to highlight TUNING. > Press GO to bring up the TUNING menu. EDIT PROGRAMS is already highlighted. > Press GO to bring up the EDIT PROGRAMS menu. > Press or to select the program you wish to move. > Press once to be able to move the program.
>> Edit tuned programs Name tuned programs The EDIT PROGRAMS menu also allows you to name all programs yourself. Name programs … > Press TV to switch on the television, or RADIO to switch on the radio. > Press MENU to bring up the SETUP menu, and press to highlight TUNING. > Press GO to bring up the TUNING menu. EDIT PROGRAMS is already highlighted. > Press GO to bring up the EDIT PROGRAMS menu. > Press or to select the program you wish to name. > Press the green button to be able to name the program.
Adjust tuned TV programs – manual tuning You can store TV programs on program numbers of their own. Fine tune the program reception, indicate the presence of coded programs and choose appropriate sound types for the individual programs. > Press TV to switch on the television. > Press MENU to bring up the TV SETUP menu and press to highlight TUNING. > Press GO to bring up the TV TUNING menu and press to highlight MANUAL TUNING. > Press GO to bring up the TV MANUAL TUNING menu.
>> Edit tuned programs Adjust tuned FM or DAB programs – manual tuning If your television is equipped with the optional FM or FM/DAB module, you can tune in FM and DAB radio programs. During first time setup both types of radio programs are tuned in. > Press RADIO to switch on the radio. > Press MENU to bring up the SETUP menu and press to highlight TUNING. > Press GO to bring up the RADIO TUNING menu and press to highlight MANUAL TUNING. > Press GO to bring up the RADIO MANUAL TUNING menu.
What’s on the ADJUST DAB AERIAL menu … When an ‘ensemble’ has been found, this menu can be used to optimise signal reception. The ‘ADJUST DAB AERIAL’ menu helps you find the best placement for your dab aerial. ADJUST DAB AERIAL .............................................................. DR DAB 12 C CHANNEL Turn your DAB aerial to a position where the bar is as filled out as possible. The bar at the top of the menu shows the reception quality.
Re-tune or add programs 26 You can make your television find your TV and radio programs for you. Preset up to 99 different TV and radio programs on program numbers of their own and give each program a distinct name. You can tune in new programs, for example, if you move – or re-tune previously deleted programs. When tuning in programs via the ADD PROGRAM menu, your previously tuned programs are left unchanged.
Add new programs You can add a new program or update a tuned program which, for example, has been moved by the broadcaster. > Press TV to switch on the television, or RADIO to switch on the radio. > Press MENU to bring up the SETUP menu and press to highlight TUNING. > Press GO to bring up the TUNING menu and press to highlight ADD PROGRAM. > Press GO to bring up the ADD PROGRAM menu. > Press to start. New programs are added automatically as they are found.
Set positions for the television to turn to 28 If your television is equipped with the optional motorised stand, you can turn it using the Beo4 remote control. Furthermore, you can program the television to turn automatically to face your favourite viewing position when you switch on the television, turn to a different position when you listen to radio, and turn away to a standby position when you switch it off. You can also turn your television by hand.
Set the time and date When you preset your television to switch itself on or off at a particular time, or when you preset a timed recording of a programme on a connected video recorder, the clock ensures that these features are switched on and off at the right times. The simplest way to set the clock is to synchronise it with a tuned TV program’s teletext service via the CLOCK menu.
Adjust picture and sound settings 30 Picture and sound settings are preset from the factory to neutral values which suit most viewing and listening situations. However, if you wish, you can adjust these settings to your liking. Adjust picture brightness, colour or contrast. Sound settings include volume, bass and treble. Store your picture and sound settings temporarily – until your television is switched off – or store them permanently.
Change volume, bass or treble Adjust the sound settings via the SOUND SETUP menu. Temporary settings are cancelled when you switch off the television. What’s on the SOUND SETUP/SOUND ADJUSTMENT menu … VOLUME … Adjusts the volume level the TV uses when you switch it on. > Press TV to switch on the television. (CENTRE) … Only available if you have connected > Press MENU to bring up the TV SETUP menu loudspeakers to the television. Adjusts the and press to highlight OPTIONS.
Choose menu language 32 The menu language you choose during the first-time setup of your television can be changed at any time. Once a menu language is chosen, all menus and display messages are shown in this language. You can select the language for on-screen menus via the TV SETUP menu. The text on the screen changes as you move from language to language. TV SETUP PROGRAM GROUPS TUNING TIMER RECORDING PLAY TIMER > Press TV to switch on the television.
Choose radio display You can change the radio display at any time. Your choice determines what is shown on the screen, when you select radio as your source. When you change the radio display style in the RADIO DISPLAY menu, a sample of the display style is shown in the menu. > Press RADIO to switch on the radio. > Press MENU to bring up the RADIO SETUP menu and press to highlight TUNING. > Press GO to bring up the RADIO TUNING menu and press to highlight RADIO DISPLAY.
Placement, sockets and connections In this chapter, you can find out how to place and connect your television. It also gives you an overview of the socket panels.
Set up your television 36 For information about how to fasten and run the cables on the rear of the television, refer to page 38. For further information about the socket panel, refer to page 40. Handling your television – Avoid placing your television in direct sunlight or direct artificial light, such as a spotlight, as this may reduce the sensitivity of the remote control receiver. Also if the screen is overheated, black spots may appear in the picture.
Placement options The television can be placed in several ways, some are illustrated to the right. Please contact a Bang & Olufsen retailer for further information. If you mount the television on one of the motorised stands or on the wall bracket, you can tilt the television up and down, as well as turn it left and right. Note, however, that tilting can only be done manually. While mounting the television on the base, stand or wall bracket, you can use the packaging to support the products.
>> Set up your television Aerial and mains connections When you set the television up on its own, simply connect the TV aerial to the TV socket and a FM aerial to the socket marked FM and connect the television to the mains as shown to the right. If your television is equipped with the optional DAB module, you must connect a DAB aerial also. When using a DAB aerial … – Use the DAB AERIAL ADJUSTMENT menu, described on page 23, to find out where to place your aerial.
Camera and headphones sockets You can connect headphones and listen to a programme, or you can connect a Camcorder and watch your home movies on the television. If you have connected a BeoCord V 8000 video tape recorder, you can copy Camcorder recordings onto a videotape. 39 Sockets for temporary connections PHONES You can connect stereo headphones to the socket marked PHONES. The television speakers are muted when headphones are connected and activated again when the headphones are disconnected.
Socket panel 40 The socket panel on your television allow you to connect signal input cables as well as a variety of extra equipment, such as a video recorder or a linked Bang & Olufsen music system. The AV sockets are the primary sockets for connection of extra equipment. Any equipment you connect to these sockets must be registered in the CONNECTIONS menu. For further information, refer to the chapter ’First-time setup of your television’ on page 16.
Computer connection – DVI socket The speaker and digital sockets mentioned below are only available, if your television is equipped with the optional Surround Sound module: REAR The two sockets are used for connecting the external rear speakers in a surround sound setup. FRONT The two sockets are used for connecting the external front speakers in a surround sound setup. SUBWOOFER Socket used for connecting a BeoLab 2 subwoofer in a surround sound setup.
Connect additional video equipment 42 This chapter describes how to connect additional video equipment to the television. Connect a decoder BeoCenter A decoder can be connected to the television via the AV 2 socket. If your setup also includes a Bang & Olufsen video recorder, you should connect the decoder to the video recorder. Primary decoder Secondary decoder A set-top box can be connected to any of the AV sockets.
Connect a set-top box Disconnect all involved systems from the mains before you connect external equipment. > Connect one end of a 21-pin AV cable to the set-top box. > Run the cable to the AV 1 or AV 2 socket on the back of the television. > Connect the IR transmitter to the IR OUTPUT socket on the television. > If your set-top box delivers HDTV video signal, and your television is HD-ready, connect the settop box to either the DVI-I or Y-Pb-Pr sockets also.
>> Connect additional video equipment Connect a Bang & Olufsen recorder BeoCenter Video recorder Disconnect all involved systems from the mains before you connect external equipment. > Connect one end of a 21-pin AV cable to the AV socket on the rear of the recorder. > Then run the cable to the AV 1 socket on the back of the television. Aerial connection Use your external aerial connection (or cable TV network connection) and the aerial cable supplied with the video recorder.
Register additional video equipment 46 If you connect additional video equipment to your television, you must register the equipment in the CONNECTIONS menu. What is connected? When the system is first set up, the equipment connected at that particular moment is detected by the television, and the CONNECTIONS menu appears automatically on the screen. If you connect equipment at a later date, on a permanent basis, then you must register this equipment in the CONNECTIONS menu.
When you have connected additional video equipment to your television, you must also ‘tell’ the system if you have made additional connections, such as connecting a digital sound input, a digital video signal or an IR transmitter. What’s on the CONNECTIONS menu … AV 1 NONE … if no equipment is connected. V.MEM … if you have connected a Bang & Olufsen video recorder or any other video recorder. V.MEM+DECODER … if you have connected a Bang & Olufsen video recorder with a decoder connected to it. V.
Loudspeaker setup – surround sound 48 If your television is equipped with the optional surround sound module, you can create a surround sound setup. A surround sound setup fits easily into your living room. Let the picture determine your ideal listening and viewing position. You get the best sound experience in the area created by the speakers. This chapter explains how to set up speakers for surround sound, as well as how to make the adjustments necessary to get the best sound.
Connect speakers Connect Bang & Olufsen speakers and a BeoLab 2 subwoofer to the connection panel at the back of the television. The speakers must be Bang & Olufsen Power Link speakers. L R FRONT To connect speakers… > Use the cables enclosed with the speakers. > Connect the two front speakers to the sockets marked FRONT. > Connect the two rear speakers to the sockets marked REAR. > Connect the subwoofer to the socket marked SUBWOOFER.
>> Loudspeaker setup – surround sound Set speaker distance Switch on the television from your favourite viewing position. Enter the straight-line distances in metres between your position and the individual speakers. CENTRE To set the speaker distances … > Press MENU to bring up the TV SETUP menu and press to highlight OPTIONS. > Press GO to bring up the OPTIONS menu and press to highlight SOUND. > Press GO to bring up the SOUND SETUP menu and press to highlight SPEAKER DISTANCE.
Calibrate the sound level When you have connected speakers in a surround sound setup to the television, you must perform a speaker calibration. A calibration sound is produced alternately in each of the speakers you have connected in your surround sound setup. Your task is to adjust the sound level from all the connected speakers to match the sound level from the centre speaker. You can choose whether you want the sound sequence to occur automatically or manually.
>> Loudspeaker setup – surround sound Sound adjustments Sound settings are preset at the factory to neutral values which suit most listening situations. However, if you wish, you can adjust these settings to your liking. You can preset levels for sound volume, bass, treble and a connected BeoLab 2 subwoofer. In addition, you can switch the loudness feature on or off. The loudness feature compensates for the human ear’s lack of sensitivity to high and low frequencies.
Choose a speaker combination While you are watching a movie or programme, you can choose the speaker combination you wish to switch on, provided that the various sound modes are available in your system. The television may switch on a speaker combination automatically. This happens if a programme or DVD contains information about the number of speakers to be switched on. You are still free to choose the speaker combination you prefer.
>> Loudspeaker setup – surround sound See the name of the active sound system You can see the name of the active sound system for a source or programme on the screen. However, it is not possible to adjust or preset a sound system. > Press MENU to bring up the TV SETUP menu and press to highlight OPTIONS. > Press GO to bring up the OPTIONS menu and press to highlight SOUND. > Press GO to bring up the SOUND SETUP menu and press to highlight SOUND SYSTEM. > Press GO to bring up the SOUND SYSTEM menu.
BeoLink system All your Bang & Olufsen products can be connected in a BeoLink system. A complete BeoLink system enables you to distribute sound and picture from one central source throughout the house. Advanced operation, 5 All you need to know about using your television beyond daily use, such as how to operate timed play and timed standby functions, and a connected set-top box. How to operate a surround sound system.
Connect and operate an audio system 56 If you connect a compatible Bang & Olufsen audio system to the television using a Master Link cable, you obtain the benefits of an integrated audio/video system. Play a CD on your audio system using your television speakers, or switch on a TV programme and send the sound to your audio system speakers. Your AV system can be placed together in one room or in two rooms with the television placed in one room and the audio system with a set of speakers placed in another.
Option setting If your television has been set up in an AV system, you may need to set it to the correct Option with Beo4. Switch the entire system to standby first. Option setting for the television > While holding the • button on Beo4, press LIST. > Let go of both buttons. > Press LIST repeatedly to display OPTION? on Beo4 and press GO. > Press LIST repeatedly to display V.OPT on Beo4 and then key in the appropriate number (1, 2 or 4).
>> Connect and operate an audio system Use an integrated audio/video system If you integrate your audio system and your television, you can choose a speaker combination appropriate to the current video or audio program, and also record video sound on the audio system. Video sound recording If you listen to sound from your television on your Bang & Olufsen audio system’s speakers, and your audio system has a tape recorder, you can record television sound on the audio tape recorder.
Your television in a link room with an audio system If you set up your television in a link room and enable the internal radio, you can choose which radio you want to listen to. However, you can only use the internal radio in your television, if you have enabled it, as described on page 56. The setups described on this page illustrate which radio is activated when you have enabled the internal radio and connected a link radio to your television also.
Your television in a link room 60 If you have BeoLink installed in your home and you choose to place your television in a link room, you can operate all connected systems through the television.
Link room operation When you are in the link room, you can operate all connected systems with the Beo4 remote control.
Distribute sound and picture with BeoLink 62 The BeoLink system makes it possible to distribute picture and/or sound to other rooms throughout the house. For example, you can connect your television in the living room to another video system or set of speakers in another room, thereby making it possible to ‘move’ the picture or sound to other rooms.
System modulator Link frequency MODULATOR SETUP MODULATOR LINK FREQUENCY ON store GO If you have an audio setup, such as a BeoLink Active/Passive, and you choose to set up a non-linkable television in the same room, you must set the system modulator to ON. The factory setting is OFF, which must be used if you are using a linkable Bang & Olufsen television. To switch on the system modulator … > Press TV to switch on the television.
Two televisions in the same room 64 If you have placed your BeoCenter 6 in a room where you already have a Bang & Olufsen television, and commands from Beo4 can be received by both televisions, you must change the option setting of BeoCenter 6. This prevents simultaneous activation of both televisions.
Customise Beo4 66 The Beo4 buttons give direct remote control of a large number of television functions, and the Beo4 display gives you access to even more functions. Whenever a source is displayed on Beo4 (TV, RADIO, etc.), you can press the LIST button and bring up extra functions in the display to help you operate that source, just as if you were calling up extra buttons. You can also switch on extra equipment connected to your television.
Move extra ‘buttons’ Remove an extra ‘button’ You can rearrange the order in which the extra ‘buttons’ appear when you press LIST. You can remove any of the extra ‘buttons’ that are available when you press LIST. Press and hold the standby button down • Press and hold the standby button down • Press to get access to the Beo4 setup function LIST Press to get access to the Beo4 setup function LIST GO Let go of both buttons.
Index Beo4 remote control Connections Add a ‘button’ to the Beo4 list, 66 Changing the Beo4 batteries, Guide p. 18 Cleaning the Beo4, Guide p. 18 Configure Beo4, 66 Customise Beo4, 66 Introducing your television and Beo4, Guide p. 4 Move extra ‘buttons’, 67 Remove a ‘button’ from the Beo4 list, 67 Replace Beo4 batteries, Guide p. 18 Using Beo4, Guide p.
First-time setup Picture Set-top box First-time setup procedure, 16 Adjust brightness, colour or contrast, 30 Change the picture format, Guide p. 9 Remove the picture from the screen, 30 Connect a set-top box, 43 Set-Top Box Controller menu, 10 Universal Beo4 operation, 11 Use the set-top box in a link room, 11 Use the set-top box’s own menu, 11 Format Change the picture format, Guide p. 9 Pincode Create Groups, Guide p. 12 Move programs within a Group, Guide p.
> Index Teletext TV programs Basic teletext functions, Guide p. 10 Day-to-day use of MEMO pages, Guide p. 11 Store favourite teletext pages, Guide p. 11 Add new TV programs, 27 Adjust tuned programs, 23 Auto-tuning – first-time setup of your television, 16 Bring up a TV list, Guide p. 6 Delete tuned programs, 21 Edit tuned programs, 20 Move tuned programs, 21 Name tuned programs, 22 Re-tune via automatic tuning, 26 Select a TV program, Guide p.
Waste Electrical and Electronic Equipment (WEEE) – Environmental protection The European Parliament and the Council of the European Union have issued the Waste Electrical and Electronic Equipment Directive. The purpose of the Directive is the prevention of waste of electrical and electronic equipment, and to promote the reuse and recycling and other forms of recovery of such waste. As such the Directive concerns producers, distributors and consumers.
www.bang-olufsen.