
User's Manual
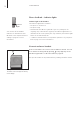
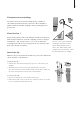

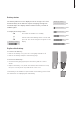

Table Of Contents
- Before you start…
- Contents
- Get started
- Charge the handset battery
- First-time registration of a handset to a base
- Name the handset
- Set BeoCom 1 for use with one or two lines
- Set the time and date
- Phone feedback – indicator lights
- Connect and use a headset
- Placement and surroundings
- Clean BeoCom 1
- Attach the clip
- The handset display
- Handset keys
- Battery status
- Replace the battery
- Daily use
- 2-line use
- Advanced operations
- System use with several handsets
- Preference settings
- Important information about BeoCom 1
- Index
- For the Canadian market only…
- For the American market only…
- For your information…

13
Placement and surroundings
The phone must not be placed in damp, dusty or polluted
surroundings and should not be exposed to direct sunlight or
liquids. Avoid the handset charging contacts touching metal or
greasy parts.
Clean BeoCom 1
Clean your BeoCom 1 with a soft, damp cloth with a few drops of
mild detergent added. To clean the charging contacts of charger
and handset – and only these parts – use a cotton swab and
isopropyl alcohol. Do not use isopropyl alcohol to clean any other
part of the charger or handset!
Attach the clip
With the clip you can attach the handset to your pocket. Attach the
clip on the back of the handset:
To attach the clip…
> Slide the two flaps down along the two grooves on the sides of the
handset.
> When the clip is positioned correctly, approximately 1.75 inches
(4.5 cm) from the top of the handset, it will click into place. Make sure
the clip is firmly attached on both sides of the handset.
To remove the clip:
> Pull the left flap (B) out to the left with a flat object.
> When the left flap is clear of the groove, pull the clip back – be careful
not to scratch the handset with the clip.
BeoCom 1 can only be used with
the Bang & Olufsen accessories
shown: Extra handset, EarSet 1
Home, Clip, Table charger, Wall
charger. Do not use BeoCom 1 with
BeoCom 6000 bases or chargers.
CLICK
CLICK
1
2
B