BeoLab 3 Guide
CAUTION: To reduce the risk of electric shock, do not remove cover (or back). No User-serviceable parts inside. Refer servicing to qualified service personnel. WARNING: To prevent fire or electric shock, do not expose this appliance to rain or moisture. Do not expose this equipment to dripping or splashing and ensure that no objects filled with liquids, such as vases, are placed on the equipment. To get access to the approval labels, remove the BeoLab 3 top cap.
Daily use 3 When you have finished setting up the loudspeakers as described on the following pages, connect the entire system to the mains. The loudspeakers are designed to be left in standby when not in use. Loudspeaker protection The loudspeaker is equipped with a thermal protection system which prevents overheating. If an error occurs – or the speaker units become overheated – the system automatically switches the loudspeaker to standby, and the indicator light turns yellow.
Setting up BeoLab 3 4 We recommend that you follow this procedure: – Disconnect your system from the mains. – Place the loudspeaker according to the guidelines on these two pages. For information on how to fasten the loudspeaker to the optional accessories, refer to the Guide enclosed with the accessory. – Connect the loudspeaker and set the SETUP switch as explained in ‘Cable connections’ (pp. 6–7). – Set the POSITION switch to the correct setting on each loudspeaker.
150 cm (60") c 90 cm (35") b 30 cm (12") 0 a ~ 3 m (10') The mounting holes (b and c) are blocked by two small screws, and before you can use either of these holes, the screw must be removed. a b c Note: When mounting the loudspeaker on the floor stand, use mounting hole (a) only! For optimal sound performance make sure that the loudspeaker is directed towards your preferred listening position.
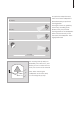
Cable connections 6 The loudspeaker can be used with Bang & Olufsen audio, video and link systems. It may also be used with non-Bang & Olufsen systems. POSITION switch SETUP switch POWER LINK and LINE socket The socket panel is located on the bottom part of the loudspeaker. 1 2 A Cover for socket panel: Run the two cables through the hole (A), before you connect them to the loudspeaker.
LEFT RIGHT 1 LEFT RIGHT 2 Power Link Mk 3 Cable Clamp: For safety reasons, the mains lead must be secured to the loudspeaker. Use the enclosed small cable clamp and screw. Power Link cables: The enclosed Power Link cables are of a new type. The new type has a triangular mark on the plug. Do not use any cables of the older type, as this will cause noise, and therefore not give optimum sound quality! Power Link connections: These connections carry both the right and left sound signals.
Adapt BeoLab 3 to your room 8 The loudspeaker may be placed almost anywhere in your room. However, the most natural sound and best stereo perspective is obtained if it is set up as explained on these pages. The POSITION switch When a loudspeaker is placed in a corner, the bass level is boosted compared to the bass level from a loudspeaker placed in a more free-standing position. To filter out this natural bass boost, the loudspeaker has a switch marked POSITION.
FREE WALL ~3m 10' CORNER ~3m 10' To obtain the most natural sound and best stereo perspective, set up your favourite listening position as shown here. How to measure? The distances referred to, are measured as shown here (the loudspeaker seen from above). The distances are meant as guidelines, and you may, of course, set the POSITION switch to any of the three settings you prefer.
>> Adapt BeoLab 3 to your room Setup examples Here are three examples which show how to set the POSITION switch on each loudspeaker in different setups. Example 1: The loudspeakers are placed in one end of the room (but not against the back wall), and not near the side walls. Therefore, the POSITION switch should be set to FREE on both loudspeakers. Example 2: One loudspeaker is placed against the wall, and the other is placed in a corner.
This product fulfils the conditions stated in the EEU directives 89/336 and 73/23. Technical specifications, features and the use thereof are subject to change without notice! For the Canadian market only! For the US-market only! This class B digital apparatus meets NOTE: This equipment has been tested and found to comply with the all requirements of the Canadian Interference-Causing Equipment limits for a class B digital device, pursuant to part 15 of the FCC Rules. Regulations.
www.bang-olufsen.