BeoLink® Active Setting-up Guide
CAUTION RISK OF ELECTRIC SHOCK DO NOT OPEN CAUTION: To reduce the risk of electric shock, do not remove cover (or back). No User-serviceable parts inside. Refer servicing to qualified service personnel. WARNING: To reduce the risk of fire or electric shock, do not expose this appliance to rain or moisture. Do not expose this equipment to dripping or splashing and ensure that no objects filled with liquids, such as vases, are placed on the equipment.
B E F O R E Setting-up guide This guide describes how to install your BeoLink Active kit in a BeoLink distribution system. If you have never carried out cable installation before, we suggest you leave it to your Bang & Olufsen dealer. Likewise, we recommend that you follow the instructions in this guide carefully. The User’s guide which is also supplied with the BeoLink Active kit describes how to operate your system once it has been installed.
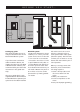
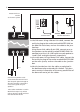
P L A C E M E N T A A To fasten the BeoLink Active receiver to the wall: 1 Using the wall bracket as a template, mark and drill the holes in the wall. 2 Using the two screws and wall plugs supplied (A), fasten the wall bracket. 3 When you have mounted the receiver cable (see page 5) hang the receiver on the wall bracket and then secure it with the tiny screw (B). 4 Fasten the cable to the wall and run it to the BeoLink Active box.
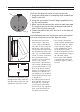
C O N N E C T I O N S Cables should always be handled with great care. When running the cables, avoid bending them too sharply and be careful not to twist them. Avoid subjecting the cables to pressure or impact. Using the cable supplied, connect the BeoLink Active receiver as follows: 1 Detach the rear cover of the BeoLink Active receiver (unscrew the two screws (C) and loosen the two screws (D), then lift off the cover).
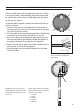
> Connections Master Link connection to the main system Main System Junction box PC* Connect one speaker to the socket marked Power Link and then loop the signals through to the other speaker as described in the User’s guide for your speakers. *The socket marked PC is used in BeoLink PC setups only. Please refer to the User’s guide enclosed with the BeoLink PC kit.
R E A D Y F O R U S E … When you have made all the connections as described in the previous chapter you may start using the system. However, in order for your setup to function properly, you may need to preprogram it. Your BeoLink Active can be preprogrammed for the following setup situations (Options): Option 0: To be used if you want to disable remote control operation of the BeoLink Active (to re-enable remote control, select one of the other options).
3500926 0702