
User`s guide


4
P L A C E M E N T
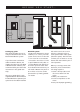
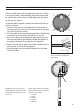
To fasten the BeoLink Active receiver to the wall:
1 Using the wall bracket as a template, mark and drill the
holes in the wall.
2 Using the two screws and wall plugs supplied
(A), fas-
ten the wall bracket.
3 When you have mounted the receiver cable (see page
5) hang the receiver on the wall bracket and then se-
cure it with the tiny screw (B).
4 Fasten the cable to the wall and run it to the BeoLink
Active box.
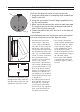
In the following we have listed some advice and require-
ments for the placement of the BeoLink Active:
• The units in the system must
all be placed in a dry place,
i.e. not outdoors (the Master
Link cable, however, may very
well be run outdoors). Once
connected, the BeoLink Active
box should be fastened to the
wall – e.g. concealed behind a
curtain or a piece of furniture.
• Place the BeoLink Active
receiver so it can receive the
remote control signals.
• If the receiver is placed next to
a door and at a suitable height,
you can easily switch on or off
by close-up operation when
entering or leaving the room.
Likewise, if it is placed near
your telephone, you can switch
off the speakers while you are
on the phone.
• Avoid placing the receiver in
direct sunlight or direct arti-
ficial light, e.g. a spotlight,
or near objects generating
electrical noise, e.g. light dim-
mers, as this will reduce the
sensitivity of the receiver.
• The receiver is designed to
function within a temperature
range of 0 – 55°C (32 – 130°F).
If it is exposed to higher or
lower temperatures, it may
block the whole system.
The box is designed to function
within a temperature range of
10 – 40°C (50 – 105°F).
• The receiver cable supplied
is 5 metres (15’). This is the
maximum lenght of cable to
be used.
A
A
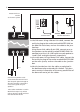
If you have installed more units
throughout the house, make sure
that the remote control can only
activate one receiver at a time.
3
2
1
B