
User`s guide


24
Set up BeoVision 5
We recommend that you follow the
procedure described below when you
set up your BeoVision 5:
– Unpack the BeoVision 5 and place
it as described and illustrated to
the right under Handling your
BeoVision 5;
– Consider the appropriate
surroundings for your BeoVision 5.
Guidelines are included to the
right;
– Connect the cables, additional
equipment, and speakers as
described on the following pages.
For an overview of the connection
panels, refer to Connection panels on
BeoVision 5 on page 25.
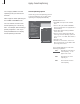
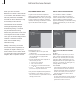
Handle your BeoVision 5
Due to the weight of BeoVision 5, any
moving/lifting should always be done by two
persons. BeoVision 5 is equipped with a
special handle for lifting it out of the packing.
After that the handle must be removed.
NOTE! BeoVision 5 is not designed to stand on
its own, it must be supported until mounted
on the chosen bracket or stand!
– Make sure that the BeoVision 5 is set up and
connected in accordance with this Guide.
– The BeoVision 5 is developed for indoor use in
dry, domestic environments only. Use
BeoVision 5 within a temperature range of
10–40ºC (50–105ºF), and at an altitude of no
more than 1500 metres (5000 ft.).
– Avoid placing your BeoVision 5 in direct sunlight
or direct artificial light (such as a spotlight), as
this may reduce the sensitivity of the remote
control receiver. Do not place any items on top
of the BeoVision 5.
– Do not attempt to open the BeoVision 5. Leave
such operations to qualified service personnel.
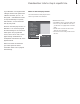
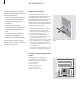
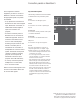
Overview of socket and connection
panels
The illustration to the right shows the
placement of the various socket and
connection panels on the BeoVision 5:
1 Top connection panel
2 Mains connection
3 Bottom connection panel
4 PC connection socket
5 Close-up connection panel
Before placing BeoVision 5 you must remove the
handle.
1
3
4
5
2