BeoVision 11 BeoVision 11–40 BeoVision 11–46 BeoVision 11–55
Dear Customer This Getting Started contains information about the daily use of your Bang & Olufsen product and connected equipment. We expect your retailer to deliver, install and set up your product. Your television offers more features and functions than described in this Getting Started. Among other things; HomeMedia and WebMedia functions and auto standby, editing and naming channels. These and other features are described in more detail in the product’s online guide. The guides are found on www.
WARNING: To reduce the risk of fire or electric shock, do not expose this appliance to rain or moisture. The lightning flash with arrowhead symbol within an equilateral triangle, is intended to alert the user to the presence of uninsulated “dangerous voltage” within the product’s enclosure that may be of sufficient magnitude to constitute a risk of electric shock to persons.
Contents Daily use 6 How to use your remote control 8 How to navigate in menus 10 Watch television 12 Pause and play back a programme 14 Play a recording 16 Watch 3D television 18 HomeMedia 19 Change picture and sound settings Installation and setting up 22 Set up your television 23 Cleaning 24 Connection panels
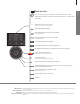
How to use your remote control 6 Beo4 operation Your television can be operated with the Beo4 with navigation button as described in this Getting Started and the online guide, available on www. bang-olufsen.com/guides. TV LIGHT RADIO DTV DVD CD V.MEM TEXT A.MEM 7 8 9 4 5 6 1 2 3 LIST 0 MENU TV The Beo4 display shows you the activated source or function TV Switch on the TV*1 DTV Switch on WebMedia (requires Internet connection).
Beo6 operation You can also operate your television with a Beo6 remote control. When Beo6 operation is different from Beo4 operation, it is described separately. TV Soft button, touch screen to select*3 Switch on a source or select a function Back up through Beo6 displays Bring up SCENE buttons, such as Zones or Speaker Press again to return Living Room TV V.MEM DTV N.MUSIC PC DVD RADIO + N.
How to navigate in menus 8 Navigate in menus and select settings using your remote control. Pressing MENU brings up the menu for the selected source. Display and menus Select source and select settings. TV Navigate in menus When a menu is on the screen, you can move between menu options, reveal settings or enter data.
Daily use 9 Select source You can select a source just by pressing the dedicated button on the remote control, or you can select a source via the menu. Bring up help texts You can bring up help texts with explanations of features and functions when available in menus and submenus. MENU Bring up main menu Select SOURCE LIST Select source Bring up the SETUP menu Select option MENU Bring up main menu Show/hide help texts General features and functions are also explained in the NICE TO KNOW menu.
Watch television 10 Watch analogue and digital terrestrial, cable and satellite channels depending on your tuner options. Make channel groups, and turn the TV. Make a recording on the optional hard disk recorder.
Daily use 11 TV or Press MENU Press or Select Select SOURCE LIST 0–9 0 Select previous channel (Beo6: Press Previous) Activate numbers and select channel 1–9 or Activate the desired function*1 MENU Press LIST Press to bring up RECORD Select TV MENU or STOP Press twice Press to start a recording Name a group.
Pause and play back a programme 12 With the optional hard disk recorder you can pause, repeat and resume a digital programme in progress. The television continues saving during timeshift, so you are sure to see the entire programme. Operation Pause a programme Pause the programme on the current channel. Before ‘Now showing’ (red = buffered. Grey = unbuffered) ‘Now showing’ indicator Play back After ‘Now showing’ (dotted = buffered.
Daily use 13 STOP To return to live signal, select source again, such as TV Press PLAY Play back 0–9 Select point in time or Step backwards or forwards Long press to cue backwards or forwards Press and hold to go to previous or next programme STOP Slow playback, press again to change speed Press STOP or Press twice to go to live signal … Press source button for source being timeshifted Timeshift settings For information on when the timeshift buffer is activated and how to make settings f
Play a recording 14 With the optional hard disk recorder you can play and browse through recordings of digital programmes. Operation Switch on the hard disk recorder It takes some time to start up the hard disk recorder.
Daily use 15 V.MEM Select source of recorder.
Watch 3D television You can enhance the experience of watching television with 3D technology, for example, when you want to watch movies, sports or nature films. Viewing conditions Place yourself in front of the screen, a little closer than when you normally watch 2D TV, and use the 3D glasses. The recommended distance between your viewing position and the screen depends on the size of the screen and the picture resolution.
Daily use 17 3D modes Select the 3D mode that matches the signal sent out by the programme provider. SIDE BY SIDE 3D TOP/BOTTOM 3D Converts side-by-side 3D signal into full screen 3D representation by scaling two pictures horizontally Converts top/bottom 3D signal into full screen 3D representation by scaling two pictures vertically STANDARD 2D SIDE BY SIDE 2D TOP/BOTTOM 2D Shows an ordinary 2D TV picture without any conversion.
HomeMedia 18 You can play music and video files and browse photos stored either on a storage device or product connected via a DLNA/UPnP enabled media server. For more information about connections and functions, see the online guide available on www.bang-olufsen.com/guides. Use HomeMedia H.MEDIA When you connect a storage device to your television, it detects the source automatically and asks if you want to browse the content. You can also access the HOMEMEDIA menu via the SETUP menu. Bring up H.
Change picture and sound settings While you watch television, you can adjust the sound and picture settings. See the online guide on www.bang-olufsen.com/guides for more information about these settings. Select sound modes The television has several sound modes optimised for different types of programmes. In the SOURCE LIST SETUP menu, you can, for each source, set up a sound mode to be used each time you activate this source.
22 Set up your television 23 Cleaning 24 Connection panels 21 Installation and setting up Contents – Installation and setting up
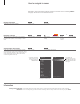
Set up your television 22 The television has several placement options. Follow the guidelines for placement and connection. Placement options The TV has several placement options. Refer to www.bang-olufsen.com for available stands and wall brackets or contact your Bang & Olufsen retailer. Due to the weight of the TV, any moving or lifting of the TV should be performed by qualified personnel – using the proper equipment.
Overview 1 Mounting bracket for wall bracket. 2 Mounting bracket for stand. 3 Covers for the main connection panel. Pull out at the bottom to remove the cover parts. 4 Socket for temporary connections. Press in the middle to open. 4 Depending on your setup, lead the cables through the hole in the middle or either sides of the connection panel cover.
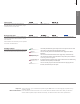
Connection panels 24 Any equipment you connect to the main connection panel must be registered in the SOURCE LIST SETUP menu. Equipment connected to the top connection panel can be registered in the SOURCE LIST SETUP menu. PL 5 PL 4 MONITOR PUC 2 CONTROL A+B PUC 1 A+B EXT. IR AV IN 5 PL 3 PL 2 PL1 PUC 3 A+B CTRL 2 CTRL 3 4 3 2 S/P-DIF IN STAND 1 CTRL 1 COMMON INTERFACE AERIAL 2 CHIPSIDE SATELLITE 1 CHIPSIDE ~ – Mains supply Connection to the mains supply. EXT. IR For future use.
We recommend that you connect the television to the Internet to be able to receive software updates and to download Peripheral Unit Controller (PUC) tables. PUC tables enable you to operate connected non-Bang & Olufsen products with your Bang & Olufsen remote control. AERIAL Aerial input socket for an external aerial/cable TV network or for an analogue signal. SATELLITE (1–2) Aerial input sockets for a digital satellite signal.
Waste Electrical and Electronic Equipment (WEEE) – Environmental protection Electrical and electronic equipment, parts and batteries marked with this symbol must not be disposed of with normal household wastage; all electrical and electronic equipment, parts and batteries must be collected and disposed of separately.