
User guide

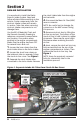


96458 v.1.0 7
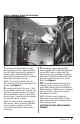
Figure 2-Remove Stock Air Box Bolts
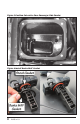
7. Locate your Banks Ram-Air filter
housing from your kit. Align the Banks
Ram-Air filter housing to fit parallel to
fender edge. Install and tighten the
previously removed bolts to secure the
Banks Ram-Air filter housing.
NOTE: The cutout on Banks Ram-Air
filter housing must face passenger side
fender. See Figure 3.
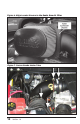
8. Locate your Banks Torx tool, T20H
in your Banks Ram-Air kit. Use the Torx
tool bit to remove the two (2) screws
securing the MAF sensor to the stock
air box cover. Leave the factory gasket
on the MAF sensor in place.
NOTE: Be careful when removing the
MAF Sensor. When removing the MAF
sensor, grasp its body and pull up
and out. Do not twist or bend when
removing.
9. Locate the supplied Banks MAF
sensor gasket and install Banks gasket
on the MAF sensor. Make sure the
sensor is properly installed. Install the
MAF sensor (with the additiional Banks
gasket) on the Ram-Air Cover sensor
boss. See Figure 4.
10. Locate your Banks Ram-Air filter
housing cover in your kit. Install the
stock MAF sensor (with the additional
Banks gasket) to MAF sensor mounting
boss as shown. Tighten the screws
(included) to 3 in/lbs.
NOTE: Ensure correct alignment,
otherwise screw holes will not align
with screw holes in the Banks Ram-Air
filter housing cover.
CAUTION: DO NOT OVER TIGHTEN
SCREWS