InstallationManual Banks SpeedBrake For use with Palm® Tungsten™ E2 only 2007-2008 Chevy/GMC 6.6L (LMM) Turbo-Diesel Pickup THIS MANUAL IS FOR USE WITH KITS 55429, 55430 & 55436 Gale Banks Engineering 546 Duggan Avenue • Azusa, ca 91702 (626) 969-9600 • Fax (626) 334-1743 Product Information & Sales: (888) 635-4565 bankspower.com ©2012 Gale Banks Engineering 02/28/12 PN 97229 v.8.
Do not use this product until you have carefully read the following agreement. This sets forth the terms and conditions for the use of this product. The installation of this product indicates that the BUYER has read and understands this agreement and accepts its terms and conditions. Disclaimer of Liability Gale Banks Engineering Inc., and its distributors, employees, and dealers (hereafter “SELLER”), shall in no way be responsible for the product’s proper use and service.
Limitation of Warranty Gale Banks Engineering Inc. (hereafter “SELLER”), gives Limited Warranty as to description, quality, merchantability, fitness for any particular purpose, productiveness, or any other matter of SELLER’s product sold herewith. The SELLER shall be in no way responsible for the product’s open use and service and the BUYER hereby waives all rights except those expressly written herein. This Warranty shall not be extended or varied except by written instrument signed by SELLER and BUYER.
General Installation Practices Dear Customer, Your new Banks SpeedBrake is a uniquely designed braking system with electronic controls, designed to achieve the optimum level of braking from your vehicle’s engine. If you have any questions concerning the installation of your Banks SpeedBrake System, please call our Technical Service Hotline at (888) 839-2700 between 7:00am and 5:00pm (PST).
TOOLS REQUIRED: • 1⁄ 2” and 3⁄ 8” drive ratchets with inch and metric sockets and 1⁄ 2” and 3⁄ 8” drive extension • Inch and metric combination or open-end wrenches • Standard & Phillips screwdriver • Clean shop towels or rags • Pliers • Utility knife • Inch-pound and foot-pound torque ratchets 97229 v.8.
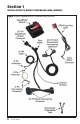
Section 1 Installation of Banks SpeedBrake wire harness Figure 1 Banks SpeedBrake and supplied wiring harness 6 97229 v.8.
1. Before beginning the SpeedBrake installation, locate The Palm Tungsten E2 Power PDA in your kit. It will need to be charged for a minimum of one hour before the unit will function. Charge the unit with the supplied AC-outlet wall charger. The unit will be fully charged in one to two hours. 2. Disconnect the negative (ground) cable from the battery (or batteries, if there are two) before beginning work.
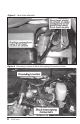
Figure 3 Heat shield alteration Figure 4 Grounding Location & Black Intercepting Connectors Shown 8 97229 v.8.
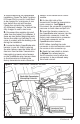
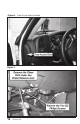
Figure 5 Driver Side Firewall Engine Compartment, Rubber Grommet 7. Secure the wire harness using some of the supplied cable ties along the factory wire harness up the left side of the engine to the Fuse box. 8. Locate the black wire harness locking connectors between the brake fluid reservoir and the air conditioning compressor. Lift the blue connector locks and disconnect the black connector pair. See Figure 4. 9.
Figure 6 Fuse Access Panel Location Figure 7 10 97229 v.8.
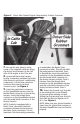
Figure 8 Removal of Knee Bolster If a Banks Diesel Tuner has been previously installed, skip step 11. 11. Locate the rubber grommet on the driver’s side of the vehicle firewall. The grommet is about 3” in diameter. Make a 1” x 1” cross-shaped incision in the grommet. Be careful not to cut or damage the factory wire harness. See Figure 5. Locate the grommet on the firewall from inside the cab and make another 1” x 1” cross-shaped incision on the grommet. 12.
16. Connect the 4-pin intercepting wire harness to the 2-pin connection on the SpeedBrake in cab cable. 17. Under the steering column locate the 4-pin connection and disconnect. See Figure 9. 18. Insert the male 4-pin connector from the Speed Brake harness into the female 4-pin connector on the factory harness. Insert the female 4-pin connector on the SpeedBrake harness onto the male 4-pin connector of the factory harness. Secure the wire harness with the supplied ties under the dash. 19.
such as Acetone, Mineral Spirits, Denatured Alcohol or Lacquer Thinner. Read and follow the manufactures operation instruction for non-oil based solvent cleanser. If vehicle is equipped with a Banks Tuner, the Banks SpeedBrake can be installed next to the Banks Tuner. 21. Insert the SpeedBrake 20-pin female Connector on the wire harness to the SpeedBrake Module. Using the supplied cable ties, secure the wire harness away from any heat sources (i.e. Driver side exhaust manifold) or moving components.
Section 2 MOUNTING THE DOCKING STATION AND CONNECTING THE BANKS POWERPDA Note: This system has been designed for use with the Palm Tungsten E2 PDA. Warning: The PDA may be susceptible to damage as a result of extended exposure to sunlight, heat or extreme cold. It is highly recommended that the PDA be removed from its mounting location if the vehicle will be subjected to high concentrations of sunlight, heat or cold for an extended period of time.
Figure 12 Note: If your vehicle is equipped with a Banks Diesel Tuner, Optional Tuner-toSpeedBrake cable will be needed (P/N 55412). See Figure 14. Disconnect the 6-pin terminal connections between Banks OBD II Interface Cable and Banks Diesel Tuner. Connect the OBD II 6-pin male connector to the optional Tunerto-SpeedBrake 6-pin female connector.
Figure 13 Figure 14 Optional Tuner-to-SpeedBrake wire WARNING: The charging cable on the docking station is designed to supply a constant low-voltage power source (+5vdc) to the Banks PowerPDA and is “live” as long as the system’s OBD II Interface Cable is completely installed and the RJ12 connector is plugged into the docking station.
Section 3 Banks SpeedBrake PowerPDA Software & Installation Figure 15 Front view HOME KEY 5-WAY NAVIGATOR MENU KEY Center Button The SpeedBrake PowerPDA software is supplied on a Secure Digital (SD) media card. The software should be installed on the Palm Tungsten E2 and run from main memory. You can use the additional space on the SD card to store music, photos and other data. Refer to your device instruction manual for using SD cards to store data.
Figure 17 Figure 19 Figure 18 Figure 20 Shown with Tuner program installed. 3. In the ‘Copy From’ drop down menu 4. Select the drop-down menu in the select “Card”. See Figure 17. The ‘Copy To’ selection will automatically change to “Device” (Figure 18). Select on the “BanksBrake” name, if it is not already selected or there is more than one item in the list. Touch the “Copy” button. A dialog box will appear, indicating the Palm Tungsten E2 is copying the software from the SD card (Figure 19).
Section 4 PLACEMENT OF THE BANKS POWER DECALS 97229 v.8.
Gale Banks Engineering 546 Duggan Avenue • Azusa, ca 91702 (626) 969-9600 • Fax (626) 334-1743 Product Information & Sales: (888) 635-4565 bankspower.