
Owner's manual

96538 v.3.0 7
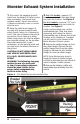
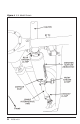
12. Adjust each of the pipes to ensure
that all of the hanger pins are parallel
with the frame mounted pins and that
the rubber hangers are all positioned
slightly forward (See Figure 5). This
allows the hangers to be properly
positioned once the exhaust reaches
operating temperature.
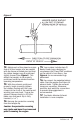
13. With the exhaust positioned
properly, begin to evenly tighten
the clamps starting with the ones
closest to the front of the vehicle and
working your way back. Torque the
exhaust clamps evenly to 35 ft-lbs.
Make sure that each slip is fully
inserted (+/-
1
⁄4”).
14. Remove the protective covering
from the tailpipe tip.
Caution: the protective covering
may ignite and burn if not removed
prior to running the engine.
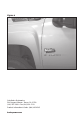
15. Your system includes two (2)
Banks Power logos designed to
complement the Chevy/GMC emblems
on the vehicle’s front doors. See
Figure 6 for recommended logo
placement.
16. Re-connect the negative battery
cable. Start the engine and listen for
exhaust leaks. Tighten the exhaust
clamps as necessary. Whenever
possible, tack weld slip connections
to prevent disengagement is
recommended.
17. The Banks Monster Exhaust
installation is now complete.
Figure 5