
Manual


43. Disconnect the battery negative
cables.
44. Remove the airbox assembly
from the passenger side of the engine
compartment (including black flexible
hose)
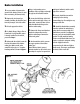
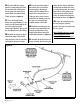
45. Underneath the vehicle, remove
the black plastic access plug located
on the lower passenger side of the
transmission adapter housing. See
Figure 12.
46. Install a crankshaft barring tool
as shown in
Figure 12. This tool
allows the engine to be rotated using
a
1
⁄2" socket wrench with extensions.
47. Remove the valve cover over the
foreword most cylinder.
48. Rotate the engine by turning the
crankshaft barring tool clockwise until
the piston is at top dead center with
both valves closed on the
compression stroke. This will allow
the exhaust valve spring to be
removed while the valve is retained
by the piston.
49. The piston will be near bottom
dead center when you see the intake
valve open and then close
completely. Continue rotating passed
this point until both rocker arms are
no longer under compressive force
and the piston is at top dead center.
50. Confirm that the piston is at top
dead center by twisting the valve
pushrods by hand. If you are able to
slightly twist each pushrod, the piston
is at top dead center and both valve
springs are not compressed.
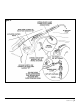
51. There will be two bolts securing
the rocker cover stand. Using a 13-
mm socket, remove the smaller bolt.
Using an 18-mm socket, remove the
large bolt.
52. Carefully remove the rocker
stand assembly. Do not remove the
pushrods and ensure that the pushrods
do not become dislodged from the
lifters during rocker stand removal.
53. Cover the holes surrounding the
pushrods with a rag to avoid dropping
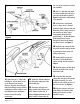
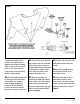
foreign matter into the crankcase.
54. Install a valve spring compressor
tool as shown in
Figure 13 on the
exhaust valve spring. Use the
compressor to compress 4-5 coils.
55. Without removing the valve
spring compressor, continue to slowly
rotate the engine using the crankshaft
barring tool. When the piston
contacts the valve head, you will see
the valve start to rise slightly. This will
ensure that the valve will not drop
into the cylinder bore when the
valve
spring and keepers are removed.
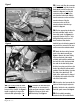
56. Using a soft rubber mallet, tap
on the top of the valve spring
compressor slightly to dislodge the
valve stem keepers. Remove the two
keepers using a magnet.
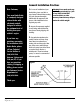
Exhaust Valve Spring Removal/Installation
Your Banks Brake is designed
to provide the maximum
retarding force possible from
your engine. This will require
the installation of heavy-duty
exhaust valve springs
designed to work with the
increased backpressure
created by the Banks Brake
system.
CAUTION:
Exhaust valve spring
replacement requires a
thorough understanding of
engine/valve train assembly
and operation. If you do not
feel you are qualified to
complete this work, have the
exhaust valve springs changed
by a Banks dealer or a
qualified Cummins Service
Center. A valve spring
compressor and crankshaft
barring tool are required for
valve spring replacement.
These can be purchased from
Gale Banks Engineering (part
number 97005).
WARNING!
Never work under any vehicle
supported only by a jack of
any kind. DO NOT USE
concrete blocks or other
masonry items that may
collapse under the vehicle
weight.
10 | 96986 v.3.0