
User guide

Printed in USA 04/06 P/N 132423
Installing the Replacement Window
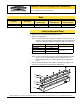
1. Remove all the screws and the bezel on the light (Figure 1).
2. Remove the existing window.
NOTE: It is not required to remove o-ring unless replacing. If necessary, remove any
debris on o-ring or surrounding area during window replacement. Replacement
o-rings are available through Banner for damaged o-rings; see models below.
O-Ring Model Linear Array Size Linear Array Housing
LEDLA290SO 290 mm
Nickel-plated aluminum
LEDLA580SO 580 mm
LEDLA290SSO 290 mm
Stainless steel
LEDLA580SSO 580 mm
3. Remove the protective coverings from both sides of the window.
NOTE: Take care not to touch the inside surface of the window; hold it by the edges
only. If necessary, clean the window using lens or window cleaner. For
Diffused Window models, place “frosted” (diffused) side of window against
o-ring.
4. Place the window onto the light. Secure with the screws and bezel. Tighten screws
so that there is no gap between the bezel and the light housing.
Banner Engineering Corp., 9714 Tenth Ave. No., Minneapolis, MN 55441 • Phone: 763.544.3164 • www.bannerengineering.com • Email: sensors@bannerengineering.com
Figure 1. Installing the replacement window on the light
For Use With Sealed Linear Array Lights
LEDLA..S.. Linear Array Replacement Window Kits
Screw
Bezel
Window
O-ring
Housing
Models
Clear Glass Clear Acrylic
Clear
Diffusing Acrylic
White
Diffusing Acrylic
For Use with
Linear Array Models
LEDLA290SW-G LEDLA290SW-P LEDLA290SCDW-P LEDLA290SWDW-P LED..LA290S..
LEDLA580SW-G LEDLA580SW-P LEDLA580SCDW-P LEDLA580SWDW-P LED..LA580S..