SureCross Web Configurator rev.
Contents Contents Web Configurator ......................................................................................................................................3 Logging into the Web Configurator ......................................................................................................................................3 Changing the Device's IP Address .............................................................................................................................
Web Configurator The SureCross™ DX80 GatewayPro and DX83 Ethernet Bridge devices use an XML file to configure the network. To access the XML file, use any web browser and enter the device’s IP address into the browser’s address window: http://192.168.0.1 The web configuration pages are arranged with a hierarchy of index tabs. The upper row of tabs is the top of the hierarchy and selects a broad topic. Top level tabs open related tabs on the next levels down.
SureCross Web Configurator After entering the IP address, the home web page for the SureCross device displays. To log in, click on any tab at the top of the page. To log out, close the browser. For user-level access, enter the following as the user name and password. • User name: system • Password: admin For Admin-level access, enter the following as the user name and password: • User name: root • Password: sxi Admin-level access allows administrators to set up system users and their passwords.
SureCross Web Configurator IMPORTANT! Verify the new IP address is correct before cycling power to the device. After the IP address changes, you must use the new IP address to access these configuration screens. Print this page and file for your records. Selecting a Host Communication Protocol By default the Ethernet Bridge and GatewayPro systems communicate with a host using Modbus/TCP. After establishing the IP address of the Ethernet Bridge and host, the system is set up to use Modbus/TCP.
SureCross Web Configurator The Get ALL command retrieves the parameters on the Configure Points and I/O Linking pages. These parameters are specific to the wireless network. The Get ALL command does not retrieve parameters involving the host system or the wired network components. 1. From the RF Devices > Select Models screen, verify the DX80 radio devices are defined using the Models drop-down list and the device name.
SureCross Web Configurator Defining a Device To define the DX80 radio network devices: 1. Select the device from the drop-down list, always using device zero for the Gateway. Most device descriptions can apply to either the Gateway or the Node. 2. Name the device. 3. Select the Change checkbox. 4. Click the Update button to send this information to the Ethernet Bridge. Using the Change checkbox and Update buttons sends the only device name and model to the Ethernet Bridge/GatewayPro device.
SureCross Web Configurator This sends the I/O point configuration information to the DX80 devices. Once the Send ALL function has begun, click the Check Status button at the bottom of the screen. A monitoring screen displays each device’s progress. Other Commands Check Status Click the Check Status button to watch the status of a Get ALL or Send ALL command. Sending or retrieving information from the DX80 devices can take several minutes.
SureCross Web Configurator Configure Points After setting up the basic model for each device, configure the I/O points. There are two ways to access the I/O points configuration screen: 1. Use the Configure Points tab; or 2. Click on the hyperlinked device number in the left column of the Select Models table to access the Expanded Configure Points page (see the Expanded Configure Points section). Refer to the device’s data sheet for factory default information.
SureCross Web Configurator Parameters The following parameters are set on the Configure Points screen. Change If you leave any Web Configurator screen without clicking the Change button to submit the changes to the Ethernet Bridge or GatewayPro, all changes are lost. Delta The delta parameter defines the change required between sample points of an analog input before the analog input reports a new value. To turn off this option, set the Delta value to 0.
SureCross Web Configurator Select the checkbox to enable the individual I/ O point. If the checkbox is not selected, that I/ O point is disabled, regardless of what other parameters may be defined. For efficient power usage, do not enable I/O points that are not used. I/O Name The I/O name field is an optional text field used to assign names to the individual I/O points for easy reference. This name may appear in many other screens relating to the I/O point.
SureCross Web Configurator To access this expanded view, which displays all parameters for the I/O point selected, click on the I/O number hyperlink from the Configure Points tab. Several parameters on the expanded view also appear in the standard Configure Points screen and can be modified from either screen. After making changes to the parameters screen: 1. Click the Change button to submit the changes to the Ethernet Bridge or GatewayPro. 2. Click the Send button to update the radio devices.
SureCross Web Configurator When a default condition occurs, these default output values are written to the output register. Hold Last State The I/O point retains the last value recorded instead of the default output value during selected default conditions. I/O Selection or Type Invert I/O Selecting this checkbox inverts the digital representation of the I/O. Select the I/O type from the drop-down list. The drop-down list includes all options available for the entire DX80 line.
crete I/ O) Pulse Width ple high and sample low parameters are used to create a filter to avoid unwanted input transitions. The default value is 0, which disables this feature. The value range is 1 through 255. ered OFF. A typical hysteresis value is 10% to 20% of the unit’s range. The pulse width determines the length of time, in seconds, that a digital output is active (1) before returning to zero. Select 0 to disable this feature.
SureCross Web Configurator Input Units Units 6 Description Definition Temp °C Celsius, high resolution. Analog input for temperature devices such as thermocouples, RTD, and thermistors. In high resolution mode, temperature = (Modbus register value) ÷ 20. LCD: 0000.0C 7 Temp °F Fahrenheit, high resolution. Analog input for temperature devices such as thermocouples, RTD, and thermistors. In high resolution mode, temperature = (Modbus register value) ÷ 20. LCD: 0000.
SureCross Web Configurator Output Units Units 6 Description Definition Signed Analog, 0 to For a signed value, such as temperature, that is to be converted to a mA out value. Use null to 20 mA set the start point and span to define the range. The null value is the starting temperature to be associated with 0 mA. The span is the entire temperature range that is to be associated with 0 to 20 mA. LCD: 0.00mA–20.
SureCross Web Configurator Supply Output Voltage The Supply Output Voltage sets the voltage required for the sensor device. This parameter is only applicable when using the supplied switch power option. Supply Warmup Supply Warmup defines the length of time the switch power should be turned on before examining the sensor’s input.
SureCross Web Configurator Change If you leave any Web Configurator screen without clicking the Change button to submit the changes to the Ethernet Bridge or GatewayPro, all changes are lost. Refresh Click the Refresh button to refresh the screen image. This updates any information on the screen that may have changed on the device. Get Click the Get button to read all device and I/O parameters from the DX80 device and load them into the Web Configurator screens.
SureCross Web Configurator For example, thermocouple inputs are multiplied by 20 before being written to the Modbus register. To convert this register value back to a temperature reading use the Scaling screen. The Offset value can be used to account for errors introduced into the sensor system, such as errors introduced because of wiring lengths in a thermocouple input system.
SureCross Web Configurator After power-up, the DX80 Gateway is a slave device (to the Ethernet Bridge) for the time defined in the Master Timeout field, defined in seconds with a 90 second minimum. During this time, the operating mode can be changed using the browser interface. To change the mode: 1. Click one of the radio buttons to select how the DX80 Gateway functions. • Select Modbus/TCP Client/Server mode (default) when you are connecting a DX80 to an external PLC or similar equipment.
SureCross Web Configurator changes to the Ethernet Bridge or GatewayPro, all changes are lost. Get Click the Get button to read all device and I/O parameters from the DX80 device and load them into the Web Configurator screens. This does not save the parameters to the XML file. Send Clicking the Send button transmits device and I/O parameters to the radio devices. The Send operation usually requires several second to complete. Refresh Click the Refresh button to refresh the screen image.
SureCross Web Configurator 1. Node 1, registers 17 through 32. 2. Node 2, registers 33 through 48. 3. Node 3, registers 49 through 64. 4. Gateway, Slave ID 1, registers 1 through 16. 5. DX83 Ethernet Bridge DX80 Gateway is Modbus RTU Master When a DX80 Gateway is set up as a Modbus RTU master device, the communication between the DX83 Ethernet Bridge (used to configure the network) and the Gateway is ignored.
SureCross Web Configurator 1. DX83 Ethernet Bridge 2. Slave ID 2, DX85 Modbus RTU Remote I/O 3. Node 1, registers 17 through 32 4. Master Device, DX80 Gateway, registers 1 through 16. 5. Node 2, registers 22 through 48. 6. Node 3, registers 49 through 64. 7. Slave ID 5, DX80 Gateway, registers 1 through 16. 8. Node 2, registers 33 through 48 9. Node 1, registers 17 through 32. rev. - www.bannerengineering.
SureCross Web Configurator Parameters Get Select an action from the following: None, Reads From, or Writes To. Select None to perform no action, Reads From reads the parameter from the remote register and copies the contents into the local register, and Writes To writes the data from the local register to the remote register. Click the Get button to read all device and I/O parameters from the DX80 device and load them into the Web Configurator screens. This does not save the parameters to the XML file.
SureCross Web Configurator Holding Register. 4xxxx - SureCross slave devices, read/write, 16 bit Selecting None for remote type negates the rule though it remains in the list until deleted. Unused rules at the end of the list always show None as the remote type. DX80 is Modbus RTU Slave The third option, DX80 is Modbus RTU Slave, sets up a Gateway and Ethernet Bridge or GatewayPro as a slave device. This selection stops the communication between the Ethernet interface and the DX80 Gateway.
SureCross Web Configurator Showing Lists the pages of registers for the selected slave (RTU unit). configuration information permanently to the XML file. Update checkbox Unless the Update checkbox is selected, this register data will not be submitted to the Ethernet Bridge or GatewayPro. RTU Error Codes The first occurrence of read and write errors are shown along with the map number that was processing when the error occurred.
SureCross Web Configurator TCP Registers The TCP Registers page displays data mapped by the virtual server user map defined under Network > Modbus/TCP Setup > Server Map. This is a snapshot of what the remote client sees when the user map is enabled. The diagnostic info displays the connection status for each available connection. A code of A/B where A is zero is an available connection, and B indicates the reason for closing (may be normal TCP close).
SureCross Web Configurator Resetting Error Codes The first occurrence of read and write errors are shown along with the map number that was processing when the error occurred. Check the Reset box to the left of the error column and click the Update button to clear the error. If more than one error is active, the next error code displays. The right three columns display an error count for all maps for each device.
SureCross Web Configurator Modbus RTU Setup Submenu The Modbus RTU Setup submenu contains the read and write map screens for setting up the Modbus RTU Slave option. The two screens contained within the Modbus RTU Setup tab apply only to the Ethernet processor on the GatewayPro or a DX83 device. RTU Read Map The RTU Read Map screen creates a map entry to read data from one or more remote Modbus RTU serial devices. Click on the map number in the left column to view more detail and to insert or delete maps.
SureCross Web Configurator Remote Unit # (Slave ID) The Remote Unit number is the slave ID of the remote unit to be read. The value in this register is then written to the local register listed. in the floating point register associated with the I/ O point. Swapped Check the Swapped box to swap the byte orientation. Update Clicking the Update button sends information to the Ethernet Bridge or GatewayPro or retrieves information depending on which checkboxes are selected: Change or Get/Send All.
SureCross Web Configurator retained bits will be right justified in the result. The result is multiplied by the scale factor and added to the offset. The final result is written to the local register number selected. Delete and Insert Clicking the Delete button removes the rule or map number shown in the Rule # or Map # box. Clicking the Insert button inserts a new map ahead of the map number shown.
SureCross Web Configurator rule to the bottom of the list, increase the number of rules or maps enabled. Local Register The data in the local register is multiplied by the scale factor, then written to the remote register. Name The name is optional and used only for display purposes. The name acts as an identifier for a specific register map. Type in the name in this screen.
SureCross Web Configurator Modbus TCP Setup Submenu Use the Modbus TCP Setup pages to specify the network address and optional device parameters of a remote Modbus/TCP device. Example remote Modbus/TCP devices may include another Gateway device or any remote device using Modbus/TCP to communicate. Devices Use the Devices page to set up the network address and optional device parameters for a remote Modbus/TCP device that is linked to for remote input and/or output.
SureCross Web Configurator Unit (Optional) The unit or device number is an optional parameter and used primarily for organizational purposes. Client Read Map Use the Client Read Map tables to create maps that read data from the Modbus/TCP devices defined in the Devices page. Maps entered on the Client Read Map page only read data from remote devices. To write data to those devices, go to the Client Write Map page.
SureCross Web Configurator in the floating point register associated with the I/ O point. Update Clicking the Update button sends information to the Ethernet Bridge or GatewayPro or retrieves information depending on which checkboxes are selected: Change or Get/Send All. Updating information does not save configuration information permanently to the XML file.
SureCross Web Configurator Local Register The data in the local register is multiplied by the scale factor, then written to the remote register. Name The name is optional and used only for display purposes. Names are defined on the Devices page, local name field. Prev and Next If there are more than 16 devices or rules/ maps, use the Prev and Next buttons to display the next screen of information. Remote Device The local names from the Devices tab are listed in this drop-down list.
SureCross Web Configurator Use the Server Map page to set up a copy of various remote register data to a specific, unused block of Modbus registers. For example, copy the data in register 8 from all devices to a Modbus register block. This map is also referred to as the user map. Bit Field and Fill. Defining the Bit field allows the compiling of register contents derived from multiple sources.
SureCross Web Configurator Custom Registers Enabled The Custom Registers Enabled parameter controls how many maps are enabled and displayed. Delete and Insert Clicking the Delete button removes the rule or map number shown in the Rule # or Map # box. Clicking the Insert button inserts a new map ahead of the map number shown. It is not necessary to use the Insert button to add maps to the bottom of the list or to define any rule with None as the register type.
SureCross Web Configurator Default Data When the Server Timeout value is set to a non-zero value, the default data is stored into the local register when the server times out. Hex Select the Hex checkbox to view or enter valCheckbox ues in hexadecimal (not recommended for floating point). Prev and Next If there are more than 16 devices or rules/ maps, use the Prev and Next buttons to display the next screen of information.
SureCross Web Configurator Thresholds (Data Submenu) The status of the threshold action maps displays on this Thresholds tab. The Threshold tab only displays information; no parameters are changed here. The true/false status may not reflect the correct result of the test. Because the indicated result is qualified by hysteresis and on-time or off-time before taking effect, the anticipated result may be delayed.
SureCross Web Configurator Action Rules Submenu The Action Rules submenu contains the rules regarding data manipulation and calculations. Thresholds (Action Rules Submenu) The main Threshold tab only displays the rules. Click on the hyperlinked rule number in the left column to view the expanded threshold rule screen and to make changes to the rule.
SureCross Web Configurator Threshold rules trigger actions based on events. The event occurs when a source register meets the criteria defined by the rule. The result of the event can be setting another register to a value as indicated in the rule template, sending an e-mail notification, sending a text message to a cell phone, or logging an event or data to a log file.
SureCross Web Configurator To track a register: 1. Enter the register number to be tracked in the Tracked Register # field. 2. Select destination registers for the Average Register, Min Register, and Max Register, by entering unassigned register numbers in the supplied fields. Unassigned integer and floating point registers are listed at the bottom of the screen. To automatically assign the result registers, click the Auto Allocate button.
SureCross Web Configurator Enter the single destination register or a range of destination registers to copy the source register to. If no last destination register is entered, only a single destination register is used. Do not use the same source register more than once in the cascade rules. To copy a register’s contents to multiple, non-consecutive registers, only use the primary source register once.
SureCross Web Configurator To establish calculations, select the operation from the drop list. All operations except logical NOT operations require two operands. Enter the register numbers as applicable. Some operations are valid for ranges of registers. Select and or thru to select two registers or multiple registers in a range. Average, sum, and logic operations are valid for ranges of multiple registers.
SureCross Web Configurator Browse Selects a file for upload from the PC. Once selected, click the Upload button to complete the process. Save Stores the current Web Configurator contents to a flash memory file. The configuration overwrites the selected file in the local file directory. Confirm and Restart Select the Confirm checkbox and click the Restart button to re-boot the system. Power is not cycled to the hardware, but the processor reboots as if the power cycled.
SureCross Web Configurator Set the IP address to 255.255.255.255 to use Dynamic Host Configuration Protocol (DHCP) to obtain an IP address upon power-up. The IP address change takes effect on the next power cycle or when the Restart button is clicked on the Config File page. After changing the IP address of the DX80 device, print this page for your records. The Refresh button only updates the information shown on this page, it does not submit a DHCP renewal request. DHCP renewal is automatic.
SureCross Web Configurator Any occurrence of a serious error puts the DDNS update in the Suspended state. If this occurs, resolve the problem and restart the system or click Reset DNS. DO NOT click Reset DNS without knowing the problem is resolved. Repeated attempts to update DNS inappropriately may result in your host name being blocked. Clicking Reset DNS results in an immediate IP verification and attempt to reupdate DNS.
SureCross Web Configurator User The User page changes the log-on password. The current user’s name is displayed. To change the password, enter the old password, the new password, and confirm the new password by entering it again. Click the Accept button to submit the change. This change takes effect immediately. Admin - Root Login This second view of the User screen shows the screen when logging on using the admin/root login.
SureCross Web Configurator Click the Refresh button to view the current time. Enter a new time and click the Change button to set the clock/calendar. Use the same string format observed when changing time/date. To apply Daylight Saving Time: 1. Select the rules as needed. 2. Select the 'Is in effect now' checkbox if Daylight Saving Time is currently in effect and select the Is enabled checkbox to enable Daylight Saving Time. 3. Click the Update button.
SureCross Web Configurator Weekly Schedule Use the Weekly Schedule page to manage weekly activities. Before setting any schedules, verify the system’s time and date are accurately set in the System > Setup > Time and Date tab. During the On Time, the On Value is applied to the given register. The remainder of the time, the register is set to the Off Value.
SureCross Web Configurator Including Holidays To include holidays in the scheduled event: 1. Select a holiday from the Available Holidays list. 2. Click the Add button. 3. Click on the Include radio button. If the selected Holiday falls on a day not selected with the checkboxes, selecting the Include button includes that Holiday in the schedule regardless of the day of the week it falls on.
SureCross Web Configurator The starting time and date (ON Time/Date) determine when the ON Value is applied to the given register. The ending time and date (OFF Time/Date) determine when the ON period ends. The OFF Value is applied at the end of the ON Time. After an On Demand event has passed, it should be removed from the list. The expired event remains included in the list until it is deleted, serving as a record of a past event.
SureCross Web Configurator For example, if the office doors should be opened automatically at 8 a.m. every weekday, use a holiday schedule to override the normal schedule on Christmas and New Year’s Day to keep the office locked. To create a holiday: 1. Enter the holiday name. 2. Enter an on time, on date, off time, and off date. Set the on time to begin the holiday one second after the day begins and end the holiday one second before the day ends. 3.
SureCross Web Configurator One event log and three data logs may be created. The event log saves events based on changes occurring in defined registers. The data logs store register data based on a periodic rate defined by the user. Select the event log or one of the three data logs using the Next and Prev buttons. Enable Logging Select the checkbox to turn on the data logger. File Name The file name must be contain no more than eight characters and include the file extension .txt.
SureCross Web Configurator Log files are saved to either RAM or FLASH memory. Log files stored in RAM are lost when the system power cycles. The RAM area is directory RAM0 with a capacity of 1000KB (1 Megabyte). The FLASH area is directory FLASH0 with a capacity of 256KB. This FLASH0 area is shared with configuration files and program files. Resource Allocation To avoid filling a log file and losing data, allocate the system resources.
SureCross Web Configurator Clear All Selecting one or more of the checkboxes directand Set ly to the right of the Clear All button and clicking All the Clear All button clears all selected checkboxes in that column. Similarly, clicking the Set All button sets all checkboxes in the column checked next to the buttons. Only named registers may be checked or unchecked; unnamed registers are assumed to be unused.
SureCross Web Configurator To copy a data log file from this page, right click on the file name link and select Save As in the web browser. The files save in CSV format text files that may be imported into MS Excel. Delete To delete the files, select the checkbox for the unwanted file then click the Delete button. Prev and Next Scrolls through the pages of event and log files. Refresh Click the Refresh button to refresh the screen image.
SureCross Web Configurator Checking the Include Standard Message box includes either the Default E-Mail Message or Cell Phone Message (whichever is selected). Select the Include Custom Message checkbox to include a custom message along with the default message. The standard auto-generated cell phone message is limited to 160 characters. Selecting both the standard cell phone message and a custom message will exceed this limit.
SureCross Web Configurator • T-Mobile. @tmomail.net • VoiceStream. @voicestream.net • Verizon. @vtext.com Click the Send Test button to send a message to the defined recipient, testing the settings defined for the POP3/SNMP servers as well as the DNS server. The most common problem is usually the e-mail user and password setup or the system contact. Contact your network administrators for questions concerning access to outside providers.
SureCross Web Configurator The expected acknowledgement code is included in the outgoing notification e-mail. A typical notification code may look like ! 08052012R1! and must be included in the reply in exactly the same form, including the exclamation points. Replying and sending the email from within the e-mail program is sufficient as long as the e-mail reply includes the original message. Repeat Time.
SureCross Web Configurator the IP address to zero if a domain name is used. If the IP Address is not zero, the IP address is used and the name ignored. A typical SMTP server domain name looks something like smtp.mycompany.com. The default SMTP port number is 25. POP3. The POP3 IP address is used if the POP3 server (incoming e-mail) is at a static IP address. If the POP3 server is known by domain name, use the name instead and set the IP address to zero.
SureCross Web Configurator Browse Click the Browse button to find a file to upload from the PC. Once the file is selected, click the Upload button to load the file. Delete Removes the selected file from the local file directory. New Creates a new file with the name entered into the text window. the program. Do not run two copies of the same program. Stop Terminates the running program if it enters an endless loop. If you are implementing a control loop, you will want the program to be an endless loop.
SureCross Web Configurator Erase Scratch Pad To erase the scratch pad, select the Erase Scratch Pad checkbox and click the Clear button. the code using standard text editing commands such as cut, copy, paste, etc. Save Saves changes back to selected file listed on the Program File page. Creating a New Program File To create a new program file, use the Program File page. The new file is empty until the contents of the scratch pad are saved to it.
SureCross Web Configurator Use this page to select the type of devices and the device names. After making changes, go to the System > Setup > Config screen to save the settings displayed on the web pages to an XML file stored in flash memory. Setting up the Devices In the sample screen shown, two devices are set up in the network: a Gateway (device 0) and one Node (device 1). To define the devices: 1. Always set up the Gateway as device 0 and the Nodes as devices 1 through 15. 2.
SureCross Web Configurator 1. Select the I/O Enable checkbox. If the checkbox is not enabled, that I/O point is active and is ignored. 2. From the I/O Selection drop-down list, select the appropriate I/O configuration. Refer to the device data sheet to determine which discrete and which analog I/O points are active for a given device. (NPN and PNP settings for discrete I/O shown on the data sheet are default settings only and can be changed.) 3.
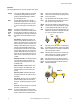
SureCross Web Configurator The Device # field shows which device is displayed. Use the Prev and Next buttons to scroll through the devices. In the sample screens shown, device 0, I/O point 1 (Gateway Discrete IN 1) is mapped to device 1, I/O point 9 (Node Discrete OUT 1). Each of device 0’s input points 1, 2, 5, and 6 are mapped to the corresponding outputs on device 1. Similarly, device 1’s inputs 1, 2, 5, and 6 are mapped to device 0’s outputs 9, 10, 13, and 14.
SureCross Web Configurator A link timeout is a failure in the radio communications between the Gateway and a Node. A link is timed out when the Gateway has polled a Node and failed Maximum Bad Count times consecutively. In the sample shown, the Gateway must poll and fail to communicate with a Node seven times before the link is considered to be timed out.
SureCross Web Configurator 1: The DX80 device IP address, subnet mask, and gateway. 2: When using an SMTP domain name in the e-mail setup page instead of an SMTP IP address, enter at least one static DNS server IP address. The DNS server addresses are supplied by an Internet Service Provider (ISP) or network administrator. 3. Select a dynamic DNS service and enter in the device’s host name, the DDNS user name, and password.
SureCross Web Configurator Thresholds Thresholds are set to trigger actions based on events. The event occurs when a source register value meets criteria defined by a threshold rule. The result of the event can include setting another register to a specific value, sending an e-mail or text message notification, or logging an event or data to a log file. Threshold rules are created using the System > Action Rules > Thresholds > Thresholds - Expanded View page.
SureCross Web Configurator 3. Enter in a log rate in the format of HH:MM:SS. For data logs, leaving the log rate set to zero disables logging. Because event logs trigger when an event occurs, the log rate is not used for event logs. 4. Select the criteria for beginning a new file. Choose between When Full, a specific day of the week, or Daily. Choose to begin a new file at a specific time or a specific file size. Once the file fills up, a new file is created. 5.
SureCross Web Configurator Scheduling To schedule specific events or actions, use the Advanced > Scheduler pages. Use the Weekly Schedule page to manage weekly activities and the On Demand page to set up one time only events. To exclude or include specific holidays from weekly events, set up the holidays in the list. In the screen shot shown, eight single-day holidays are set up to start one second after midnight and end one second before midnight that night.
SureCross Web Configurator The screen shots shows a sample weekly event occurring Monday through Friday, excepting the specific holidays listed on the right. This event starts at 6:00 am and ends at 8:00 pm and writes a value of 0 during that time to register 121. During the off times, a value of 1 is written to register 121. Register 121 controls an automated lock for the front door of a business that is typically open Monday through Friday from 6:00 am until 8:00 pm.
SureCross Web Configurator To track a register: 1. Enter the register number in the Tracked Register # field. 2. Select the destination registers for the calculated values using the unassigned registers listed at the bottom of the screen. In the sample screen shown, register 1, Gateway IN 1, is tracked in one minute increments with 10 samples taken each minute. The resulting average value is stored in register 257.
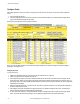
SureCross Web Configurator I/O Point Floating Point Register 1 1001, 1002 2 1003, 1004 3 1005, 1006 4 1007, 1008 5 1009, 1010 Troubleshooting Restoring Factory Default Settings Restoring the factory default settings resets the settings for: • • • • • • • IP Address: 192.168.0.
SureCross Web Configurator Record size overflow. Too much information per record is being logged. As this time, the record size is a maximum of 1000 characters. Illegal file name. File names must use alphanumeric characters only and may have no embedded spaces. The suffix must be .txt for event and data log files. E-mail error: -n. There is a problem attempting to e-mail a log file. The error codes are listed below. Unknown x/y. A status x with code y has not been enumerated for the web page.
SureCross Web Configurator Error Code Description Error Code Description -23 NAFS_END_OF_FILE -74 NAFS_INVALID_BYTES_TO_WRITE -24 NAFS_SUPER_BLOCK_CORRUPTED -75 NAFS_INVALID_SS_TABLE_INDEX -25 NAFS_DATA_CORRUPTED -76 NAFS_INVALID_MAX_OPEN_DIRS -26 NAFS_SERVICES_TABLE_FULL -77 NAFS_INVALID_MAX_OPEN_FILES -27 NAFS_INVALID_VOLUME_NAME_LENGTH -78 NAFS_INVALID_FILE_HANDLE -28 NAFS_VOLUME_NAME_MISMATCH -79 NAFS_RENAME_DIR_ENTRY_FAILED -29 NAFS_IO_INTF_TABLE_FULL -80 NAFS_FILE_IS_OP
SureCross Web Configurator E-mail Error Codes E-mail error codes are listed in the following tables. The missing recipient error should not occur because no send is attempted when no recipient is defined. The most likely error is a server error, referring to an error with the connection to the e-mail server. Check the SMTP address, e-mail login, and password. E-mail error codes are positive or negative numbers depending on when the error occurs.
SureCross Web Configurator • • • • • • • • • • -17: NAMAILC_NOATTACHFILENAME -18: NAMAILC_NOATTACHDATA -19: NAMAILC_INVALIDATTACHSIZE -20: NAMAILC_TOOMANYATTACH -21: NAMAILC_INVAILDMAILID -22: NAMAILC_INVALIDUSERNAME -23: NAMAILC_INVALIDAUTHTYPE -24: NAMAILC_INVALIDLENGTH -25: NAMAILC_NOMEMORY -26: NAMAILC_NOTCONNECTED Floating Point Registers The floating point registers associated with each I/O point are assigned based on the following equation: 1000 + I/O# × 2 − 1.
SureCross Web Configurator Network Connection Errors Connection errors are internal network related errors and include: • • • • 2001 General socket error 2005 Could not reach local DNS to look up remote host 2006 HTTP client aborted a web session < 200 Unexpected network errors. Contact Banner Engineering if these errors occur.
Index P R polling messages 10 re-link count 10 rev.