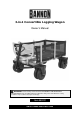
3-in-1 Convertible Logging Wagon Owner’s Manual WARNING: Read carefully and understand all ASSEMBLY AND OPERATION INSTRUCTIONS before operating. Failure to follow the safety rules and other basic safety precautions may result in serious personal injury.
® Thank you very much for choosing a Bannon product! For future reference, please complete the owner’s record below: Serial Number/Lot Date Code: ________________________________ Purchase Date: ____________________________________________ Save the receipt, warranty, and this manual. It is important that you read the entire manual to become familiar with this product before you begin using it. This wagon is designed for certain applications only.
Table of Contents Intended Use .......................................................................................................................................... 4 Technical Specifications ...................................................................................................................... 4 Important Safety Information ............................................................................................................... 4 Specific Operation Warnings .......................
Intended Use Bannon’s 3-in-1 Convertible Logging Wagon is perfect for hauling oversized loads such as wood, rock, and other solid material. Technical Specifications Property Rated Capacity Tires Construction Bed Dimensions (inches) Wagon Width (inches) Specification 1800 lbs 16 inch pneumatic Steel 72 x 38 52 Important Safety Information ⚠WARNING • Read and understand all instructions. Failure to follow all instructions may result in serious injury or property damage.
⚠WARNING WORK AREA SAFETY • Inspect the work area before each use. Keep work area clean, dry, free of clutter, and well-lit. Cluttered, wet, or dark work areas can result in injury. Using the wagon in confined work areas may put you dangerously close to cutting tools and rotating parts. • Keep children and bystanders away from the work area while operating the wagon. Do not allow children to handle the wagon.
Specific Operation Warnings ⚠WARNING • Do not exceed the overall maximum load capacity of 1800 lbs. The weight rating is based on an evenly distributed load. • Do not tow behind a vehicle on a road or in any high speed situation. • Do not load items on the top edges of the posts. Remove posts before loading oversized items. Use caution when removing the posts. • Do not use the wagon to transport passengers or animals in or on the wagon. • The wagon is not intended for highway use.
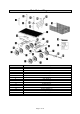
Main Parts of Wagon Reference 1 2 3 4 5 6 7 8 9 10 11 12 13 14 15 16 17 Subassembly Wagon Base (1) Front Axle Pivot (1) Front Axle (1) Rear Axle Mount (2) Rear Axle (1) Yoke (1) Tire (8) Axle Shaft (4) Rear Post (4) Front Post (2) Front Panel (1) Chain (2) Handle (1) Coupler Adapter (1) Cargo Net (1) Wrench (1) Hardware Kit (1) Page 7 of 19
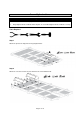
Assembly Instructions ⚠WARNING • It’s recommended that two people assemble the product. • Finger-tighten all nuts and bolts. After all parts are assembled, tighten all nuts and bolts securely. Tools Required Step 1 Attach the pivot to the wagon bed. Finger-tighten bolts. Step 2 Attach the rear axle mounts (2) to the wagon bed. Finger-tighten bolts.
Step 3 Attach the rear axle to the rear axle mounts. Finger-tighten nuts. Step 4 Attach the yoke to the front axle. Finger-tighten nuts.
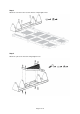
Step 5 Attach the front axle assembly to the wagon bed. Do not over-tighten the castle nut. Next slide the cotter pin through the threaded pivot shaft and bend. Step 6 Attach (2) tires onto each axle using axle shafts, spacers, washers. Secure using the locking pins. Make sure to assemble the tires so the valve stems and grease-fittings will be accessible for maintenance.
Step 7 Tighten all nuts and bolts securely then flip the wagon onto the tires. Team lift is recommended. Step 8 Attach the rear posts (4) to the wagon. Secure using locking pins.
Step 9 Attach the front posts (2) and the front panel (1) to the wagon. Secure using the locking pins. Step 10 Attach the chains (2) to connect the front posts and front panel to the wagon. Tighten bolts securely.
Step 11 Attach the handle to the wagon. Step 12 Attach the cargo netting to the wagon. A. Slide the rear sleeve of the tarp over a rear post. B. Slide the other sleeve over the opposite rear post. Note: It may be easier to remove the second rear post and slide it into the tarp and then re-insert the post. C. Route the tarp to the inside of the other rear and front posts. D. Clip the top hooks to the D loops on top of the posts. Clip the bottom hooks to the underside of the C channel on the wagon bed.
Step 13 (optional) Installation of the Coupler Adapter This part should only be used if you purchase a trailer coupler from Northern Tool & Equipment (sold separately). Before Each Use ⚠WARNING • Read carefully and understand all assembly and operation instructions before operating. • Failure to follow the safety rules and other basic safety precautions may result in serious personal injury. • Periodically check all nuts, bolts, and pins for tightness.
Operating Instructions ⚠WARNING • Always use caution when loading and unloading the wagon. • Do not exceed the overall maximum load capacity of 1800 lbs. The weight rating is based on an evenly distributed load. • Distribute the load evenly. • Do not tow behind a vehicle on a road or in any high speed application. • Do not load items on the top edges of the posts. Remove posts before loading oversized items. Use caution when removing the posts.
Parts Diagram Parts List Reference 2 3 4 5 6 7 8 9 10 11 12 13 14 15 16 17 Item Description Front Axle Pivot Front Axle Assembly Rear Axle Mount Rear Axle Assembly Yoke Assembly Tire Axle Shaft Rear Post Front Post Front Panel Chain Handle Coupler Adapter Cargo Net Wrench Hardware Kit Page 16 of 19 Quantity 1 1 2 1 1 8 4 4 2 1 2 1 1 1 1 1
Replacement Parts • For replacement parts and technical questions, please call Customer Service at 1-800-222-5381. • Not all product components are available for replacement. The illustrations provided are a convenient reference to the location and position of parts in the assembly sequence. • When ordering parts, the following information will be required: item description, item model number, item serial number/item lot date code, and the replacement part reference number.
Limited Warranty Northern Tool and Equipment Company, Inc. ("We'' or '"Us'') warrants to the original purchaser only ("You'' or “Your”) that the Bannon product purchased will be free from material defects in both materials and workmanship for a period of two years from the date of purchase. The foregoing warranty is valid only if the installation and use of the product is strictly in accordance with product instructions.
Distributed by: Northern Tool & Equipment Company, Inc. Burnsville, Minnesota 55306 www.northerntool.