
User Guide


F-21662-1 © Copyright 2006 TAC All Rights Reserved. 3
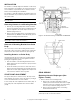
Removal of Mounting Bracket from Valve
Body
If it is necessary to remove the mounting bracket from the
valve body, remove stem sleeve, indicator plate, locking nut
and packing nut. Then remove bracket nut. (See Figure 3).
2. Remove actuator piston sleeve. Slide (2) large washers
(1-1/4" O.D. x 9/16" I.D. X 1/8" thick) over the actuator
shaft and screw a 1/2"-20 thread hex nut against the
washers.
3. Tighten the nut (5 turns) until the actuator shaft has been
pulled (compressing the actuator springs) approximately
1/4".
Caution:
Do not remove this retaining nut until reassembly
is completed. Strong spring forces are present.
4. Remove upper and middle housing, bolts and
diaphragms as required. (See Figure 4).
5. Install replacement diaphragms in reverse order. Be sure
diaphragm ribs fit properly in the actuator cover grooves.
6. Reassemble housing and remove retaining nut and
washer on the actuator shaft.
Caution:
Make certain that housing bolts are securely
tightened prior to removal of retaining nut on actuator shaft.
7. Reassemble the actuator to the mounting bracket using
mounting bolts supplied. Spacers (2) are required on
MK-8900 series actuators.
Actuator Springs: Not field replaceable. Return actuator to
factory for service.
MAINTENANCE
This is a quality product. Regular maintenance of the total
system is recommended to assure sustained optimum
performance.