
User Guide


6 © Copyright 2008 TAC All Rights Reserved. F-23576-6
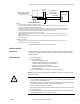
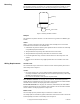
Mounting
Caution:
Do not twist or exert any force on the actuator housing during installation. Either
turn the base by hand or, if necessary, use a 1-5/8" open-ended wrench (TOOL-37) on the
flats provided on the actuator base or the valve body mounting nut. Refer to Figure-4 .
Figure-4 Housing and Base Location.
Dampers
The actuator is not position sensitive. It can be mounted in any position in an NEMA Type 1
location.
Valves
Allow 3" (76 mm) of clearance above the actuator valve assembly for the removal and
reattachment of the actuator to the installed valve.
1. Install all two-way valves so that they close against the flow. An arrow on the valve body
or tag indicates proper flow direction.
2. Always install three-way mixing valves with two inlets and one outlet.
3. Always install three-way diverting valves with one inlet and two outlets.
4. For steam applications only, mount the actuator above the valve body at 45° from
vertical.
5. Actuators can be mounted in any upright position above the centerline of the valve
body.
Wiring Requirements Control Leads
The control leads may be connected to a Class 2 circuit if routed separately from Class 1
circuit wiring. Refer to Figure-9 .
Caution:
• Use either 18 gage, two- or three-conductor twisted, shielded wire when it becomes
necessary to install the control leads in the same conduit with power wiring or when high
RFI/EMI generating devices are near.
• Do not connect the shield to earth ground or any other leads.
135 Ω Slidewire Controller: Use 18 gage, three-conductor, twisted leads (TAC Part
Number W-103 or equivalent) for runs of up to 500 ft. (152 m) between the 135 Ω slidewire
controller and the actuator. Use larger-gage wires for longer runs.
4 to 20 mAdc Controller: Use 18 gage, two-conductor, twisted leads (TAC Part Number
W-102 or equivalent) for runs of up to 500 ft. (152 m) between the 4 to 20 mAdc controller
and the actuator. Use larger-gage wires for longer runs.
Power Leads
The low voltage (24 Vac) actuators may be connected to a Class 2 circuit.
Line voltage (120 Vac and 240 Vac) power leads must be connected to a Class 1 circuit and
routed separately from Class 2 circuit wiring. Refer to Figure-9 .
Housing
Base
Wrench Flats