
Overview of Primary Product
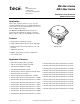
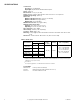
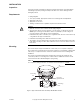
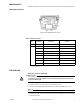
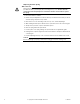


Table Of Contents
- Application
- Features
- Applicable Literature
- SPECIFICATIONS
- INSTALLATION
- Mounting
- ADJUSTMENTS
- MAINTENANCE
- MAINTENANCE PARTS
- Figure-2 MK-46xx Maintenance Parts.
- 1. Disconnect air line to actuator.
- 1. Disconnect air line to actuator.
- 2. Rotate start point adjustment counterclockwise (as viewed from the bottom) to remove as much spring compression as possible.
- 3. Remove the four cover mounting screws, the top cover, and the diaphragm.
- 4. While holding down the piston with the heel of your hand, remove the connecting pin.
- 5. Slowly release pressure on piston and remove piston.
- 6. Remove spring and insert replacement.
- 7. Position piston over spring, making sure position indicator is aligned with guide.
- 8. Pushing down on piston, align holes in valve stem extension and piston shaft and insert connecting pin.
- 9. Position diaphragm and top cover on actuator and even secure with the four screws.
- 10. Refer to "ADJUSTMENTS" on page 4 and adjust start point of actuator to desired value.
- MK-46xx Series
- MK4-46xx Series
- MK-46xx Series
- MAINTENANCE PARTS

6 © Copyright 2006 TAC All Rights Reserved. F-13894-7
Replacing Actuator Spring
W A R N I N G
Strong spring forces approaching 100 lbs. (45 kg) are present. Follow the following
procedure in order to prevent injury when removing the top cover. Actuator must be
connected to valve body and piston connected to the valve stem in order to replace
the spring.
1. Disconnect air line to actuator.
2. Rotate start point adjustment counterclockwise (as viewed from the bottom) to remove
as much spring compression as possible.
3. Remove the four cover mounting screws, the top cover, and the diaphragm.
4. While holding down the piston with the heel of your hand, remove the connecting pin.
5. Slowly release pressure on piston and remove piston.
6. Remove spring and insert replacement.
7. Position piston over spring, making sure position indicator is aligned with guide.
8. Pushing down on piston, align holes in valve stem extension and piston shaft and insert
connecting pin.
9. Position diaphragm and top cover on actuator and even secure with the four screws.
N O T E
Be sure diaphragm is properly positioned in housing groove before securing cover.
10. Refer to "ADJUSTMENTS" on page 4 and adjust start point of actuator to desired value.