
User Guide

6 © Copyright 2008 TAC All Rights Reserved. F-16290-7
Checkout
After installing a thermostat, make an initial check of the switch action. Remove the
thermostat cover by removing the two (2) thermostat cover screws. Verify the switch action
by listening to and watching the switch contacts, using a volt-ohm meter between the proper
sides of the switch, or by observing the controlled device.
1. Turn each setpoint dial to a temperature above ambient.
2. Turn the setpoint dial setting down gradually.
Calibration
All thermostats are calibrated at the factory and normally do not require any such attention.
However, if recalibration is necessary for any reason, proceed as follows:
1. Disconnect power to thermostat.
2. Set the adjusting dial to correspond to actual room temperature.
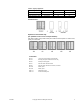
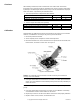
3. Remove thermostat cover, remove screw that secures right-hand side of insulator, fold
back insulator, and remove contact cover. See Figure 3.
Figure-3 Part Identification.
Caution: Do not breathe on the thermostat or handle excessively as this affects the
accuracy of the final calibration.
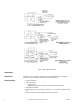
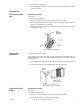
4. If the right contact blade is not made to the “R” contact, use a 3/16" open end wrench
(TOOL-11) to turn calibration screw clockwise (looking at head of screw) until blade just
makes “R” contact.
Note: Each complete revolution of the screw changes calibration approximately 6°F
(3.3°C).
5. If the right contact blade is made to the “R” contact, turn the calibration screw slowly
counterclockwise until the element makes the “B” contact.
6. Repeat steps 4 and 5 for the left contact blade. Thermostat is now properly calibrated.
7. Replace contact covers, insulator, and thermostat cover.
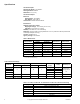
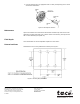
Thermostat Part Number Make Contact Break Contact
TC-1161, TC-1161-770, TC-1161-116, TC-1161-602 R & R1
TC-1161-479, TC-1161-530, TC-1161-531 R B1
Thermostat Part Number Make Contact Break Contact
TC-1161, TC-1161-770, TC-1161-116, TC-1161-602 B & B1
TC-1161-479, TC-1161-530, TC-1161-531 B1 R