
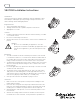
Install Instructions

Schneider Electric 1354 Clifford Ave. Loves Park, IL 61111 1-888-444-1311 www.schneider-electric.com
F-27651-1 June 2011 ao
© 2011 Schneider Electric. All rights reserved.
VB-7000 Series Globe Valves
Venta
3
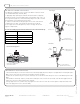
VB-7XX3 and VB-7XX5 Threaded Valve Bodies
1. Apply pipe dope sparingly to all but the last two threads of a properly
threaded, reamed, and cleaned pipe. Make sure that pipe chips, scale, etc.
do not get into the pipe since this material may lodge in the valve seat and
prevent proper closing and opening of the valve.
2. Start the joint by hand screwing the pipe into the valve. If the thread en-
gagement feels “right,” turn the pipe by hand as far as it will go.
3. Use a pipe wrench to fully tighten the valve to the pipe. Do not over
tighten or strip threads.
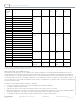
VB-7XX3 Normal Thread Engagement Between NPT Male Pipe Thread
and Valve Body.
Valve Size Inches (NPT) Normal Engagement
1/2” 1/2”
3/4” 9/16”
1” 11/16”
1-1/4” 11/16”
1-1/2” 11/16”
2” 3/4”
VB-7XX5 Normal Thread Engagement Between Rp Male Pipe Thread
and Valve Body.
Valve Size in mm (Rp) Normal Engagement
15 13
20 14
25 17
32 17
40 17
50 19
Use pipe wrench to
prevent valve from turning.
Tighten pipe using
this pipe wrench.
Valve
Assembly
Threaded
Right
Wrong
Pipe threads too long.
Pipe interferes with seat.
VB-7XX2 Flared Valve Bodies
1. Cut end of tubing square using a tube cutter.
2. Slip the flare nut onto the end of the copper pipe. Move it back out of the way to allow working room.
3. Place the base of the flaring tool around the copper tube at the appropriate diameter size.
4. Attach the flare cone over the copper tube opening using screw fitting. Tighten it down until the cone is firmly seated inside
the base the vise base.
5. Remove the copper tube from vise base and examine for splits. Bring the nut back to the end of the flared tubing.
6. Verify the flare fits snugly in bottom of the nut. Now attach and tighten the nut to the valve.
7. Pressure the system and check for leaks.