FloweraokeTM Sing-A-Long CD Player with Dual Microphones See page 14 for your hidden GEMSTONE FUN button surprise! OWNER'S MANUAL BAR502 Barbie and associated trademarks and trade dress are owned by, and used under license from, Mattel, Inc. ©2007 Mattel, Inc. All Rights Reserved.
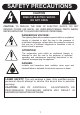
SAFETY PRECAUTIONS CAUTION RISK OF ELECTRIC SHOCK DO NOT OPEN CAUTION: TO REDUCE THE RISK OF ELECTRIC SHOCK, DO NOT REMOVE COVER (OR BACK). NO USER-SERVICEABLE PARTS INSIDE. REFER SERVICING TO QUALIFIED SERVICE PERSONNEL.
1. 2. 3. 4. 5. SAFETY INSTRUCTIONS Read these instructions. Keep these instructions. Heed all warnings. Follow all instructions. Do not use this unit near water. 6. Clean only with a dry cloth. 7. Do not block any ventilation openings. Install in accordance with manufacturer’s instructions. 8. Do not install near any heat sources such as radiators, heat registers, stoves or other apparatus (including amplifiers) that produce heat. 9.
FCC WARNING: This equipment may generate or use radio frequency energy. Changes or modifications to this equipment may cause harmful interference unless the modifications are expressly approved in the instruction manual. The user could lose the authority to operate this equipment if an unauthorized change or modification is made. INFORMATION: This equipment has been tested and found to comply with the limits for a Class B digital device, pursuant to Part 15 of the FCC Rules.
Emerson Radio Corp. has produced this audio product under license from Mattel. We have taken great care to make sure your unit was in perfect working order when it left our factory. It has been designed to give you many years of enjoyment and trouble-free operation. Read this manual before operating this unit to become familiar with its features. In the event you require technical assistance, please contact the Emerson Radio Customer Service hotline at 1-800-898-9020.
Dear Customer: Selecting fine audio equipment such as the unit you’ve just purchased is only the start of your musical enjoyment. Now it’s time to consider how you can maximize the fun and excitement your equipment offers. This manufacturer and the Electronic Industries Association’s Consumer Electronics Group want you to get the most out of your equipment by playing it at a safe level.
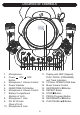
LOCATION OF CONTROLS OPEN /CLOSE POWER REPEAT MIN MAX MIN MIC 1 VOL 1. 2. 1 2 3 4 MAX MIC 1 MIC 2 MIC 2 VOL 5 6 MIN PROG MAX MUSIC VOLUME 7 8 Microphones Power ON/ OFF Button 3. Microphone 1 Volume Control 4. Power Indicator 5. GEMSTONE FUN Button 6. Microphone 2 Volume Control 7. Battery Compartment (Bottom of Unit) 8. Microphone 1 Jack 9. DC 9V IN Jack (Rear of Unit) 10. Microphone 2 Jack 9 10 11 12 13 14 15 16 17 18 19 1 11. Display with REP. (Repeat), PLAY, PROG.
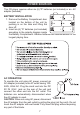
POWER SOURCES This CD player requires either six (6) “D” batteries (not included) or an AC adapter (included). BATTERY INSTALLATION 1. Remove the Battery Compartment door located on the bottom of the unit by pushing in on the tabs and lifting the door off. 2. Insert six (6) “D” batteries (not included) according to the polarity diagram inside the Battery Compartment. Alkaline batteries are recommended for the longest playing time.
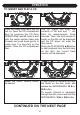
OPERATION TO INSERT AND PLAY A CD 1 2 2 OPEN REP. PLAY PROG. OPEN REP. PLAY PROG. POWER REPEAT 1 MAX MIN POWER MIN MIC 1 VOL REPEAT MAX MIC 1 MIC 2 MIN MIC 2 VOL PROG MAX MUSIC VOLUME Press the Power button 1 to turn the unit on. Open the CD compartment door by pressing the CD Door OPEN/CLOSE area 2. Insert a disc onto the center spindle (label side forward) and push down gently to make sure it is securely on the spindle. Close the CD compartment door.
OPERATION (CONTINUED) 5 6 OPEN REP. PLAY PROG. OPEN REP. PLAY PROG. POWER POWER REPEAT REPEAT MIN MIN MAX MIN MIC 1 VOL MIC 1 MAX MAX MIC 1 VOL MIC 2 MIN MIC 2 VOL PROG PROG MAX MIN MAX MIC 2 VOL MIC 1 MIC 2 MIN MAX MUSIC VOLUME MUSIC VOLUME When the disc is through playing, it will stop. Press the STOP X button to stop the disc before it is finished. 2 Press the Power button to turn the unit off. 2 TO PAUSE PLAYBACK 1 OPEN REP. PLAY PROG.
OPERATION (CONTINUED) CD PLAYBACK NOTES: • This unit is capable of playing standard CDs or 3” singles; no adapter is required. • If a disc is inserted incorrectly, dirty, damaged or not present at all, “00” will appear in the display. • To remove the disc, open the CD compartment, hold the edge of the CD and gently press the center spindle and lift the CD.
OPERATION (CONTINUED) TO REPEATEDLY PLAY BACK ONE TRACK 2 PROG. PLAY PROG. 3 1 REP. PLAY OPEN REP. 1 POWER POWER MIN REPEAT MIN MAX MIN MIC 1 VOL MAX MIC 1 MIC 2 MIN MIC 2 VOL MAX MIN MIC 1 VOL PROG MIC 1 MAX MIN Press the SKIP/SEARCH o 1 or n 2 button to select a track and press the PLAY/PAUSE ®p button ❸ to start playback. The unit will play the selected track over and over until the STOP ■ button 4 is pressed. TO REPEATEDLY PLAY BACK ALL TRACKS 2 OPEN REP.
OPERATION (CONTINUED) TO PROGRAM THE MEMORY (UP TO 20 TRACKS) OPEN 1 2 REP. PLAY PROG. OPEN REP. PLAY PROG. 1 POWER POWER MAX MIN MIC 1 VOL MAX MIC 1 MIC 2 MIN MIC 2 VOL MIN PROG 3 OPEN 4 REP. 1 POWER MIN MAX MIC 2 VOL MIC 2 REPEAT MIN PROG 2 MAX MUSIC VOLUME Select the first track to be played back using the SKIP/SEARCH o 1 or n 2 button, then press the PROG. button ❸ again. Repeat this step to program additional tracks (up to 20 tracks).
OPERATION (CONTINUED) SINGING ALONG This unit has two Microphone jacks and two included microphones that allow you to sing along with the CD as follows: 1 2 OPEN REP. PLAY PROG. POWER OPEN REP. PLAY PROG. POWER REPEAT MIN MAX MIC 1 VOL MIN MAX MIC 2 VOL MIC 1 MIC 2 MIN PROG REPEAT MAX MIN MUSIC VOLUME Start playback as described on page 8. Insert the Microphone plug(s) into the Microphone 1 and/or 2 jacks.
OPERATION (CONTINUED) BarbieTM has a surprise just for you! Just follow the instructions below and see what you can do with your GEMSTONE FUN button! See what you can do with your GEMSTONE FUN button! Step 1 Step 2 Step 1 Step 2 Listen to what Barbie TM recorded just for you! OPEN POWER REPEAT MIN MAX MIC 1 VOL MIN MAX MIC 2 VOL MIC 1 MIC 2 MIN PROG MAX MUSIC VOLUME Press the GEMSTONE FUN button on your CD player.
CARE AND MAINTENANCE Caring for Compact Discs • • • • • • • • • Treat the compact disc carefully. Handle the compact disc only by its edges. Never allow your fingers to come in contact with the shiny, unprinted side of the compact disc. Do not attach adhesive tape, stickers, etc. to the compact disc label. Clean the compact disc periodically with a soft, lintfree, dry cloth. Never use detergents or abrasive cleaners to clean the compact disc. If necessary, use a CD cleaning kit.
TROUBLESHOOTING GUIDE If you experience a problem with this unit, check the chart below before calling for service. SYMPTOM Unit will not turn on. CAUSE SOLUTION Weak or dead Replace batteries. Batteries not Insert correctly. AC adapter Check AC adapter batteries. inserted correctly. not connected. Disc will not play. CD compartment not closed. Reinsert disc Dirty or defective Try another disc. disc. Moisture correctly. Wipe disc with soft condensation Erratic playback.
EMERSON RADIO CORP. LIMITED WARRANTY (Valid in the United States) Emerson Radio Corp. warrants manufacturing defects in original material, including original parts and workmanship, under normal use and conditions, for a period of ninety (90) days from the date of original purchase in the U.S. With your dated proof of purchase, we will provide repair service at no charge for labor and parts at an authorized Depot Repair Facility, or replace the product in our discretion.
® EMERSON WARRANTY (Valid in Canada) Consumer Electronics, Home Appliances and Home Office Products ® Thank you for choosing EMERSON ! SYNNEX Canada Limited gives the following express warranty to the original consumer purchaser or gift recipient for this EMERSON product, when shipped in its original container and sold or distributed in Canada by SYNNEX Canada Limited or by an Authorized EMERSON Dealer: SYNNEX Canada Limited warrants that this product is free, under normal use and maintenance, from any de
® BAR502-090707-02 Printed in China