Please remove everything from the package and compare to the contents shown on page 4. If any items are missing, please call 1-800-524-8697. Keep these instructions for future reference as they contain important information. 8+ ® N6891-0920 DANGER – To prevent electric shock, do not immerse in water; wipe clean with damp cloth. Electrical rating (Input: AC 120V 60 Hz; Output: DC 24V 0.5A) Mattel, Inc. N6891 Z102 N83 Immersing this toy can result in an electric shock.
Table of Contents What’s in the Box..................................................................................................4 Introduction...........................................................................................................5 System Requirements..........................................................................................5 Installation of Software.......................................................................................6 Installation of ink cartridge...
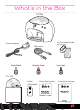
What’s in the Box Printer Power adapter USB cable Pre-print Coat White Polish Ink Cartridge inside foil pouch Top Coat CD-ROM Printer alignment DIGITAL NAIL PRINTER FOR YOU © 2008 Quick Start guide Instruction manual card ved. Mattel, Inc.
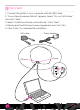
Introduction Lid On/Off Finger Slot Camera/Print Button USB port Power System Requirements •PC (Windows XP and Vista only) •Pentium III 800 MHz or above (Intel Core 1.8 GHz or above recommended) •512 MB of RAM (1GB of RAM or above recommended) •Screen resolution 1024 x 768 •800 MB free hard drive space •Direct X 9.0 or above •USB 2.0 •Internet Explorer 6.0 or later with SP1 and Macromedia Flash Plug In. •Internet Connection recommended (Internet connection required for updates only.
Installation 1 Software IMPORTANT NOTE: Install the software before connecting the printer to your computer. 1. Insert the CD-ROM into your CD drive to launch the installer. (If it doesn’t launch automatically, double-click “My Computer” on your Desktop, then double-click on the CD drive.) Double click “setup.exe.” 2. Follow the on screen prompts to install the software. 3. After the software is installed, connect the power cord. 2 Any other printers you have can stay connected.
3 Connect 1. Connect the printer to your computer with the USB cable. 2. “Found New Hardware Wizard” appears. Select “No, not at this time” and click “Next”. 3. Select “Install the software automatically.” Click “Next”. 4. Please read the Software License Agreement and click “Yes”. 5. Click “Finish” to complete the installation.
4 Alignment of Camera and Printer 1. After installing the software, click the icon to launch the program. 2. The program launches and automatically opens the Camera Settings window. 3. Follow the directions on screen to align the camera. 4. When you have finished aligning the camera, the Printer Alignment window opens. 5. Follow the directions on screen to align the printer.
Interface Overview Here is the screen where you start. Here are the buttons and icons explained.
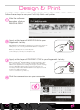
Design & Print Follow these steps to use your Doll’d Up Nails™ nail printer. After the software 1 launches, click on DESIGN & PRINT. Apply a thin layer of WHITE POLISH to your 2 fingernails. Let dry. Important: Ensure WHITE POLISH is applied prior to printing the design. Ink staining may occur on the fingernail if WHITE POLISH is not applied. Note: If you already have a colored nail polish (not included) on your nail, you can skip this step. 3 Apply a thin layer of PRE-PRINT COAT to your fingernails.
Insert a finger into the finger slot. Press all the way in, until the back wall 5 moves and the mechanism raises up. Your finger will be held securely in the up position, ready to be photographed. The left button on the printer will 6 flash. Press that button to take a snapshot of your finger. Press down on the finger slot until it clicks, then remove your finger. Click on a nail design. Use the scaling and sizing tools to fit the design to 7 your finger.
Press the flashing button on the printer to 9 print. Press down on the finger slot until it clicks, 10 then remove your finger carefully. Give the design a few seconds to dry, then 1 1 apply TOP COAT if you want to keep the design. Allow 5 minutes for TOP COAT to dry. The nail design washes off easily with soap and water if you do not apply the TOP COAT. LONGER NAILS: For nails longer than 1/2”, position designs in lower portion of nail for a French manicure look. Nail Design Print Size 0.
The design that was just dragged to the star appears in the “My Favorites” 4 category. Remove the design by clicking and dragging it to the trash can in the 5 lower right hand side of the category. Trash can pulses, indicating that it has removed the design. This does 6 not delete that design from the program. This only removes it from “My Favorites”. The design that was just dragged to the trash can disappears from the 7 “My Favorites” category. Import Your Own Images Click on the Import menu.
Helpful Tips IMPORTANT: Make sure white polish is applied prior to printing the design. Ink staining may occur on the fingernail if white polish is not applied. NOTE: your own colored polish may also be used instead of white polish. PRE-PRINT POLISH: Apply a thin coat of pre-print coat to your fingernail. Allow to dry completely. TOP COAT: Give the design a few seconds to dry, then apply top coat if you want to keep the design. Allow 5 minutes for top coat to dry.
Settings Camera settings Camera brightness: Drag the slider to adjust the image brightness. Camera contrast: Drag the slider to adjust the image contrast. Camera alignment: Follow instructions on computer screen. Printer settings Ink levels: Click to display the amount of ink left in the ink cartridge. Clean cartridge: Click to run the ink cartridge through a cleaning cycle. Use this if the colors of your nail designs are printing faintly, or if one color is not printing at all.
Maintenance Cleaning the Finger Holder To clean the finger holder if it gets ink on it, turn off the printer. Use a dab of nail polish remover (not included) on a clean rag to carefully clean off the ink. Changing the Ink Cartridge See Installation of Ink Cartridge section. NOTE: Dispose of the used ink cartridge responsibly. Ink cartridges can be recycled through many retailers. Check the web sites of office supply retailers to find out if they accept used ink cartridges.
Troubleshooting PROBLEM SOLUTION Pre-print coat takes a long time to dry. Apply only a thin layer of pre-print polish. Pre-print coat gets ripples in it if I blow on it. For best results, let the polish air dry. Don’t blow on it. Left to right “streaks” in the design. In Settings, click Printer Settings, then click Clean Cartridge. If streaks still appear, remove the ink cartridge from the printer (see page. 6).
This equipment has been tested and found to comply with the limits for a Class B digital device, pursuant to part 15 of the FCC rules. These limits are designed to provide reasonable protection against harmful interference in a residential installation. This equipment generates, uses and can radiate radio frequency energy and, if not installed and used in accordance with the instructions, may cause harmful interference to radio communications.