
Installation & Assembly

CAUTION: PRODUCT IS FRAGILE. TO AVOID BREAKAGE AND POSSIBLE INJURY HANDLE WITH
CARE!NOTE: Pictures may NOT exactly represent Basin.
INSTALLATION INSTRUCTIONS
Above Counter Basin
COUNTERTOP INSTALLATION
!
OBSERVE LOCAL PLUMBING AND BUILDING CODES
WE RECOMMEND CONSIDERING PROFESSIONAL INSTALL OF ALL PRODUCTS
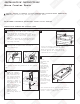
Using the basin as a template, locate the
position of the sink on the countertop.
Provide proper clearance under the
countertop for the plumbing lines, drain
assembly and the structural parts of the
cabinet.
NOTE:
If replacing an existing basin be
certain to shut off water supply before
removing old sink.
1
4
Place the basin temporarily inposition.
Check for alignment and clearance.
Mark the basin and countertop in
several places as a guide for the
installation location.
Mount the tapware
and drain assembly
(not included) on
the sink following
the manufacturer’s
instructions. Be
certain to apply a
bead of silicone on
the underside of the
drain in order to
ensure a watertight
seal between the
sink and drain.
Remove excess
silicone after
installing drain on
sink.
3
A
Drill a clearance hole inside the
marked line to assit with cutting of
the countertop.
Cut opening around the perimeter of the marked
line.
2
Perimeter
of
line
Cut around
line
5
After
checking fit
and
alignment,
turn basin
upside down
and apply a
generous
portion of
silicone
adhesive
around the
under side of
the rim near
the edge.
Place bain in
position. Wipe
off excess
adhesive.
Once basin has been installed in correct
position silicone / caulk around basin to
create a water tight seal.