
Installation & Assembly
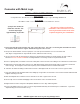

Consoles with Metal Legs
INSTALLATION INSTRUCTIONS
P 847•244•1234 www.barclayproducts.com
4/23/18
Tools Needed
• Screwdriver • Drill • Level • One Tube White or Clear Silicone • Pencil •
NOTE: DO NOT tighten too much or you may damage basin.
1. Please note that the metal stand for this sink is decorative only. The sink is secured by wall installation and does
not need the metal stand for support. Maximum height of sink is 31-1/2”.
2. One person should hold the console top in place. The other person should use a level on the back and
side edges to help position the top, both side to side, and front to back correctly.
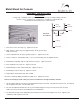
3. Use the pencil to mark the mounting hole position for sink and flange positions for metal stand on the wall. Start to
drill hole in
2”x12” re-inforced wall for mounting hardware. Screw large wood screws provided into wall.
4. Before replacing basin, it would be convenient at this point to mount the faucet according to the manufacturer’s instructions.
5. Slide basin on to bolts and ensure that it is level. Slide plastic flange washers and metal washers onto bolts. Thread hex
nuts on snugly. Do not tighten sink to wall completely until metal stand has been installed under basin.
6. Assemble the stand according to instructions enclosed. Hand tighten with the set screws to ensure legs are stable.
7. Place assembled metal sink stand under sink, sliding top of legs under the flat surface on the bottom of basin and horizontal
supports into flanges on wall.
8. Make final adjustments on stand to ensure all surfaces are flush. Tighten all set screws.
9. On the tops of the metal sink stand apply a thin coat of silicone where the basin will rest.
10.Tighten basin to wall. If vanity has a backplash, add silicone to the edge and facing sides.
11.Connect all supply tubes to the faucet. Connect trap and drain assembly as described by the manufacturer. Legs can be
adjusted using set screws at bottom of leg.
Parts Included
• 4-Way Ball Joint • Sets Screws for Flanges • Console Sink Top • Legs • Mounting Hardware Kit
2 people are needed to
install the console. The
console top weighs
approximately 70 pounds.
Be sure to re-inforce wall before
installation. We recommend a 2”x12”
securely fastened to wall studs at the
required height for your installation.
Mounting hardware