
Installation Instructions

Versailles
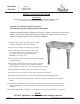
Console
INSTALLATION INSTRUCTIONS
P 847•244•1234 www.barclayproducts.com
12/4/07
Tools Needed
• Screwdriver • Drill & Bits • 2 Lag Screws or Large Molly Bolts (NOT Included) •
• Level • One Tube White or Clear Silicone • Wrench • Pencil •
NOTE:
DO NOT tighten too much or you may damage console.
3 people are needed to install the console
The console top weighs approximately 120 pounds
Mounting hardware must be adequate for the type of wall. If lag screws are used, first
install a wooden horizontal mounting board between the studs in the wall. This will
serve as a supporting base for the mounting hardware.
1. Place the large console top upside down on a piece
of packing cardboard, to prevent scratching.
2. Place a bead of silicone around the top of each leg.
3. Place each leg into the sockets in the front of the
console top. Make sure the legs are firmly set into
each socket. It is best to let the silicone dry for
24 hours to let the legs “set”.
4. After 24 hours, stand the console assembly up and support
it against the wall.
5. Two people should hold the console top in place. The other
person should use a level on the back and side edges to
help position the top, both side to side, and front to back correctly.
6. Use the pencil to mark the mounting hole positions on the wall.
7. Remove the console top and set aside. Drill the pilot holes into the wall.
8. Install lag screws, molly bolts or other mounting hardware in the wall as appropriate.
9. Place the console top with legs against the wall and install using the hardware selected, then
tighten.
10. Two people should slightly lift up the front of the console and legs. The second person should
apply a small amount of silicone to the bottom of each leg to prevent the legs from moving after
installation.
11. Completely tighten the 2 connections of the console to the wall, being careful not to over tighten.
Cat. No.
PGVCS (36”)
PGVCL (42”)