
User's Guide


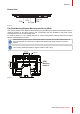


Table Of Contents

R5911667 /03 AMM215WTTP10
2.1 Workspace
To prepare a suitable workspace
Before you carefully unpack your monitor, prepare a suitable workspace
You need:
• a stable and level surface
• a grounded power outlet
• an area which is relatively free of glare from sunlight or other sources of bright light
The monitor is cooled by natural convection (it has no fan). For optimum performance, do not block the cooling
vents.
2.2 Unpacking
To unpack the monitor
• Inspect the monitor and other package contents for shipping damage that could cause a fire or shock
hazard.
• Immediately report any shipping damage to the carrier or transportation company and contact customer
service in case of return.
2.3 Start Your Installation
To Start Installation
Please follow these instructions to hook up the cables to associated connectors:
1. Lay the LCD flat on an even surface.
2. Move the stand into position as seen in the step 1 diagram.
3. Remove the cable cover as seen in the step 2 diagram.
4. Connect the cables to the appropriate connectors as seen in the step 3 diagram.
5. Re-attach the cable cover. Take the screw (CBM M3x6) out of the accessory box, and insert the screw into
the cable cover and monitor as seen in the step 4 diagram.
Installation