Coronis Fusion 6MP User Guide Supported displays: MDCC-6230
(This page intentionally left blank.
Welcome! Thank you for choosing this CORONIS FUSION 6MP display! Coronis Fusion is an ingenious PACS display system designed to further enhance flexibility and productivity in diagnostic imaging. Featuring the industry’s first 30-inch color LCD that can be used as two seamless heads or one wide-screen display, Coronis Fusion offers you the freedom to organize your workspace just the way you want it.
(This page intentionally left blank.
Table of contents Welcome!.........................................................................3 What's in the box.............................................................6 Parts, controls and connectors ........................................7 Front view ............................................................................................... 7 Rear view ................................................................................................ 8 Display installation ..................
Power lock function.............................................................................. 28 Keys sound ............................................................................................ 29 Ethernet over USB................................................................................. 29 DDC HID Device..................................................................................... 30 DPMS mode..........................................................................................
Explanation of symbols ........................................................................ 62 Legal disclaimer .................................................................................... 63 Technical specifications ........................................................................ 65 Open source license information ........................................................
What's in the box Your CORONIS FUSION 6MP display comes with: • this CORONIS FUSION 6MP display guide • a system CD • two DVI cables • two DisplayPort cables • a USB cable • a set of AC power cords • an external power supply If you ordered a Barco display controller, it’s also in the box together with its accessories. A dedicated user guide is available on the system CD. Keep your original packaging. It is designed for this display and is the ideal protection during transport.
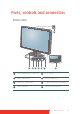
Parts, controls and connectors Front view 8 1 2 3 4 5 6 7 1 USB downstream connectors 2 Left/Up key 3 Right/Down key 4 Menu/Enter key 5 Stand-by/Cancel key 6 Power status indicator light 7 Control wheel 8 Ambient light sensor Coronis Fusion 6MP 9
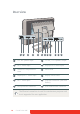
Rear view 1 2 3 4 5 6 7 8 9 10 11 12 1 +24 VDC power input 2 +5 VDC, 0.5 A power output 3 DVI 2 video input 4 DisplayPort 2 video input 5 Connector compartment cover 6 Neck cover 7 DisplayPort 1 video input 8 Display stand cover 9 DVI 1 video input 10 Ethernet connector (see note below) 11 USB upstream connector 12 USB downstream connector The Ethernet connection is used for maintenance purposes and is not supported for user application.
Display installation Prior to installing your CORONIS FUSION 6MP display and connecting all necessary cables, make sure to have a suitable display controller physically installed in your computer. If you are using a Barco display controller, please consult the dedicated user guide available on the system CD. Removing the covers CONNECTOR COMPARTMENT COVER The connector compartment cover should be removed to get access to the connectors.
DISPLAY STAND COVER To get access to the cable routing channel, the display stand cover should be removed. This can be done as follows: 1 Gently press and hold the clips at the inside top of the cover. 2 Slide the cover upwards while holding the clips pressed.
Unlocking the height mechanism In the factory, the height-positioning system in the display stand is locked with a red hook to prevent damage during transportation. You’ll have to remove this hook before adjusting your display height position. 1 While holding the display panel pushed down, pull out the red hook in the display stand. To retain the hook for possible future transportation, insert the short, red end of the hook back into the stand of your display.
Adjusting the display position Now that the height-positioning system of your display is unlocked, you can tilt, swivel, raise and lower the display as desired. Do not try to pivot your display when attached to the stand. Trying to do so could cause serious damage to your display and its stand.
Connecting the signal cables 1 Connect one head of the display controller to the DVI 1 or DisplayPort 1 connector with one of the supplied DVI or DisplayPort cables. 2 Connect another head of the display controller to the DVI 2 or DisplayPort 2 connector with one of the supplied DVI or DisplayPort cables. Each side of your display can have a different video input connected (one side can have DVI connected while the other side has DisplayPort connected).
Connecting the power cables 1 Connect the supplied external DC power supply to the +24 VDC power input of your CORONIS FUSION 6MP display. 2 Plug the other end of the external DC power supply into a grounded power outlet by means of the proper power cord delivered in the packaging. Routing the cables Route all connected cables through the cable routing channel in the stand of your display.
Re-attaching the covers 1 Re-attach the display stand cover by sliding it downward. You’ll hear a “click” sound of the cover’s clips when the display stand cover is in position. Pay attention that all cables stay in the cable channel while replacing the cover. 2 Re-attach the connector compartment cover by sliding the cover’s top in position and then push the cover’s bottom. You’ll hear a “click” sound of the cover’s clips when the connector compartment cover is in position.
1 Gently pull open both lower sides of the cover. 2 Slide the cover upwards while holding the lower sides pulled open. 3 Lift the plastic frame that covers the fixation of the panel to the stand. Turn it for 45 degrees to uncover the fixation screws.
4 Unscrew the four fixation screws fixing the panel to the stand. 5 Attach the panel firmly to the arm using 4 screws M4 x 10 mm. You should mount the panel in landscape position. Portrait position is possible but not supported. Use an arm that can support a weight of at least 20 kg (44.09 lbs). Failure to do so could make the panel fall, causing serious injury to a child or adult, and serious damage to the equipment.
First time starting up You are now ready to start up your BARCO CORONIS Display System for the first time. 1 Switch on your CORONIS FUSION 6MP display as described in “Standby switching” on page 24. 2 Turn on the computer connected to your display. If you have properly installed your display and display controller, the Windows start-up messages will appear once the boot procedure is finished.
Daily operation Recommendations for daily operation OPTIMIZE THE LIFETIME OF YOUR DISPLAY Enabling the Display Power Management System (DPMS) of your display will optimize its diagnostic lifetime by automatically switching off the backlight when the display is not used for a specified period of time. By default, DPMS is enabled on your display, but it also needs to be activated on your workstation. To do this, go to “Power Options Properties” in the “Control Panel”.
performance of the product. To ensure optimal product quality, Barco applies strict selection criteria for its LCD panels. To learn more about LCD technology and missing pixels, consult the dedicated white papers available at www.barco.com/ medical. ENHANCE USER COMFORT Every Barco multi-head display system is color matched with the highest specification in the market. Barco recommends keeping color-matched displays together.
Key indicator lights By default, the key indicator lights will be dimmed which makes them unavailable at that moment. TO MAKE THE KEYS LIGHT UP: 1 Gently sweep your finger over the bottom right hand side of your display. As a result, the keys will light up and are now available for further actions. However, if no further actions are taken within the following 5 seconds, the key indicator lights will dim again. The key indicator lights auto-dim function can be disabled in the OSD menu.
Stand-by switching The connected power supply also provides a switch that can be used to turn the power completely off. To use the display, please make sure to switch on this power supply. This can be done by pushing the on/off switch on the power supply into the "|" position. Switching on the display while it is in stand-by mode or vice versa can both be done by using the keys or by using the control wheel.
TO SWITCH YOUR DISPLAY ON USING THE CONTROL WHEEL: 1 Press the control wheel for approximately 2 seconds. TO SWITCH YOUR DISPLAY TO STAND-BY USING THE CONTROL WHEEL: 1 Press the control wheel once, a small window pops-up. Press the control wheel again to confirm. As a result, the display will switch on or will switch to stand-by mode. When the display is switched on, the power status indicator light is dimmed. When the display is in stand-by mode, the power status indicator light is orange.
TO BRING UP THE OSD MENU USING CONTROL WHEEL: 1 If not already done so, switch on the display as previously described. 2 Shortly turn the control wheel. As a result, the OSD main menu comes up in the bottom right corner of the screen. If no further actions are taken within the following 90 seconds however, the OSD menu will disappear again. The OSD menu automatic close function can be disabled in the OSD menu.
• Use the Stand-by/Cancel (sub)menu. key to cancel adjustments or exit a • Exit the OSD menu by touching the Stand-by/Cancel approximately 2 seconds. key for TO NAVIGATE THE OSD MENU USING THE CONTROL WHEEL: • Rotate the control wheel to move through the menus, change values or make selections. • To go into a submenu or confirm adjustments and selections, shortly click the control wheel. • Click the control wheel for approximately 2 seconds to cancel adjustments or exit a (sub)menu.
Advanced operation OSD menu position ABOUT THE OSD MENU POSITION By default, the OSD menu comes up in the bottom right corner of the screen. This position can be modified however. There’s choice from a number of predefined positions. TO CHANGE THE POSITION OF THE OSD MENU: 1 Bring up the OSD main menu. 2 Navigate to the Configuration > User Interface > Menu menu. 3 Enter the Position submenu. 4 Select one of the available OSD menu positions and confirm.
OSD menu automatic close function ABOUT THE OSD MENU AUTOMATIC CLOSE FUNCTION By default, the OSD menu will disappear automatically after approximately 90 seconds of inactivity. However, this function can be disabled so that the OSD menu remains on the screen until manually closed. TO ENABLE/DISABLE THE OSD MENU AUTOMATIC CLOSE FUNCTION: 1 Bring up the OSD main menu. 2 Navigate to the Configuration > User Interface > Menu menu. 3 Enter the Automatic Close submenu.
Key indicator lights ABOUT THE KEY INDICATOR LIGHTS By default, after lighting up, the key indicator lights will dim again if no further actions are taken within the following 5 seconds. However, this behavior can be changed so that the key indicator lights are always on or always off. TO CONFIGURE THE KEY INDICATOR LIGHTS: 1 Bring up the OSD main menu. 2 Navigate to the Configuration > User Interface > Indicator Lights menu. 3 Enter the Keys submenu.
Keys sound ABOUT THE KEYS SOUND By default, the keys will make a “beep” sound on every touch. However, this sound can be disabled so that no sound will be heard when using the keys. TO ENABLE/DISABLE THE KEYS SOUND: 1 Bring up the OSD main menu. 2 Navigate to the Configuration > User Interface > Controls menu. 3 Enter the Sound submenu. 4 Select Enabled/Disabled as desired and confirm. Ethernet over USB ABOUT ETH. OVER USB By default, the Ethernet over USB will be disabled.
TO ENABLE/DISABLE THE ETH. OVER USB: 1 Bring up the OSD main menu. 2 Navigate to the Configuration > Connectivity menu. 3 Enter the Eth. over USB submenu. 4 Select Enabled/Disabled as desired and confirm. DDC HID Device ABOUT DDC HID DEVICE By default, the DDC HID Device will be enabled. This will allow the internal CORONIS FUSION 6MP display processor to communicate directly over USB with the connected PC.
DPMS mode ABOUT DPMS MODE Enabling the Display Power Management System (DPMS) mode on your display will optimize its diagnostic lifetime by automatically switching off the backlight when the display is not used for a specified period of time. By default, DPMS mode is enabled on your display, but it also needs to be activated on your workstation. To do this, go to the “Power options properties” window of your workstation. Barco recommends setting DPMS activation after 20 minutes of non-usage.
Hibernate ABOUT HIBERNATE Enabling hibernation will not only switch off the backlight but will also force the display to disable other functionalities so that power consumption is further reduced to a minimum. This happens after a specific period of time which can be manually adjusted. Hibernate can only be enabled on your display when the DPMS mode is enabled first. Therefore, please refer to “DPMS mode” on page 33 to do this. TO ENABLE/DISABLE HIBERNATION ON YOUR DISPLAY: 1 Bring up the OSD main menu.
Luminance target ABOUT THE LUMINANCE TARGET The luminance target of your CORONIS FUSION 6MP display is adjustable over a predefined range. When you change the luminance target, the display will adjust its backlight to reach the target. TO SET THE LUMINANCE TARGET: 1 Bring up the OSD main menu. 2 Navigate to the Configuration > Calibration menu. 3 Enter the Luminance Target submenu. 4 Set a luminance target value as desired and confirm.
TO SELECT A COLOR PRESET: 1 Bring up the OSD main menu. 2 Navigate to the Configuration > Calibration > Color Definition menu. 3 Enter the Color Presets submenu. 4 Select one of the available Color Presets and confirm. Color temperature ABOUT COLOR TEMPERATURE: It is possible to change the color temperature of your display. Color temperature can only be changed on your display when color presets is set to user. Therefore, please refer to “DPMS mode” on page 33 to do this.
Color coordinates ABOUT COLOR COORDINATES: It is possible to change the color coordinates of your display. Color coordinates can only be changed on your display when color presets is set to user. Therefore, please refer to “DPMS mode” on page 33 to do this. TO CHANGE THE COLOR COORDINATES: 1 Bring up the OSD main menu. 2 Navigate to the Configuration > Calibration > Color Settings menu. 3 Enter the Color Definition submenu. 4 Select Color Coordinates and confirm. 5 Enter the X and/or Y submenu.
Viewing modes ABOUT VIEWING MODES The CORONIS FUSION 6MP display can be used in two viewing modes: Diagnostic This mode provides the full calibrated luminance and is intended for using the display for diagnostic purposes. Text In this mode, the luminance is reduced to approximately half of the luminance. This is intended for using the display with office applications such as word processing.
Display functions ABOUT DISPLAY FUNCTIONS Native, uncorrected panels will display all grayscale/color levels at an equal luminance. Studies have shown however, that in medical images certain grayscale/color parts contain more diagnostic information then others. To respond to these conclusions, display functions have been defined. These functions emphasize on these parts containing crucial diagnostic information by correcting the native panel behavior.
TO SELECT A DISPLAY FUNCTION: 1 Bring up the OSD main menu. 2 Navigate to the Configuration > Calibration menu. 3 Enter the Display Function submenu. 4 Select one of the available display functions and confirm. Ambient Light Compensation (ALC) ABOUT ALC Ambient Light Compensation (ALC) can only be enabled on your display when the DICOM display function is selected. Therefore, please refer to “Display functions” on page 39 to correctly set the display function.
Reading rooms ABOUT READING ROOMS Reading rooms can only be selected when the DICOM display function is selected. Therefore, please refer to “Display functions” on page 39 to correctly set the display function. The American Association of Physicists in Medicine (AAPM) composed a list of pre-defined reading rooms.
Emergency Room Corresponds to light conditions in emergency rooms. Operating Room Corresponds to light conditions in operating rooms. This setting has the highest maximum ambient light. TO SELECT A READING ROOM: 1 Bring up the OSD main menu. 2 Navigate to the Configuration > Calibration > Ambient Light menu. 3 Enter the Reading Room submenu. 4 Select one of the available reading rooms and confirm.
Image scaling ABOUT IMAGE SCALING Enabling image scaling will multiply each individual pixel to one or more adjacent pixels so that the size of the displayed image will be a multiple of the original image source video input signal. Image scaling is only possible when the resolution of your display’s video input signal is less than or equal to half the maximum resolution of the display. TO ENABLE/DISABLE IMAGE SCALING: 1 Bring up the OSD main menu. 2 Navigate to the Configuration > Image Sources menu.
adjust certain video settings yourself. The start to this is selecting one of the following image source selection modes available for your display: Automatic In this mode, your display automatically detects the connected video input signals, attaches them to the correct display side and applies the correct video settings to it (resolution, video encoding mode, refresh rate,...). No video settings are available when this mode is selected.
Video input signals ABOUT VIDEO INPUT SIGNALS Your CORONIS FUSION 6MP display automatically detects the connected video input signals. Manually selecting image source video input signals is possible, but then your display’s image source selection mode should be set to allow this. Please refer to “Image source selection modes” on page 43 to do this.
Video encoding modes ABOUT VIDEO ENCODING MODES Your CORONIS FUSION 6MP display automatically detects the connected video input signals and applies the correct video encoding settings. Manually selecting a video encoding mode is possible, but then your display’s image source selection mode should be set to allow this. Please refer to “Image source selection modes” on page 43 to do this. Video encoding modes specify how the color and luminance information is encoded in the video signal.
Dual 10 Dual 10 is a Barco specific 10-bit video encoding mode which is usually used on grayscale displays and which allows full refresh rate. Automatic When selecting this option, your CORONIS FUSION 6MP display will automatically assign the correct video encoding settings to the connected video input signals. TO MANUALLY SELECT A VIDEO ENCODING MODE: 1 Bring up the OSD main menu. 2 Navigate to the Configuration > Image Sources > (Left/Right) Image Source menu. 3 Enter the Video Encoding submenu.
Use Green Channel This mode is intended for grayscale displays where gray is sent over the green channel. Use Blue Channel This mode is intended for grayscale displays where gray is sent over the blue channel. Use All Channels This mode is intended for grayscale displays where gray is sent over the red, green and blue channel. This done by means of a standard conversion mechanism where 30% red, 59% green and 11% blue are used to generate gray.
EDID timings ABOUT EDID TIMINGS Your CORONIS FUSION 6MP display will automatically adjust the connected video input signals and apply the correct timings based on the preferred EDID timings. To manually configure these EDID timings your display’s image source selection mode should be set to allow this. Please refer to “Image source selection modes” on page 43 to do this.
TO MANUALLY SET EDID TIMINGS: 1 Bring up the OSD main menu. 2 Navigate to the Configuration > Image Sources > (Left/Right) Image Source menu. 3 Enter the EDID Timings submenu. 4 Select Resolution, Refresh Rate, Preferred Orientation or Color Depth. 5 Select one of the available settings and confirm. Display info ABOUT DISPLAY INFO Your display serial number, color type, native resolution, firmware versions, etc. are available in a dedicated submenu of the OSD menu.
TO RETRIEVE THE STATUS OF YOUR DISPLAY: 1 Bring up the OSD main menu. 2 Navigate to the Status menu. 3 Enter the Display, Image Source, Calibration or Connectivity submenu as desired.
Cleaning your display Front glass Clean the front glass using a sponge, cleaning cloth or soft tissue, lightly moistened with one of the following tested products: • Flux • Pril • Windex Glass Plus • Ajax glass cleaner • Bohle glass cleaner • Sidolin glass cleaner • Mr. Proper • 25% ethanol solution (EtOH) In case none of the above cleaning products is available, use plain water. Take care not to damage or scratch the front glass.
Do not use following products: • Alcohol/solvents at higher concentration > 5% • Strong alkalis lye, strong solvents • Acid • Detergents with fluoride • Detergents with ammonia • Detergents with abrasives • Steel wool • Sponge with abrasives • Steel blades • Cloth with steel thread Cabinet 1 Clean the cabinet using a soft cotton cloth, lightly moistened with a recognized cleaning product for medical equipment.
Repackaging instructions 8 7 6 5 4 3 2 1 54 Coronis Fusion 6MP
1 Box 2 System CD + User guide 3 Bottom buffer 4 Power supply 5 CORONIS FUSION 6MP display 6 Top buffer 7 Display controller box 8 Cables (video, USB, power) 1 Place the empty box on a stable surface. 2 Slide the system CD and user guide in the dedicated bag attached at the inside of the box. 3 Place the bottom buffer in the box. 4 Put the power supply in the dedicated cavity of the bottom buffer.
Important information Safety information GENERAL RECOMMENDATIONS Read the safety and operating instructions before operating the equipment. Retain safety and operating instructions for future reference. Adhere to all warnings on the equipment and in the operating instructions manual. Follow all instructions for operation and use.
POWER CONNECTION - EQUIPMENT WITH EXTERNAL 24 VDC POWER SUPPLY • Power requirements: The equipment must be powered using the delivered medical approved 24 VDC SELV power supply. • The medical approved DC power supply must be powered by the AC mains voltage (protective earth terminal). POWER CORDS: • Utilize a UL-listed detachable power cord, 3-wire, type SJ or equivalent, 18 AWG min., rated 300 V min.
the equipment may fall, causing serious injury to a child or adult, and serious damage to the equipment. THIS APPARATUS CONFORMS TO: CE0120 (MDD 93/42/EEC class IIb product), Directive 2004/108/EC, IEC 60950-1:2005 2ND EDITION, DEMKO - EN 60601-1:2006, VCCI, FCC class B, FDA 510(K), RoHS, KCC, IEC 60601-1:2005 3RD EDITION, ANSI/AAMI ES 60601-1:2005, CAN/CSA-C22.2 No. 60601-1 (2008), CCC - GB9254-2008 + GB4943.1-2011 + GB17625.1-2003, ICES-001 Level B. NATIONAL SCANDINAVIAN DEVIATIONS FOR CL. 1.7.
Environmental information DISPOSAL INFORMATION (WASTE ELECTRICAL AND ELECTRONIC EQUIPMENT) This symbol on the product indicates that, under European Directive 2002/96/EC governing waste from electrical and electronic equipment, this product must not be disposed of with other municipal waste. Please dispose of your waste equipment by handing it over to a designated collection point for the recycling of waste electrical and electronic equipment.
中国大陆 ROHS (CHINESE MAINLAND ROHS) 根据中国大陆 《电子信息产品污染控制管理办法》(也称为中国大 陆 RoHS),以下部分列出了 Barco 产品中可能包含的有毒和 / 或有 害物质的名称和含量。中国大陆 RoHS 指令包含在中国信息产业部 MCV 标准:“ 电子信息产品中有毒物质的限量要求 ” 中。 According to the "China Administration on Control of Pollution Caused by Electronic Information Products" (Also called RoHS of Chinese Mainland), the table below lists the names and contents of toxic and/or hazardous substances that Barco's product may contain.
电源供应器 Power supply unit 文件说明书 Paper manuals 光盘说明书 CD manual X O O O O O O O O O O O O O O O O O O: 表示该有毒有害物质在该部件所有均质材料中的含量均在 SJ/T 11363-2006 标准规定的限 量要求以下 . O: Indicates that this toxic or hazardous substance contained in all of the homogeneous materials for this part is below the limit requirement in SJ/T11363-2006. X: 表示该有毒有害物质至少在该部件的某一均质材料中的含量超出 SJ/T 11363-2006 标准规 定的限量要求 .
Regulatory compliance information INDICATIONS FOR USE: CORONIS FUSION 6MP The Coronis Fusion 6MP DL (MDCC-6230) display is a display device capable of displaying two 3MP display images electronically fused together on the one panel. It is intended to be used in displaying and viewing digital images for review and analysis by trained medical practitioners. It provides a screen resolution of 3280 x 2048 pixels at a pixel pitch of 0.1995mm. This provides the equivalent resolution of 2 x 3MP displays.
• Connect the equipment into an outlet on a circuit different from that to which the receiver is connected. • Consult the dealer or an experienced radio/TV technician for help. CANADIAN NOTICE This ISM device complies with Canadian ICES-001. Cet appareil ISM est conforme à la norme NMB-001 du Canada. EMC NOTICE This device complies with appropriate medical EMC standards on emissions to, and interference from surrounding equipment.
Explanation of symbols On the display or power supply, you may find the following symbols (nonrestrictive list): 0120 Indicates compliance to the essential requirements of the Directive 93/42/EEC Indicates compliance with Part 15 of the FCC rules (Class A or Class B) Indicates the display is approved according to the UL regulations or or Indicates the display is approved according to the c-UL regulations Indicates the display is approved according to the DEMKO regulations S&E Indicates the display is
Consult the operating instructions Indicates this apparatus must not be thrown in the trash but must be recycled, according to the European WEEE (Waste Electrical and Electronic Equipment) directive Legal disclaimer DISCLAIMER NOTICE Although every attempt has been made to achieve technical accuracy in this document, we assume no responsibility for errors that may be found. Our goal is to provide you with the most accurate and usable documentation possible; if you discover errors, please let us know.
photocopying, taping or information storage and retrieval systems without written permission of Barco. © 2012 Barco N.V. All rights reserved. PATENT INFORMATION This product is covered under the following intellectual property rights: US Patent RE43,707 US Patent 7,038,186 US Patent 7,166,829 US Patent 6,950,098 European Patent 1 274 066.
Technical specifications CORONIS FUSION 6MP Product acronym MDCC-6230 Screen technology TFT AM Color LCD Dual Domain IPS-Pro Active screen size 772 mm (30.4") (diagonal) Active screen size (H x V) 654 x 409 mm (25.8 x 16.1") Aspect ratio (H:V) 16:10 Resolution native 6MP (3280 x 2048) configurable to 2 x 3MP+ (1640 X 2048) configurable to 2 x 3MP (1536 X 2048) Pixel pitch 0.
Response time (Tr + Tf) 18 ms Scanning frequency (H; V) 30-150 kHz; 15-80 Hz Housing color Black/Silver Video input signals DVI-D Dual Link (2x), DisplayPort (2x) Video inout terminals NA USB ports 1 upstream (endpoint), 3 downstream USB standard 2.
Height adjustment range 96 mm Tilt -5° / +25° Swivel -45° / +45° Pivot NA Mounting standard VESA (100 mm) Screen protection Protective, non-reflective glass cover Recommended modalities CT, MR, US, DR, CR, NM, Film Certifications CE0120 (MDD 93/42/EEC class IIb product), Directive 2004/108/EC, IEC 60950-1:2005 2ND EDITION, DEMKO - EN 60601-1:2006, VCCI, FCC class B, FDA 510(K), RoHS, KCC, IEC 60601-1:2005 3RD EDITION, ANSI/AAMI ES 60601-1:2005, CAN/CSA-C22.2 No.
Open source license information This product contains software components released under an Open Source license. A copy of the source code is available on request by contacting your MID customer support representative at image.careGLOB@barco.com. The licenses are only provided in English because translations do not legally state the distribution terms for software that uses these licenses - only the original English text does that. However, translations in your local language are available at www.gnu.org.
exchange for a fee. 2. You may modify your copy or copies of the Program or any portion of it, thus forming a work based on the Program, and copy and distribute such modifications or work under the terms of Section 1 above, provided that you also meet all of these conditions: a) You must cause the modified files to carry prominent notices stating that you changed the files and the date of any change.
satisfy simultaneously your obligations under this License and any other pertinent obligations, then as a consequence you may not distribute the Program at all. For example, if a patent license would not permit royalty-free redistribution of the Program by all those who receive copies directly or indirectly through you, then the only way you could satisfy both it and this License would be to refrain entirely from distribution of the Program.
programs, and that you know you can do these things. To protect your rights, we need to prevent others from denying you these rights or asking you to surrender the rights. Therefore, you have certain responsibilities if you distribute copies of the software, or if you modify it: responsibilities to respect the freedom of others. For example, if you distribute copies of such a program, whether gratis or for a fee, you must pass on to the recipients the same freedoms that you received.
However, it does not include the work's System Libraries, or general-purpose tools or generally available free programs which are used unmodified in performing those activities but which are not part of the work.
b) Convey the object code in, or embodied in, a physical product (including a physical distribution medium), accompanied by a written offer, valid for at least three years and valid for as long as you offer spare parts or customer support for that product model, to give anyone who possesses the object code either (1) a copy of the Corresponding Source for all the software in the product that is covered by this License, on a durable physical medium customarily used for software interchange, for a price no mo
be marked in reasonable ways as different from the original version; or d) Limiting the use for publicity purposes of names of licensors or authors of the material; or e) Declining to grant rights under trademark law for use of some trade names, trademarks, or service marks; or f) Requiring indemnification of licensors and authors of that material by anyone who conveys the material (or modified versions of it) with contractual assumptions of liability to the recipient, for any liability that these contractu
In the following three paragraphs, a "patent license" is any express agreement or commitment, however denominated, not to enforce a patent (such as an express permission to practice a patent or covenant not to sue for patent infringement). To "grant" such a patent license to a party means to make such an agreement or commitment not to enforce a patent against the party.
IN NO EVENT UNLESS REQUIRED BY APPLICABLE LAW OR AGREED TO IN WRITING WILL ANY COPYRIGHT HOLDER, OR ANY OTHER PARTY WHO MODIFIES AND/OR CONVEYS THE PROGRAM AS PERMITTED ABOVE, BE LIABLE TO YOU FOR DAMAGES, INCLUDING ANY GENERAL, SPECIAL, INCIDENTAL OR CONSEQUENTIAL DAMAGES ARISING OUT OF THE USE OR INABILITY TO USE THE PROGRAM (INCLUDING BUT NOT LIMITED TO LOSS OF DATA OR DATA BEING RENDERED INACCURATE OR LOSSES SUSTAINED BY YOU OR THIRD PARTIES OR A FAILURE OF THE PROGRAM TO OPERATE WITH ANY OTHER PROGRAMS
that it becomes a de-facto standard. To achieve this, non-free programs must be allowed to use the library. A more frequent case is that a free library does the same job as widely used non-free libraries. In this case, there is little to gain by limiting the free library to free software only, so we use the Lesser General Public License. In other cases, permission to use a particular library in non-free programs enables a greater number of people to use a large body of free software.
In addition, mere aggregation of another work not based on the Library with the Library (or with a work based on the Library) on a volume of a storage or distribution medium does not bring the other work under the scope of this License. 3. You may opt to apply the terms of the ordinary GNU General Public License instead of this License to a given copy of the Library.
needed for reproducing the executable from it. However, as a special exception, the materials to be distributed need not include anything that is normally distributed (in either source or binary form) with the major components (compiler, kernel, and so on) of the operating system on which the executable runs, unless that component itself accompanies the executable.
15. BECAUSE THE LIBRARY IS LICENSED FREE OF CHARGE, THERE IS NO WARRANTY FOR THE LIBRARY, TO THE EXTENT PERMITTED BY APPLICABLE LAW. EXCEPT WHEN OTHERWISE STATED IN WRITING THE COPYRIGHT HOLDERS AND/OR OTHER PARTIES PROVIDE THE LIBRARY "AS IS" WITHOUT WARRANTY OF ANY KIND, EITHER EXPRESSED OR IMPLIED, INCLUDING, BUT NOT LIMITED TO, THE IMPLIED WARRANTIES OF MERCHANTABILITY AND FITNESS FOR A PARTICULAR PURPOSE. THE ENTIRE RISK AS TO THE QUALITY AND PERFORMANCE OF THE LIBRARY IS WITH YOU.
a) Give prominent notice with each copy of the Combined Work that the Library is used in it and that the Library and its use are covered by this License. b) Accompany the Combined Work with a copy of the GNU GPL and this license document. c) For a Combined Work that displays copyright notices during execution, include the copyright notice for the Library among these notices, as well as a reference directing the user to the copies of the GNU GPL and this license document.
K5902055-00 December 2012 0120 Barco n.v. President Kennedypark 35 8500 Kortrijk Belgium www.barco.