
User guide

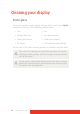
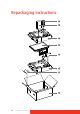


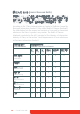
Table Of Contents
- Welcome!
- Table of contents
- What's in the box
- Parts, controls and connectors
- Display installation
- Daily operation
- Advanced operation
- OSD menu position
- OSD menu language
- OSD menu automatic close function
- Power status indicator light
- Key indicator lights
- Power lock function
- Keys sound
- Ethernet over USB
- DDC HID Device
- DPMS mode
- Hibernate
- Luminance target
- Color presets
- Color temperature
- Color coordinates
- Viewing modes
- Display functions
- Ambient Light Compensation (ALC)
- Reading rooms
- Continuous ALC
- Image scaling
- Image source selection modes
- Video input signals
- Video encoding modes
- Grayscale conversion modes
- EDID timings
- Display info
- Display status
- Cleaning your display
- Repackaging instructions
- Important information

Coronis Fusion 6MP 55
1 Place the empty box on a stable surface.
2 Slide the system CD and user guide in the dedicated bag attached
at the inside of the box.
3 Place the bottom buffer in the box.
4 Put the power supply in the dedicated cavity of the bottom buffer.
5 Put the C
ORONIS FUSION 6MP display in its original bag and place it in
the box with its panel facing upwards.
6 Put the top buffer on top of the display.
7 When applicable, slide the display controller box in the dedicated
cavity of the buffers.
8 Put all cables (video, USB, power) in their original bag and slide
them in the dedicated cavity of the buffers.
9 Close and seal the box.
Box System CD + User guide
Bottom buffer Power supply
C
ORONIS FUSION 6MP display Top buffer
Display controller box Cables (video, USB, power)
1
2
3
4
5
6
7
8