
Instruction manual


ImagePRO-II • User’s Guide 21
3. Hardware Installation
Installation
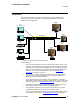
d. Connect the video source(s) to the analog or digital input connectors as
required.
7. Output Connections
e. To connect the ImagePRO-II to a digital projector or other digital display,
connect one of the following output connectors to the appropriate input of
the display device:
•DVI-D
• HDMI
• DisplayPort
•SDI-1
f. To connect the ImagePRO-II to an analog display, connect the
ImagePRO-II’s analog output to the analog input of the display device.
8. Genlock Connections
g. If you will be using synchronous video camera sources in your
production, use a BNC cable to connect a PAL or NTSC black burst or an
HD tri-level sync signal to the Genlock In connector.
h. If you are looping reference video to another unit in your system, connect
a BNC cable from the Genlock Loop connector to the next device’s
Genlock In connector.
i. If this ImagePRO-II unit is the last device in a reference video chain,
terminate the Genlock Loop with a 75 termination.
9. Power Connection — Connect an AC power cord to the AC Power Connector
on the rear of the ImagePRO-II chassis, and then to AC outlets. Connect AC
power cords (or AC adapters) to all peripheral equipment, such as Ethernet
switches and monitors. Please note:
~ Connect each unit only to a properly rated supply circuit.
~ Reliable grounding (earthing) of rack-mounted equipment should be
maintained.
10. Power On — Turn on power to all units.
11. Web Interface Connection
To configure your system for control from the ImagePRO-II’s Web Interface, refer
to Chapter 5, Web Remote Control Operations
, on page 129. Following are
prerequisites for remote web operations:
j. Ensure that your computer uses one of the following operating systems:
• Windows
®
XP, Windows Vista™, or Windows 7
•Mac OS
®
X
•Red Hat
®
Linux
®
k. Ensure that you have an HTML5-compatible web browser installed,
such as Google Chrome, Apple Safari
®
or another browser based on the
WebKit engine. Or download Google Chrome Frame to work with
Internet Explorer.
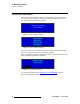
l. Turn on the ImagePRO-II’s DHCP setting:
• On the Setup Menu, select System > Ethernet.
•Select DHCP and turn it On.
m. Verify the IP address of the ImagePRO-II. (Refer to Chapter 4, the
section titled Setting Ethernet Options
on page 91.)