B410019/03 BarcoView Theodoor Sevenslaan 106 8500 Kortrijk, Belgium Phone: +32(0)56 23 32 44 Fax: +32(0)56 23 33 74 E-mail: sales.medical@barco.com http://www.barcoview.com BarcoView Inc 3059 Premiere Parkway Duluth, Georgia, 30097,USA Phone: +1 678 475 8000 Fax: +1 678 475 8100 E-mail: sales.medical@barco.com http://www.barcoview.com MFCD 1218 BarcoView LTD 16F-1, Cheng Loong Plaza 33, Min Sheng Road Section 1, Pan Chiao, Taipei Hsien, Taiwan, R.O.C.
SAFETY INSTRUCTIONS • Read the safety and operating instructions before operating the apparatus. • Retain safety and operating instructions for future reference. • Adhere to all warnings on the apparatus and in the operating instructions manual. • Follow all instructions for operation and use. •This apparatus conforms to: UL1950, cUL CAN/CSA C22.2 No. 950-95, CE • FCC notice This equipment has been tested and found to comply with the limits of a class B digital device, pursuant to Part 15 of the FCC rules.
CONTENTS 1. Overview ..................................................................................................... 1.1 Introduction .......................................................................................... 1.2 Package contents ................................................................................ 1.3 Controls and connectors ...................................................................... 5 5 6 6 2. Installation ......................................................
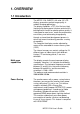
1. OVERVIEW 1.1 Introduction The MFCD 1218, BARCO’s full color 18” LCD display, guarantees perfect image quality in medical imaging applications. The display combines a TFT (thin film transistor) liquid crystal display panel structure and a built-in backlight with inverter for a better picture quality. It is designed to meet users' needs for performance, consistency, and outstanding image quality through a streamlined development process in which wall-mount functionality provides a variety of capability.
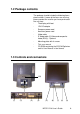
1.2 Package contents The package should include the following items, please check. If some of the items are missing, please contact the reseller you have purchased the unit from. - The display with foot - 12V DC adapter - European power cord - American power cord - Video cable - S-Video cable (S-Video and composite video (RCA)) - Optional - Mounting plate with 8 screws - This user manual - CD-ROM containing the DICOM Optimizer and its User Manual in html format 1.
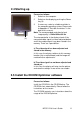
(1) 12V DC power input (2) Analog video input (3) DVI input (4) S-Video input (5) Menu key (6) <-> Key (7) <+> Key (8) Power LED The LED is off when the display is off. The LED is green when the display is on.
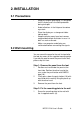
2. INSTALLATION 2.1 Precautions • Keep your original packaging. It is designed for this display and is the ideal protection during transport. • Avoid reflections in the flat panel to reduce eye strain. • Place the display on a strong and stable table or desk. • Keep the display away from heat sources and provide enough ventilation in case it is built in a rack or console. • Make sure computer and display are switched off before connecting the signals. 2.
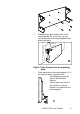
A 2 Slide back the locks at both sides of the mounting plate (B). In that way, you can secure the panel to the mounting plate after placing the panel. B Step 3: Place the panel on the mounting plate 1 Place the panel on the mounting plate (C). If you want to secure the panel to the mounting plate, place the panel in the frontmost notches. Please make sure that the four shafts are securely placed in the notches of the mounting plate.
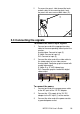
2 To secure the panel, slide forward the locks on both sides of the mounting plate. Lock the panel with one screw at both sides (D). D 2.3 Connecting the signals To connect the video & sync signals: 1 Connect one end of the appropriate video cable to the corresponding video input of the monitor. Analog video: Connect to input (2) S-Video: Connect to input (4) DVI: Connect to input (3) 2 Connect the other end of the video cable to the video output of your video source.
2.4 Starting up Proceed as follows: 1 Switch on the computer. 2 Switch on the display by pushing the Power key (9). 3 If necessary, select a suitable resolution in the computer operating system. Please refer to Appendix A, "Possible resolutions" in the back of this manual. Note: The recommended resolution for best image quality is 1280x1024 at 60 Hz.
3. ON-SCREEN DISPLAY (OSD) MENUS 3.1 How to use the OSD Proceed as follows: 1 Press the Menu key (5) on the front to display the OSD main menu. Note: It may be possible that the OSD menu does not appear. If this is the case, the front Controls are locked. To unlock them, please follow the procedure described in § 3.2 below. (5) (6) 2 Press the <+> key (7) or <-> key (6) to scroll to the desired menu item.
3.2 Description of the menu items Main menu Function Description Brightness To adjust the overall image and background brightness level. Contrast To adjust the image brightness in relation to the background (the background is unchanged). Auto Adjust * To automatically set the H Position, V Position and Clock. Horizontal Position* To move the screen horizontally left or right. Vertical Position* To move the screen vertically upward or downward.
**To unlock the Controls, proceed as follows: 1 Press the Power key to switch off the display 2 With one hand, press and hold the <+> and the <-> key at the same time. With the other hand, press the Power key shortly to switch the display on again. 3 Keep holding the <+> and the <-> key for about 3 seconds. 4 At last, release the <+> and the <-> key. Now, by pressing the Menu key, the OSD menu will appear. Video menu When you select a video input source, the Main menu changes into the Video Menu.
Color Menu Color Menu - (Down) + (Up) Auto Balance 68 Red 65 Green 70 Blue Main Menu A1 1024 x 768 - 60.1 > 48.4k Note: The color menu cannot function under SVideo input type. Function Description Auto Balance To automatically adjust the contrast level of RGB. This does not support resolution of Mac 832 x 624 at 75Hz. R To adjust the level of color Red. G To adjust the level of color Green. B To adjust the level of color Blue. Main Menu To return to Main Menu.
4. MAINTENANCE Panel Take care not to damage or scratch the panel. Clean with a soft woolen or cotton towel. Use a watery solution or a mild commercial glass cleaning solution. Cabinet Do not use chemical cleaning products, benzene, toluene, xylene or other solvents. Clean with a soft cloth dampened with mild detergent and water. Repeat this with water only and wipe dry with a dry cloth. 5. TROUBLESHOOTING Pixel Faults Permanently dark or bright pixels can happen to TFT displays.
APPENDIX A: POSSIBLE RESOLUTIONS There are 22 preset modes and 2 user modes. The following modes are preset as factory defaults. Resolution Pixel Horizontal Vertical Freq. (MHz) Freq. (kHz) Freq. (Hz) Standard Analog Digital 640 x 350 25.175 31.47 70 VGA V V 640 x 480 25.175 31.47 60 VGA/VESA V V 30.24 35.00 67 Mac V 31.50 37.90 72 VESA V 31.50 37.50 75 VESA V 36.00 43.30 83 VESA V 720 x 400 28.321 31.47 70 VGA V 800 x 600 36.00 35.10 56 VESA V 40.00 37.
APPENDIX B: TECHNICAL SPECIFICATIONS Picture panel 18.1-inch diagonal viewable screen TFT (thin film transistor) active matrix, color liquid crystal display, RGB interface Resolution SXGA 1280 x 1024 @ 85 Hz (native) Display area (H x V) 359 x 287 (mm) Viewing angle Vertical: 160º Horizontal: 160º Input signals Analog: Hor. 31.47 to 91.2 kHz Vert. 56 to 85 Hz Digital: Hor. 31.47 to 64 kHz Vert. 60 to 70 Hz TV-video: NTSC (3.58M), PAL (4.43M) Video: 0.7 Vpp Sync: TTL level Max. video input bandwidth 157.
Safety standards UL1950, cUL CAN/CSA C22.2 No. 950-95, CE Dimensions (W x H x D) 450 mm x 461.8 mm x 213.9 mm Net weight 7.7 kg Operating Temperature 10°C to 35°C Storage Temperature -10°C to 60°C NOTICE: DUE TO OUR POLICY OF CONTINUOUS PRODUCT IMPROVEMENT, THE ABOVE SPECIFICATIONS ARE SUBJECTED TO CHANGE WITHOUT NOTICE.