PHxx series Safety manual Sicherheitshandbuch Manual de seguridad Manuel de sécurité 安全マニュアル 安全手册 R5905598WW/01 28/01/2014
Barco nv Noordlaan 5, B-8520 Kuurne Phone: +32 56.36.82.11 Fax: +32 56.36.883.86 Support: www.barco.com/esupport Visit us at the web: www.barco.
1. Safety 1. SAFETY About this chapter Read this chapter attentively. It contains important information to prevent personal injury while installing and using a PHxx series projector. Furthermore, it includes several cautions to prevent damage to the PHxx series projector. Ensure that you understand and follow all safety guidelines, safety instructions and warnings mentioned in this chapter before installing your PHxx series projector.
1. Safety WARNING: To prevent electric shock, do not use this (polarized) plug with an extension cord; receptacle or other outlet unless the blades can be fully inserted to prevent blade exposure. CAUTION: Not for use in a computer room as defined in the Standard for the Protection of Electronic Computer/ Data Processing Equipment, ANSI/NFPA 75. 1.
1. Safety To prevent personal injury • Mercury Vapor Warnings: Keep the following warnings in mind when using the projector. The lamp used in the projector contains mercury. In case of a lamp rupture, explosion there will be a mercury vapor emission. In order to minimize the potential risk of inhaling mercury vapors: - Ensure the projector is installed only in ventilated rooms. - Replace the lamp module before the end of its operational life.
1. Safety To prevent the risk of electrical shock 4 • Never add any attachments and/or equipment without the approval of the manufacturer as such additions may result in the risk of fire, electric shock or other personal injury. • Use 100-240 V AC 50/60 Hz to prevent fire or electric shock. • The power cords for use in the U.S., Europe or China are included with this projector. Use the appropriate one for your country.
1. Safety To prevent projector damage • Unplug this projector from the wall outlet before cleaning it. Do not use liquid aerosol cleaners. Use a damp soft cloth for cleaning. • Do not use this projector near water or in contact with water. • Do not use the projector with condensation on it. It can lead to breakdown or other failure. • Never place the projector in direct sun light. Sun light on the lens can severely damage the Digital Mirror Devices TM in which case there is a loss of warranty.
1. Safety About batteries • Use of a battery of wrong type may cause explosion. • Only Carbon-Zinc or Alkaline-Manganese Dioxide type batteries should be used. • For disposal of used batteries, always consult federal, state, local and provincial hazardous waste disposal rules and regulations to ensure proper disposal. • Before you dispose of the batteries, insulate them by placing insulation tape on the positive (+) and negative (-) terminals.
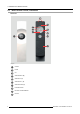
2. Batteries and Remote Control 2. BATTERIES AND REMOTE CONTROL 2.1 Installation of the batteries into the remote control Read carefully the battery safety instructions, see "Important safety instructions", page 2 Necessary parts Two size-AAA batteries (R03). How to insert 1. Slide and remove the rear lid of the remote control. 1 3 2 Image 2-1 Batteries insertion 2. Check the polarity (+), (-) of the batteries, and set them correctly, inserting their (-) side first.
2. Batteries and Remote Control 2.
2.
2.
3. Lamp replacement 3. LAMP REPLACEMENT 3.1 Lamp replacement warnings Warnings • Be careful not to drop the lamp fixing screws into the inside of the projector. Don’t put a metal piece or flammable object into the projector. Using the projector with any foreign object present inside may result in electric shock or fire. When you can’t remove the foreign object from the inside, contact your dealer for removal. • Do not touch the lamp with bare hands or give a shock to the lamp.
3. Lamp replacement Image 3-1 3.3 Lamp replacement CAUTION: Only authorized service personnel are allowed to remove the covers. How to replace 1. Unplug the power cord from the outlet or appliance inlet. 2. Loosen two screws (a) on the rear and two screws (b) on the side that are securing the side cover (c) using a Phillips screwdriver. (a) (c) (b) Image 3-2 3. Slide and remove the side cover towards the rear. Image 3-3 4.
3. Lamp replacement (e) (d) Image 3-4 5. Loosen two screws (f) that are securing the lamp box to be removed using a Phillips screwdriver. 2 1 (f) (f) Image 3-5 6. Pull the handle. 7. Pull out the lamp box by the handle while holding the projector. Image 3-6 - Pull the lamp box out of the projector slowly. When the lamp is broken, glass fragments may be scattering by quickly pulling out the lamp box.
3. Lamp replacement (e) (d) Image 3-9 Note: You cannot turn on the projector without attaching the lamp cover. 12.Insert the side cover (c) into the projector and tighten two screws (a) on the rear and two screws (b) on the side of the side cover using a Phillips screwdriver. (a) (c) (b) Image 3-10 3.4 Reset of the lamp operation time What can be done? You can reset the lamp operation time of the newly installed lamp using the menu. How to reset 1. Plug the power cord into the wall outlet. 2.
3. Lamp replacement Important • When the operation times of both lamps have exceeded 4000 hours3, you can operate the projector only for 3 minutes after turning on the power. During this time, carry out steps 15 to 20 to reset the lamp operation times. • The projector doesn’t turn on if the lamp cover isn’t attached securely. • Be sure to reset the lamp operation time whenever you replace the lamp. • Do not reset the lamp operation time unless you replace the lamp. • The lamp is fragile.
Barco nv Noordlaan 5, B-8520 Kuurne Fon: +32 56.36.82.11 Fax: +32 56.36.883.86 Support: www.barco.com/esupport Besuchen Sie uns im Internet:: www.barco.
1. Sicherheit 1. SICHERHEIT Über dieses Kapitel Lesen Sie dieses Kapitel aufmerksam. Es enthält wichtige Informationen zum Schutz vor Verletzungen während der Installation und Verwendung des PHxx series projector. Darüber hinaus enthält dieses Kapitel diverse Vorsichtshinweise zur Vermeidung von Beschädigungen des PHxx series projector.
1. Sicherheit WARNUNG: Um einen Stromschlag zu vermeiden, verwenden Sie diesen (gepolten) Stecker nur dann in Verbindung mit einem Verlängerungskabel, einer Steckdose oder sonstigen Anschluss, wenn die Stifte vollständig eingesteckt werden können und nicht freiliegen. ACHTUNG: Nicht zur Verwendung in einem Computerraum gemäß Definition im Standard für den Schutz elektronischer Computer-/Datenverarbeitungsausrüstung, ANSI/NFPA 75. 1.
1. Sicherheit So verhindern Sie Verletzungen • Warnungen zu Quecksilberdampf: Beachten Sie bei Nutzung des Projektors folgende Warnungen. Die in diesem Projektor verwendete Lampe enthält Quecksilber. Im Falle eines Lampenbruchs tritt Quecksilberdampf aus. Beachten Sie Folgendes, um das mögliche Risiko beim Einatmen von Quecksilberdampf zu minimieren: - Stellen Sie sicher, dass der Projektor nur in belüfteten Räumen installiert wird.
1. Sicherheit So verhindern Sie die Brandgefahr • Halten Sie brennbare oder leicht entzündbare Materialien vom Projektor fern! • Vermeiden Sie direkte Sonneneinstrahlung in das Projektorobjektiv. Es besteht Brandgefahr. • Aussparungen und Öffnungen im Gehäuse dienen der Lüftung, um den sicheren Projektorbetrieb zu gewährleisten und ihn vor Überhitzung zu schützen.
1. Sicherheit So verhindern Sie das Risiko eines Stromschlags • Fügen Sie niemals ohne Genehmigung des Herstellers Erweiterungen und/oder Geräte hinzu, da bei solchen Ergänzungen Brand-, Stromschlag- oder sonstige Verletzungsgefahr bestehen kann. • Verwenden Sie 100-240 V AC 50/60 Hz, um Brand- oder Stromschlaggefahr zu vermeiden. • Im Lieferumfang dieses Projektors sind Netzkabel zur Verwendung in den USA, Europa oder China enthalten. Verwenden Sie das passende Kabel für Ihr Land.
1. Sicherheit So verhindern Sie Beschädigungen des Projektors • Trennen Sie diesen Projektor vor der Reinigung von der Wandsteckdose. Verwenden Sie keine flüssigen oder Sprühdosenreinigungsmittel. Verwenden Sie ein feuchtes weiches Tuch zur Reinigung. • Setzen Sie diesen Projektor nicht in der Nähe von Wasser oder im Kontakt mit Wasser ein. • Verwenden Sie diesen Projektor nicht, wenn sich Kondensat darauf gebildet hat. Dies kann zum Betriebsausfall oder sonstigen Störungen führen.
1. Sicherheit Informationen zu Batterien • Die Verwendung des falschen Batterietyps kann zur Explosion führen. • Nur Zink-Kohle- oder Alkali-Mangan-Batterien sollten verwendet werden. • Beachten Sie bei der Entsorgung gebrauchter Batterien stets die entsprechenden gesetzlichen Vorschriften, um eine ordnungsgemäße Entsorgung zu gewährleisten. • Isolieren Sie die Batterien vor der Entsorgung, indem Sie Isolierband auf den Plus (+)- und Minus (-)-Pol kleben.
1.
2. Batterien und Fernbedienung 2. BATTERIEN UND FERNBEDIENUNG 2.1 Installation der Batterien in der Fernbedienung Lesen Sie sorgfältig die Batteriesicherheitsanweisungen, siehe "Wichtige Sicherheitsanweisungen", Seite 2 Erforderliche Teile Zwei Batterien der Größe AAA (R03). So legen Sie die Batterien ein 1. Schieben Sie den hinteren Deckel der Fernbedienung ab und entfernen Sie ihn. 1 3 2 Abbildung 2-1 Einlegen der Batterien 2.
2. Batterien und Fernbedienung 2.
2.
2.
3. Lampenaustausch 3. LAMPENAUSTAUSCH 3.1 Warnungen beim Lampenaustausch Warnungen • Achten Sie darauf, dass die Befestigungsschrauben der Lampe nicht in das Innere des Projektors fallen. Führen Sie kein Metallstück oder brennbares Objekt in den Projektor ein. Der Betrieb des Projektors mit einem Fremdkörper im Projektorinneren kann zu einem Stromschlag oder Feuer führen. Wenn Sie den Fremdkörper nicht aus dem Projektinneren entfernen können, wenden Sie sich an Ihren Händler.
3. Lampenaustausch • Verwenden Sie ausschließlich die für diesen Projektor vorgesehene Lampe H LAMP 350W. Die Verwendung anderer Lampen kann zu einem Ausfall des Projektors führen. Vor dem Austausch der Lampe Überprüfen Sie im Menü INFO des Menüs OSD Lite, welche Lampe ausgetauscht werden muss. Abbildung 3-1 3.3 Lampenaustausch ACHTUNG: Nur autorisiertes Servicepersonal darf die Abdeckungen entfernen. So tauschen Sie die Lampe aus 1.
3. Lampenaustausch 4. Lösen Sie mit einem Kreuzschlitzschraubendreher die zwei Schrauben (d), mit denen die Lampenabdeckung befestigt ist, und entfernen Sie die Lampenabdeckung (e) vom Projektor. (e) (d) Abbildung 3-4 5. Lösen Sie mit einem Kreuzschlitzschraubendreher die zwei Schrauben (f), mit denen die zu entfernende Lampeneinheit befestigt ist. 2 1 (f) (f) Abbildung 3-5 6. Ziehen Sie am Griff. 7. Ziehen Sie die Lampeneinheit am Griff heraus, während Sie den Projektor festhalten.
3. Lampenaustausch (e) (d) Abbildung 3-9 Anmerkung: Sie können den Projektor erst einschalten, wenn Sie die Lampenabdeckung angebracht haben. 12.Setzen Sie die Seitenabdeckung (c) in den Projektor ein und ziehen Sie die beiden Schrauben (a) hinten und die beiden Schrauben (b) an der Seite der Seitenabdeckung mit einem Kreuzschlitzschraubendreher an. (a) (c) (b) Abbildung 3-10 3.
3. Lampenaustausch Wichtig • Wenn die Betriebszeit beider Lampen 4.000 Stunden3überschritten hat, können Sie den Projektor nach dem Einschalten nur für 3 Minuten betreiben. Führen Sie in diesem Zeitraum die Schritte 15 bis 20 aus, um die Lampenbetriebszeit zurückzusetzen. • Der Projektor schaltet sich nicht ein, wenn die Lampenabdeckung nicht fest angebracht ist. • Setzen Sie die Lampenbetriebszeit immer dann zurück, wenn Sie die Lampe austauschen.
Barco nv Noordlaan 5, B-8520 Kuurne Teléfono: +32 56.36.82.11 Fax: +32 56.36.883.86 Soporte: www.barco.com/esupport Visite nuestra web: www.barco.
1. Seguridad 1. SEGURIDAD Acerca de este capítulo Lea este capítulo cuidadosamente. Contiene información importante para prevenir daños personales al instalar y usar un PHxx series projector. Además, incluye varias precauciones para prevenir daños al PHxx series projector. Asegúrese de que entiende y sigue todas las directrices e instrucciones de seguridad y advertencias mencionadas en este capítulo antes de instalar su PHxx series projector.
1. Seguridad AVISO: Para evitar descargas eléctricas, no utilice este enchufe (polarizado)n con un cable de extensión, receptáculo u otro enchufe, a menos que las láminas puedan insertarse completamente para evitar la exposición de la hoja. PRECAUCIÓN: No se debe usar en una sala de ordenadores, según viene definido por el Estándar de protección de ordenadores eléctricos/ Equipos de procesamiento de datos, ANSI/NFPA 75. 1.
1. Seguridad Para evitar daños personales • Advertencias sobre el vapor de mercurio: Tenga en cuenta las advertencias siguientes al utilizar el aparato. La lámpara que se utiliza en el aparato contiene mercurio. Si la lámpara se rompe o explota, se produce una emisión de vapor de mercurio. A fin de minimizar el riesgo posible de inhalación de vapores de mercurio: - Asegúrese que el proyector sólo se instale en habitaciones ventiladas.
1. Seguridad Para prevenir el peligro de incendio • ¡No coloque materiales inflamables o combustibles cerca del proyector! • No encare la lente del proyector hacia el sol. Puede incendiarse. • Las ranuras y las aperturas del encapsulado sirven para la ventilación, asegurando un funcionamiento seguro del proyector y lo protegen contra el sobrecalentamiento.
1. Seguridad Para evitar el riesgo de descarga eléctrica • Nunca agregue equipos y/o accesorio sin la aprobación del fabricante, ya que puede provocar un riesgo de incendio, descarga eléctrica u otros daños personales. • Use 100-240 V AC 50/60 Hz para evitar incendios o choques eléctricos. • Los cables de alimentación para usar en los EE. UU., Europa y China están incluidos con este proyector. Use el adecuado para su país.
1. Seguridad Para prevenir daños al proyector • Desenchufe el proyector de la toma de pared antes de limpiarlo. No utilice aerosoles líquidos. Utilice un paño suave húmedo para la limpieza. • No utilice este proyector cerca del agua o en contacto con el agua. • No utilice este proyector con condensación sobre él. Puede provocar una ruptura u otro fallo. • Nunca coloque el proyector en la luz directa del sol.
1. Seguridad Acerca de las baterías • El uso de una batería de tipo incorrecto puede provocar una explosión. • Solo deben usarse baterías de carbono Zinc o dióxido de manganeso alcalino. • A fin de asegurar una eliminación correcta de las baterías usadas, tenga siempre en cuenta las regulaciones e instrucciones locales sobre la eliminación de residuos peligrosos. • Antes de desechar las baterías, aíslelas colocando una cinta aislante en los terminales positivo (+) y negativo (-).
1.
2. Baterías y Control remoto 2. BATERÍAS Y CONTROL REMOTO 2.1 Instalación de las pilas en el mando a distancia Lea cuidadosamente las instrucciones de seguridad sobre las pilas, consulte "Instrucciones de seguridad importantes", página 2 Piezas necesarias Dos pilas tamaño AAA (R03). Colocación de las pilas 1. Deslice y retire la tapa posterior del mando a distancia. 1 3 2 Imagen 2-1 Colocación de las pilas 2.
2. Baterías y Control remoto 2.
2.
2.
3. Reemplazo de la lámpara 3. REEMPLAZO DE LA LÁMPARA 3.1 Avisos de reemplazo de la lámpara Advertencias • Tenga cuidado de que los tornillos de fijación de la lámpara no caigan dentro del interior del proyector. No coloque un trozo de metal o un objeto inflamable en el interior del proyector. El uso del proyector con un objeto extraño en su interior puede provocar una descarga eléctrica o un incendio. Si no puede sacar el objeto extraño del interior, contacte con su distribuidor.
3. Reemplazo de la lámpara • Asegúrese de usar la lámpara exclusiva para este proyector, LÁMPARA H de 350 W. El uso de otras lámparas puede causar un fallo del proyector. Antes de reemplazar la lámpara Compruebe qué lámpara se debe reemplazar usando el menú INFORMACIÓN(LÁMPARA) en el menú OSD Lite. Imagen 3-1 3.3 Reemplazo de la lámpara PRECAUCIÓN: Solo se permite quitar las cubiertas a personal de servicio autorizado. Cómo reemplazar 1.
3. Reemplazo de la lámpara 4. Afloje dos tornillos (d) que aseguran la cubierta de la lámpara usando un destornillador Phillips y quite la cubierta de la lámpara (e) del proyector. (e) (d) Imagen 3-4 5. Afloje dos tornillos (f) que aseguran la caja de la lámpara que se debe extraer usando un destornillador Phillips. 2 1 (f) (f) Imagen 3-5 6. Tire del mango. 7. Saque la caja de la lámpara por el mango mientras sostiene el proyector.
3. Reemplazo de la lámpara (e) (d) Imagen 3-9 Nota: No podrá encender el proyector si no ha conectado la cubierta de la lámpara. 12.Inserte la cubierta lateral (c) en el proyector y apriete dos tornillos (a) en la parte posterior y dos tornillos (b) en el lado de la cubierta lateral usando un destornillador Phillips. (a) (c) (b) Imagen 3-10 3.
3. Reemplazo de la lámpara Importante • Cuando los tiempos de funcionamiento de ambas lámparas hayan superado las 4.000 horas3, puede hacer funcionar el proyector solamente durante 3 minutos después de encender la alimentación. Durante este tiempo, lleve a cabo los pasos 15 a 20 para restablecer los tiempos de funcionamiento de la lámpara. • El proyector no se enciende si la cubierta de la lámpara no está conectada de forma segura.
Barco nv Noordlaan 5, B-8520 Kuurne Tél.: +32 56.36.82.11 Fax: +32 56.36.883.86 Support: www.barco.com/esupport Rendez nous visite sur le web: www.barco.
1. Sécurité 1. SÉCURITÉ A propos de ce chapitre Veuillez lire ce chapitre attentivement. Il contient des informations importantes pour éviter les blessures corporelles pendant l’installation et l’utilisation d’un PHxx series projector. Il comporte en outre plusieurs mises en garde afin d’éviter d’endommager le PHxx series projector. Veillez à bien comprendre et suivre l’ensemble des consignes de sécurité et avertissements mentionnés dans ce chapitre avant d’installer votre PHxx series projector.
1. Sécurité ATTENTION: Pour prévenir toute électrocution, n’utilisez pas cette prise (polarisée) avec une rallonge, un prolongateur ou tout autre socle sauf si les broches peuvent être complètement insérées pour empêcher leur exposition. PRÉCAUTION: À ne pas utiliser dans une salle informatique, tel que défini dans la Norme relative à la protection des ordinateurs et des équipements informatiques, ANSI/NFPA 75. 1.
1. Sécurité Pour éviter les blessures corporelles • Avertissements relatifs aux vapeurs de mercure: N’oubliez pas les avertissements suivants lors de l’utilisation du projecteur. La lampe utilisée dans le projecteur contient du mercure. Toute rupture ou explosion de la lampe provoquera une émission de vapeurs de mercure. Pour minimiser le risque potentiel d’inhaler des vapeurs de mercure : - Veillez à installer le projecteur uniquement dans des pièces aérées.
1. Sécurité Pour éviter tout risque d’incendie • Ne placez aucune matière inflammable ou combustible à proximité du projecteur ! • Ne placez pas l’objectif du projecteur en face du soleil. Cela pourrait provoquer un incendie. • Les fentes et ouvertures dans le boîtier sont destinées à la ventilation. Elles assurent un fonctionnement fiable du projecteur et le protègent de la surchauffe.
1. Sécurité Pour éviter les risques d’électrocution • N’ajoutez jamais d’accessoires et/ou équipements sans l’accord du fabricant. Ceci pourrait entraîner un risque d’incendie, d’électrocution ou d’autre lésion corporelle. • Utilisez une alimentation électrique de 100 à 240 V CA, 50/60 Hz pour empêcher un incendie ou une électrocution. • Les cordons d’alimentation à utiliser aux USA, en Europe ou en Chine sont livrés avec ce projecteur. Utilisez celui prévu pour votre pays.
1. Sécurité Pour éviter que le projecteur ne soit endommagé • Débranchez le projecteur de la prise murale avant tout nettoyage. N’utilisez pas de nettoyants en aérosol liquides. Utilisez un chiffon doux et humide pour le nettoyage. • N’utilisez pas ce projecteur à proximité d’un point d’eau et ne le mettez pas en contact avec de l’eau. • N’utilisez pas le projecteur si de la condensation s’y est déposée. Ceci peut entraîner une panne ou une autre défaillance.
1. Sécurité Concernant les piles • L’utilisation d’un type de batterie non adapté peut entraîner une explosion. • Seules des piles de type carbone-zinc ou alcalines à dioxyde de manganèse doivent être utilisées. • Pour garantir une élimination conforme des piles usagées, consultez toujours les différentes réglementations et règles locales, régionales et nationales en vigueur.
1.
2. Piles et télécommande 2. PILES ET TÉLÉCOMMANDE 2.1 Mise en place des piles dans la télécommande Lisez attentivement les consignes de sécurité relatives aux piles, voir "Consignes de sécurité importantes", page 2 Pièces nécessaires Deux piles de taille AAA (R03). Comment les insérer 1. Faites coulisser et enlevez le couvercle arrière de la télécommande. 1 3 2 Image 2-1 Insertion des piles 2.
2. Piles et télécommande 2.
2.
2.
3. Remplacement de la lampe 3. REMPLACEMENT DE LA LAMPE 3.1 Avertissements de remplacement de la lampe Avertissements • Veillez à ne pas faire tomber les vis de fixation de la lampe à l’intérieur du projecteur. Ne placez pas de pièce en métal ou d’objet inflammable dans le projecteur. L’utilisation du projecteur avec un corps étranger dedans peut être à l’origine d’une électrocution ou d’un incendie. Si vous ne pouvez pas enlever le corps étranger, contactez votre revendeur.
3. Remplacement de la lampe Avant de remplacer la lampe Vérifiez quelle lampe doit être remplacée avec le menu INFO du menu OSD Lite. Image 3-1 3.3 Remplacement de la lampe PRÉCAUTION: Seul du personnel de maintenance homologué est autorisé à retirer les couvercles. Comment remplacer 1. Débranchez le cordon d’alimentation de la prise murale ou de l’appareil. 2. Desserrez deux vis (a) à l’arrière et deux vis (b) sur le côté qui bloquent le couvercle latéral (c) avec un tournevis Phillips.
3. Remplacement de la lampe (e) (d) Image 3-4 5. Desserrez deux vis (f) qui fixent le boîtier de la lampe à enlever avec un tournevis Phillips. 2 1 (f) (f) Image 3-5 6. Tirez sur la poignée. 7. Retirez le boîtier de la lampe par la poignée tout en tenant le projecteur. Image 3-6 - Retirez lentement le boîtier de la lampe du projecteur. Si la lampe est cassée, des fragments de verre peuvent se disperser en cas de retrait rapide du boîtier de la lampe.
3. Remplacement de la lampe (e) (d) Image 3-9 Note: Vous ne pouvez pas allumer le projecteur si le couvercle de la lampe n’est pas fixé. 12.Insérez le couvercle latéral (c) dans le projecteur et serrez deux vis (a) situées à l’arrière et deux vis (b) situées sur le côté du couvercle latéral avec un tournevis Phillips. (a) (c) (b) Image 3-10 3.
3. Remplacement de la lampe Important • Lorsque les durées de fonctionnement des deux lampes ont dépassé 4 000 heures3, vous ne pouvez faire fonctionner le projecteur que pendant 3 minutes après la mise sous tension. Pendant ce temps, effectuez les étapes 15 à 20 pour réinitialiser les durées de fonctionnement de la lampe. • Le projecteur ne s’allume pas si le couvercle de la lampe n’est pas bien fixé.
Barco nv Noordlaan 5, B-8520 Kuurne Tel: +32 56.36.82.11 Fax: +32 56.36.883.86 サポート: www.barco.com/esupport Barco Webサイト: www.barco.
1. 安全 1. 安全 この章について この章の内容は注意深くお読みください。PHxx シリーズ プロジェクター を設置および使用するときにけがを防止するための 重要な情報が記載されています。また、PHxx シリーズ プロジェクター の損傷を防ぐための注意事項についても記載されてい ます。PHxx シリーズ プロジェクター を設置する前に、すべての安全のためのガイドライン、指示および警告を理解して、そ の内容に従ってください。この章の後にも、特定の設置手順に関連する「警告」や「注意」の記述があります。これらの「警 告」や「注意」の記載に内容についても同様に従ってください。 ユーザー マニュアルはとても重要です。本製品を使用する前にユーザー マニュアルをよく読んでください。操 作手順などを参照するときには、マニュアルをご確認ください。 ユーザー マニュアルへのアクセス このユーザー マニュアルは、製品に同梱されている CD に入っています。CD のユーザー マニュアルにアクセスするには、 次の手順を実行してください。 1. コンピュータの CD-ROM ドライブに CD を挿入します。 2.
1. 安全 警告: 感電などの危険を防ぐため、ブレードの露出を防ぐために完全に挿入できない限り、この(接地)プラグ を延長コード、レセプタクルまたは他のコンセントで使用しないでください。 ご注意: Standard for the Protection of Electronic Computer/ Data Processing Equipment, ANSI/NFPA 75 で定義さ れているように、コンピュータ部屋で使用しないでください。 1.
1. 安全 1.
1.
1.
1.
1.
1.
2. 電池とリモコン 2. 電池とリモコン 2.1 リモコンにバッテリーを装着 バッテリーの安全手順を注意深くお読みください。詳細は、 3 ページ、 安全上の重要な注意を参照してくださ い。 必要な部品 単 4 形バッテリー 2 本(R03)。 挿入方法 1. リモコンの背面カバーをスライドして取り外します。 1 3 2 画像 2-1 バッテリー の挿入 2. バッテリーの極性 (+) と (-) を確認し、(-) を最初に挿入して正しくセットします。 注記: バッテリーを (+) の側から最初に挿入すると、渦巻き状のバネの末端がバッテリーにぶつかるので (-) 側の挿入が困 難になります。 このように無理にバッテリーを挿入すると、バッテリーの外側ラベルが剥がれ、短絡や過熱の原 因となる場合があります。 3.
2. 電池とリモコン 2.
2.
2.
3. ランプ交換 3. ランプ交換 3.
3. ランプ交換 画像 3-1 3.3 ランプ交換 ご注意: カバーの取り外しは資格を持ったサービス作業員だけに許可されています。 交換方法 1. コンセントまたは電源ソケットから電源コードを抜いてください。 2. プラスドライバーを使用して側面カバー (c) を固定している背面の 2 本のネジ (a) と側面の 2 本のネジ (b) を緩めます。 (a) (c) (b) 画像 3-2 3. 側面カバーを後ろにスライドして取り外します。 画像 3-3 4.
3. ランプ交換 (e) (d) 画像 3-4 5. プラスドライバーを使用してランプ カバーを固定している 2 本のネジ (f) を緩めます。 2 1 (f) (f) 画像 3-5 6. ハンドルを引きます。 7. プロジェクターを持ちながらハンドルでランプ ボックスを引き出します。 画像 3-6 - プロジェクターからランプ ボックスをゆっくりと引き抜きます。 ランプが壊れた場合、ランプ ボックスを素早く引き 出すとガラスの破片が飛び散る場合があります。 - 怪我や火災を避けるために、取り外したランプ ボックスに液体をこぼしたり、可燃性の物質の近くや子供の手が届く場 所にランプ ボックスを置いたりしないでください。 8. 新しいランプ ボックスを正しい向きでプロジェクターにしっかりと取り付けます。 画像 3-7 9. ハンドルを最初の場所に戻します。 注記: ハンドルがロックされたことを確認します。 10.
3. ランプ交換 (e) (d) 画像 3-9 注記: ランプ カバーを取り付けずにプロジェクターに電源を入れることはできません。 12.側面カバー (c) をプロジェクターに挿入し、プラスドライバーを使用して背面の 2 本のネジ (a) と側面カバーの 2 本のネ ジ (b) を締めます。 (a) (c) (b) 画像 3-10 3.4 ランプ稼働時間のリセット 可能な操作 メニューを使用して新しく取り付けたランプのランプ稼働時間をリセットできます。 リセット方法 1. 電源コードをコンセントに差し込みます。 2. 電源キーを押します。 3. アドバンスド メニューで オプション メニューを表示してください。 4. ▲ または ▼ キーを押して アドバンスド メニュー を選択してください。 画像 3-11 5. ENTER キーを押します。 6. ▲ または ▼ キーを押して ランプ 1 時間リセット または ランプ 2 時間リセット を選択してください。 画像 3-12 7. ENTER キーを押します。 確認ダイアログが表示されます。 画像 3-13 8.
3. ランプ交換 重要 • 両方のランプの稼働時間が 4000 時間 3 を超えた場合、電源をオンにした後 3 分間だけプロジェクターを稼働できます。 この時間中、手順 15~20 を実行してランプ稼働時間をリセットしてください。 • プロジェクターは、ランプ カバーをしっかりと取り付けなければ電源がオンになりません。 • ランプを交換した場合は必ずランプ稼働時間をリセットしてください。 • ランプを交換しない限り、ランプ稼働時間をリセットしないでください。 • ランプは壊れやすいです。 壊れた場合は、ガラスの破片で怪我をしないように注意してください。 ご注意: このプロジェクターは水銀を含むランプを使用しています。 環境の観点からランプまたはランプの付い たプロジェクターの廃棄は法律で規制されている場合があります。 廃棄またはリサイクル情報については、地元の 監督庁または Electronic Industries Alliance にお問い合わせください。 www.eiae.org(アメリカ合衆国の場合)。 3.
Barco nv Noordlaan 5, B-8520 Kuurne 电话: +32 56.36.82.11 传真: +32 56.36.883.86 支持: www.barco.com/esupport 通过 Web 访问我们: www.barco.
1. 安全 1. 安全 关于本章 请仔细阅读本章。本章介绍了在安装和使用 PHxx 系列放映机时如何预防 人身伤害的重要信息。此外,还包含多项避免 PHxx 系列放映机损坏的注 意事项。在开始安装 PHxx 系列放映机之前,请确保您了解并遵守本章中 的所有安全准则、安全指示和警告信息。在本章之后,还会根据安装步骤 列出“警告”和“小心”事项。您同样需要阅读并遵守这些“警告”和“小心”事项。 用户手册非常重要。请先阅读用户手册再使用本产品。同时保管 好手册以便查阅。 (保留备用) 访问用户手册 用户手册包含在产品附带的 CD 中。执行以下步骤从 CD 访问用户手册: 1. 将 CD 插入计算机的 CD-ROM 驱动器中。 2. 浏览到 CD 根目录,然后单击“startup.exe”(只有在 CD 未自动启动时 才需要这样做)。Internet Browser 中将打开一个 HTML 窗口。 3. 选择您的产品,然后导航至用户手册。 4. 单击 PDF 链接打开用户手册。 关于“PHxx 系列” 以下放映机都属于“PHxx 系列”的范畴:PHWU-81B、PHWX-81B 和 PHXG91B 1.
1. 安全 投影灯点亮时,不要向放映机镜头内注视,以免强光伤 眼。 警告: 务必了解并遵循本手册中的所有安全准则、安全指示、警 告及注意事项。 警告: 为避免发生火灾或电击危险,切勿使放映机淋雨或受潮。 警告: 为防止发生电击,除非插头的插片完全插入没有任何暴露 部分,否则请勿将此(两极)插头与延长线、插座或其他电源插 座配合使用。 注意: 不用于电子计算机/数据处理设备的保护标准 (Standard for the Protection of Electronic Computer/Data Processing Equipment) ANSI/NFPA 75 所定义的计算机室。 1.
1. 安全 1.3 在中国使用放映机 合规性提示 产品标准和技术要求 GB4943.1-2011 GB9254-2008 GB17625.1-2012 此数字放映机仅限在中国使用。 警告:这是 A 类产品。国内环境里,这种产品可能会导致无线电干扰,在 这种情况下,用户可能需要采取适当的措施。 1.4 FCC 合规性声明 FCC 声明 根据 FCC 规则的第 15 部分,此设备已经过测试且符合 A 类数字设备的 限制。 这些限制旨在提供合理保护,避免商业环境运作造成的有害干扰。 该设备生成,使用,并能发射无线电频率能量,如果没有按照说明书安装 和使用,可能会对无线电通讯产生有害干扰。在一个居民区操作此设备可 能产生有害干扰,在这种情况下,用户应对自己的行为和后果负责。 未经 Barco 的明确批准,任何修改或调整都会导致用户失去对本设备的操 作权限。 1.
1.
1. 安全 • 暴露于紫外线的辐射下:人们已经了解到,某些药物会使人对紫外线格 外敏感。美国工业保健协会 (ACGIH) 建议在 8 小时工作日内接触到的 有效紫外线应小于 0.
1.
1.
1.
1.
1.
2. 电池和遥控器 2. 电池和遥控器 2.1 安装遥控器的电池 仔细阅读电池安全说明,请参见"重要安全指示", 页 3 必要部分 两节 AAA 电池 (R03)。 如何插入 1.滑动并取下遥控器后盖。 1 3 2 图像 2-1 插入电池 2.检查电池极性 (+)、(-),然后正确安装,注意要先插入电池负极 (-)。 注释:如果先插入电池正极 (+),负极 (-) 将很难插入,因为有弹簧的一端 会触到电池侧面。 如果强行按此方式插入电池,会剥落电池外标 签,可能造成短路和电池发热。 3.
2. 电池和遥控器 2.
2.
2.
3. 更换投影灯 3. 更换投影灯 3.1 灯泡更换警告 警告 • 请注意,不要将灯泡固定 螺丝掉落到投影机内。不要将金属物件或 可 燃物放入放映机。使用放映机时,在其中存留任何 外来物件都可能导 致电击或起火。 如果您无法将外来物件取出,请 联系您的经销商寻求 帮助。 • 不要徒手触摸灯泡或 撞击灯泡。请正确安装灯泡。操作不当 可导致爆 炸。 • 请务必以安全方式安装灯泡。如果 灯泡安装不当,它将无法点亮。安 装不当 可导致起火。 • 不要晃动卸下的灯泡,也不要 将其举到面前。飞溅或坠落的玻璃碎片 可能 会造成眼部受伤。 • 不要在使用后立即更换灯泡, 因为灯泡盖板的温度会非常高。您可能会 被烫伤。请使用 “电源”键关闭电源。灯泡熄灭后,请等待大约 2 分钟, 直到用于散热的进气和排气风扇停止 转动。然后拔出电源线,等待至 少 1 小时 以便灯泡充分冷却到可以触摸的程度。 3.
3.
3. 更换投影灯 3.3 更换投影灯 注意: 只有经授权的维修人员才能拆卸 盖板。 如何更换 1.从插座或工具入口上 拔出电源线。 2.使用十字螺丝刀松开 固定侧盖板 (c) 的两个后面螺丝 (a) 和 两个侧面螺 丝 (b)。 (a) (c) (b) 图像 3-2 3.向后方滑动并卸下 侧盖板。 图像 3-3 4.使用十字螺丝刀松开固定 灯泡盖板的两个螺丝 (d),然后将灯泡盖板 (e) 从放映机上卸下。 (e) (d) 图像 3-4 5.
3. 更换投影灯 2 1 (f) (f) 图像 3-5 6.拉动把手。 7.握住把手拉出灯箱, 同时按住放映机。 图像 3-6 - 慢慢将灯箱拉出放映机。当灯泡 破损时,如果将其快速拉出灯箱,可 能会造成玻璃碎片 四处散落。 - 不要在卸下的灯箱上泼洒液体,也不要 将其放在任何可燃物附近或是 儿童能触碰到的地方,以免受伤 或引发火灾。 8.在确保安全的情况下,将新灯泡 向右安放到放映机中。 图像 3-7 9.将把手重新固定到原先 位置。 注释:一定要将把手锁定。 10.使用十字螺丝刀拧紧 新灯箱的两个螺丝 (f)。 2 (f) 1 (f) 图像 3-8 注释:一定要将螺丝拧紧到位。 11.
3. 更换投影灯 (e) (d) 图像 3-9 注释: 您不能在未安装灯泡盖板的情况下启动 放映机。 12.将侧盖板 (c) 插入 放映机,然后用十字螺丝刀拧紧侧盖板的两个后面螺 丝 (a) 和两个侧面螺丝 (b)。 (a) (c) (b) 图像 3-10 3.4 重置灯泡运行时间 功用 您可以通过菜单为新安装的灯泡重置 灯泡运行时间。 如何重置 1.将电源插入墙壁 插座。 2.按电源键。 3.在 高级 菜单中显示 其他设定 菜单。 4.按 ▲ 或 ▼ 键来选择 高级 菜单。 图像 3-11 5.按进入键。 6.按 ▲ 或 ▼ 键来选择 灯泡 1 时间 重置 或 灯泡 2 时间重置 。 图像 3-12 7.
3. 更换投影灯 显示确认对话框。 图像 3-13 8.按进入键重置。 灯泡运行时间尚未重置时,按菜单键。 重要信息 • 如果两个灯泡的运行时间 都超过 4000 小时 3 ,打开电源后, 您只有 3 分钟的时间可以操作放映机。在此 期间,请执行第 15 到 20 步来重置 灯泡运行时间。 • 如果灯泡盖板未安全固定, 放映机就无法启动。 • 请务必在更换灯泡时 重置灯泡运行时间。 • 除非是更换灯泡,否则不要重置 灯泡运行时间。 • 灯泡是易碎品。如果发生破损,请留意 不要被玻璃碎片划伤。 注意: 该放映机使用了含汞灯泡。处理 此类灯泡或带有此类灯 泡的放映机时,可能要遵守相关的 环境法规。有关此类处理或回 收的信息, 请联系您当地的相关机构或电子工业 协会,网址为: www.eiae.org(仅限美国用户)。 3.
4. 环境信息 4. 环境信息 4.1 处理信息 处理信息 废弃电子电气设备 产品上带有此符号表示,根据欧盟第 2012/19/EU 号指令中关于废弃 电子电气设备的规定,本产品不能与其他城市废弃物一起处理。请将此类 废弃设备拿到回收废弃电子电气设备的指定收集点,交给他们处理。为避 免未受控制的废物处理对环境或人类健康可能造成的伤害,请将此类设备 从其他类型的废弃物中分离出来,并且对它进行可靠的回收利用以提高材 料资源可持续的重复利用。 要了解有关本产品的更多回收信息,请联系您当地的市政机构或城市垃圾 处理服务机构。 有 关 更 多 详 细 信 息 , 请 访 问 Barco http://www.barco.
4.
4. 环境信息 电池包装膜 随包装物品袋 缓冲材料 外包装箱 / 隔板 随包装物品带(CD-ROM袋) 产品包装膜 随包装物包装布 : 表面 4.