ClickShare CSE-800 User guide R5900050/01 15/03/2017
Barco NV Beneluxpark 21, 8500 Kortrijk, Belgium Phone: +32 56.23.32.11 Fax: +32 56.26.22.62 Support: www.barco.com/en/support Visit us at the web: www.barco.com Registered address: Barco NV President Kennedypark 35, 8500 Kortrijk, Belgium Phone: +32 56.23.32.11 Fax: +32 56.26.22.62 Support: www.barco.com/en/support Visit us at the web: www.barco.
Barco ClickShare End-User License Agreement (EULA/Software License) PLEASE READ THIS DOCUMENT CAREFULLY BEFORE OPENING OR DOWNLOADING AND USING SOFTWARE OR HARDWARE PROVIDED TO YOU BY BARCO AS IT CONTAINS THE TERMS AND CONDITIONS BY WHICH BARCO OFFERS TO LICENSE THE SOFTWARE. BY OPENING THE SOFTWARE PACKAGE, OR USING THE HARDWARE IN WHICH THE SOFTWARE IS EMBEDDED, YOU AGREE TO BECOME BOUND BY THE TERMS OF THIS AGREEMENT.
6. YOU UNDERSTAND THAT THE SOFTWARE IS BEING PROVIDED TO YOU "AS IS".
• The identity of the product in question (such as but not limited to MAC ID, OS version, Software version, ...) • Details about the connection to Barco (such as but not limited to the first connection, last connection, # of attempts, IP address of the device, ...) • The functionality of the products which are connected through the Software, and/or • As otherwise provided by you. (hereafter referred to as “Functional Information”).
alsa-lib http://www.gnu.org/licenses/gpl.html alsa-utils http://www.gnu.org/licenses/gpl.html busybox http://opensource.org/licenses/GPL-2.0 dropbear http://opensource.org/licenses/mit-license.php fakeroot http://www.gnu.org/licenses/gpl.html linux http://www.gnu.org/licenses/old-licenses/gpl-2.0.html gmp http://www.gnu.org/licenses/lgpl.html iproute2 http://www.gnu.org/licenses/gpl.html kobs-ng http://www.gnu.org/licenses/gpl.html rsync (<3.0.0) http://www.gnu.
iftop http://www.gnu.org/licenses/old-licenses/gpl-2.0.html iperf http://opensource.org/licenses/BSD-3-Clause iptables http://opensource.org/licenses/BSD-3-Clause iw http://opensource.org/licenses/BSD-3-Clause acl http://www.gnu.org/licenses/old-licenses/gpl-2.0.html attr http://www.gnu.org/licenses/old-licenses/gpl-2.0.html libcap2 http://www.gnu.org/licenses/gpl.html libdaemon0 http://www.gnu.org/licenses/old-licenses/lgpl-2.1.html libdrm2 http://opensource.
libusb http://www.gnu.org/licenses/old-licenses/lgpl-2.1.html libxml2 http://opensource.org/licenses/MIT libz1 Free license lighttpd http://opensource.org/licenses/BSD-3-Clause lmsensors http://www.gnu.org/licenses/gpl.html logrotate http://www.gnu.org/licenses/gpl.html makedevs http://www.gnu.org/licenses/gpl.html memtest86plus http://www.gnu.org/licenses/gpl.html mesa http://opensource.org/licenses/MIT module-init-tools http://www.gnu.org/licenses/old-licenses/gpl-2.0.
ttf-dejavu-sans ttf-sazanami-gothic ttf-sazanami-mincho ttf-un-fonts udev http://www.gnu.org/licenses/old-licenses/gpl-2.0.html update-modules http://www.gnu.org/licenses/old-licenses/gpl-2.0.html update-rc http://www.gnu.org/licenses/old-licenses/gpl-2.0.html usbutils http://www.gnu.org/licenses/old-licenses/gpl-2.0.html util-linux-ng http://www.gnu.org/licenses/gpl.html xserver-xorg http://opensource.org/licenses/MIT zeroconf http://www.gnu.org/licenses/gpl.
1. This Transmitter must not be co-located or operating in conjunction with any other antenna or transmitter. 2. This equipment complies with RF radiation exposure limits set forth for an uncontrolled environment. This equipment should be installed and operated with a minimum distance of 20 cm between the radiator and your body.
1. Pour se conformer aux exigences de conformité RF canadienne l’exposition, cet appareil et son antenne ne doivent pas être co-localisés ou fonctionnant en conjonction avec une autre antenne ou transmetteur. 2. Pour se conformer aux exigences de conformité CNR 102 RF exposition, une distance de séparation d’au moins 20 cm doit être maintenue entre l’antenne de cet appareil et toutes les personnes.
Table of contents TABLE OF CONTENTS 1. Introduction . .. .. .. .. .. .. .. .. .. .. .. .. .. .. .. .. .. .. .. .. .. .. .. .. .. .. .. .. .. .. .. .. .. .. .. .. .. .. .. .. .. .. .. .. .. .. .. .. .. .. .. .. 3 1.1 1.2 1.3 Versions of the product . . . . . . . . . . . . . . . . . . . . . . . . . . . . . . . . . . . . . . . . . . . . . . . . . . . . . . . . . . . . . . . . . . . . . . . . . . . . . . . . . . . . . . . . . . . . . . . . . . . . . . . . . . . . . . . 3 About this guide . . . . . . . . . . .
Table of contents 2 R5900050 CLICKSHARE CSE-800 15/03/2017
1. Introduction 1. INTRODUCTION Overview • Versions of the product • About this guide • Symbols and fonts 1.1 Versions of the product Regional versions Depending on the location where you buy the CSE-800 product, the Base Unit and accessories are regionalized. By the time of release of this manual, 3 regional versions of CSE-800 are available: • Europe & Japan • North America • China The regional version of your CSE-800 cannot be changed. That means that you cannot use it in another region.
1. Introduction The User Guide describes how to use your CSE-800. It also contains a basic troubleshooting part where you can search for a solution when a problem occurs. 1.3 Symbols and fonts Symbol overview The following icons are used in the manual : Caution Warning Info, term definition. General info about the term Note: gives extra information about the described subject Tip: gives extra advice about the described subject Font overview 4 • Buttons are indicated in bold, e.g. OK.
2. Introduction to CSE-800 2. INTRODUCTION TO CSE-800 Overview 2.1 • About the CSE-800 • About the Base Unit • About the Button • Mobile Device Support About the CSE-800 CSE-800 sets CSE-800 makes connecting to the meeting room’s video system a matter of clicking a Button. This CSE-800 not only helps the presenter get the presentation on-screen in a second, but it also allows the other people in the meeting to participate more actively.
2. Introduction to CSE-800 Regional version Contains Accessories included • R9861580CN • power cable GB 2099 • 4x R9861500D01 • wall/ceiling mounting brackets • R9861500T01 • antenna extension cables • R9861580NA • power cable NEMA 5/15 • 4x R9861500D01 • wall/ceiling mounting brackets • R9861500T01 • antenna extension cables R9861580CN R9861580NA Contact your local sales representative for the correct regional variant to be used in your country. 2.
2. Introduction to CSE-800 To update the Base Unit software, download the latest version of the software from the Barco website. Copy the file on a USB stick and plug it into the USB port of the Base Unit. Follow the progress and instructions on the display. Status LED The color of the LED at the front of the Base Unit give information on the status of the system. LEDs behavior Explanation static red • receiving content from the Buttons and streaming towards the display.
2. Introduction to CSE-800 3b Fixture point for antenna WiFi 2 4 Reset 5 HDMI out 1 connector 6 HDMI out 2 connector 7 LAN 1 connector (primary LAN interface) 8 LAN 2 connector (secondary LAN interface) 9 USB connectors 3.0 10 USB connectors 2.0 11 Audio connectors 12 Audio connectors 13 HDMI in 1 connector 14 HDMI in 2 connector 15 Kensington lock Rocker switch The rocker switch is used to power on and off the Base Unit. • To switch on the Base Unit, set the rocker switch to “I”.
2. Introduction to CSE-800 Image 2-4 Ventilation grids IN and OUT The Base unit sucks air via the front side ventilation grid and push hot air out on the back side ventilation grid. Make sure not to cover the ventilation grids during operation of the Base Unit. Always keep a free area of minimum 50 mm in front of all ventilation grids. Bottom layout of the Base Unit The serial number label containing the Barco part number, the revision number, production date (week-year) and the serial number.
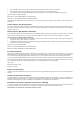
2. Introduction to CSE-800 1 2 3 Image 2-5 Button layout 1 USB connector 2 Button 3 LED ring Table 2-5 USB connector Using the USB connector the Button can be plugged into a laptop (for sharing your screen) or the Base Unit (for pairing the Button to the Base Unit or updating its software). Button Click the Button to display the content of the laptop’s screen on the meeting room display. Clicking the Button during the meeting will toggle the sharing of the screen.
2. Introduction to CSE-800 2.4 Mobile Device Support Overview The below list of Apps are supported by ClickShare and can be installed on your mobile device from Google Play or Apple App Store. Before you can use your mobile device with ClickShare, you have to connect the mobile device Wi-Fi with the ClickShare Base Unit Wi-Fi. Follow the instructions as given in your mobile device user guide.
2.
3. Getting started 3. GETTING STARTED 3.1 Activating the Base Unit About power mode You can power on and off the Base Unit and bring the system in standby mode. In standby mode the system mutes the output signal to the displays. If your display supports this, it will automatically enter power saving mode. Power on the Base Unit or awake it from standby 1. When the Base Unit is shut down, set the rocker switch at the back of the Base Unit to “I”. 1 Image 3-1 Power switch 2.
3. Getting started 3.2 Basic Use Basic functionality When entering a meeting room equipped with ClickShare and if the display is not in screensaver mode, the ClickShare wallpaper is shown on the display. The content of the wallpaper depends on the setup. Starting to use ClickShare is now very simple. To start using ClickShare 1. Take a Button and Insert the Button into a USB port of your laptop. Image 3-3 The LEDs of the Button start flashing white. On your laptop a new drive appears.
3. Getting started The ClickShare client software starts and its icon appears in the system tray. On a Windows computer: On a Macintosh: When the system is ready for use, a message appears close to the systray icon. Image 3-6 The LEDs of the Button are static white. 4. To share your screen on the display, click the Button. The LEDs of the Button become static red and your screen appears on the display.
3. Getting started 1 1 1 2 1 user 3 users 1 1 2 2 2 users 1 2 3 4 3 3 4 4 users 5 6 6 users 1 2 5 6 3 4 7 8 8 users Image 3-8 When the display mode is set to clone, if you are the fifth user who wants to share his screen, you are blocked. A message appears on your screen telling you the maximum number of users being displayed simultaneously has been reached.
3. Getting started 1 2 3 4 5 4 users 5 user 5 Image 3-10 Dual display When you click again, your content is removed and the Base Unit shows the welcome screen again. The content of the previous users is not restored on the display. 3.4 User Interface User Interface functionality After launching the client, the ClickShare icon appears in the system tray. ClickShare context menu The content of the context menu is related to the operating system. 1.
3. Getting started 3.5 Capture more Only for Windows XP, Windows Vista and Windows 7 & 8. About capture more ClickShare is optimized for optimum video performance. Upon starting the client software it will disable Win7 Aero Glass to maximize video performance. Upon quitting the ClickShare applications your Aero Glass settings will be restored. Transparent alpha layers are by default not captured. Therefore some windows may not be shown or may appear different on screen.
3. Getting started With extended desktop you can take advantage of both your laptop screen and the central meeting room display. Presentation notes or other material on primary screen will not be displayed to everyone. PC with virtual extended screen: 2 1 Image 3-13 Primary screen displayed on the PC, extended screen displayed on the meeting room display. 2 2 1 Image 3-14 PC with one extended screen connected. That extended screen will be captured and displayed on the meeting room display.
3. Getting started To know if your system supports the extended desk top feature, press Window key + P. It should bring up the following pop-up on screen: Image 3-16 How to select 1. Right click on the ClickShare icon in the system tray (1). Image 3-17 Shared desktop selection A context menu opens. More that one extended desktop can be shown, e.g. extended desktop (center) and extended desktop (right). 2. Select Shared Desktop (2). 3. Select the desired setting (3).
3. Getting started (1) (2) Image 3-18 Start moderation A context menu opens. 2. Select Start Moderation (2). The moderation application opens on his PC. All shared content is available. Image 3-19 Moderation window 3. To stop moderation, close the moderation window.
3. Getting started 1 Representation of the displays with their current content. 2 Sources pane: representation of all connected sources, apps and Buttons. When more than 4 sources are connected, scroll in the source pane to view the additional sources. How to display a content 1. Click on a content in the source pane and drag the selected source on to the screen. Image 3-21 Display a content The content will be automatically displayed on the screen.
3. Getting started Image 3-22 Display multiple contents The new added sources are displayed on the screen. The software automatically layouts the different contents on the screen. How to remove a content from the display 1. Click on a content in the display view and drag and drop outside the display. Or, click on the trash bin when hovering over the source on the display. How to display a content full screen 1. Double click on the content to display this content full screen.
3. Getting started Image 3-23 Speakers ClickShare, default (example Windows 7) 2. Click Playback devices (2). The Sound window opens on the Playback tab. 3. Select Speakers ClickShare (3) and click Set default (4). 4. Click Apply or OK to activate the new setting. Set ClickShare as default on MAC 1. Click on the Apple logo on the menu bar (1) and select System Preferences.. ..(2).
3. Getting started Image 3-24 Speakers ClickShare, default 2. Click on the Speaker icon (3). The Sound window opens. 3. Select the Output tab (4) and activate ClickShare (5). Short way to select ClickShare as audio device: Click with the mouse on the Speaker symbol in the menu bar while holding ALT. ClickShare will be visible as an option. 3.9 Pairing Pairing of the Buttons with the Base Unit To be able to use a Button it should be assigned to the Base Unit you are using. This process is called pairing.
3. Getting started A Button can only be paired to one Base Unit at a time. The Button will always make connection to the Base Unit it was last paired to. To pair a Button to the Base unit 1. Insert the Button in the USB port at the front of the Base Unit you are using. Image 3-25 Pair button Both the LEDs of the Button and the LEDs of the Base Unit are blinking white. This means pairing is in progress. The Base Unit automatically checks whether the software of the Button is up to date.
4. Troubleshooting 4. TROUBLESHOOTING 4.1 Basic Troubleshooting Problem solving In this chapter some problems that might occur while using CSE-800 are listed. For each problem possible causes are given and a solution is proposed. If you cannot solve the problem yourself, please contact your local IT administrator. Problem Cause Solution Your screen is not shown on the display when pressing the Button. You are the fifth person that wants to share the content to the display.
4. Troubleshooting Problem Cause Solution After inserting the Button into your laptop, No automatic refresh of drives. you cannot find the ClickShare drive. Bad connection at USB port on laptop. Some programs of Windows are not shown on the display. 28 Refresh the view on your laptop. • Reconnect to the USB port. • Try another USB port. • Reboot your laptop.
5. Environmental information 5. ENVIRONMENTAL INFORMATION 5.1 Disposal information Disposal Information Waste Electrical and Electronic Equipment This symbol on the product indicates that, under the European Directive 2012/19/EU governing waste from electrical and electronic equipment, this product must not be disposed of with other municipal waste. Please dispose of your waste equipment by handing it over to a designated collection point for the recycling of waste electrical and electronic equipment.
5. Environmental information 底架 x 0 x 0 0 0 Chassis 电源供应器 x 0 x 0 0 0 Power Supply Unit 文件说明书 0 0 0 0 0 0 Paper Manuals 本表格依据SJ/T 11364的规定编制 This table is prepared in accordance with the provisions of SJ/T 11364. O: 表示该有毒有害物质在该部件所有均质材料中的含量均在 GB/T 26572 标准规定的限量要求以下. O: Indicates that this toxic or hazardous substance contained in all of the homogeneous materials for this part is below the limit requirement in GB/T 26572. X: 表示该有毒有害物质至少在该部件的某一均质材料中的含量超出 GB/T 26572 标准规定的限量要求.
5. Environmental information 5.4 Importers contact information Contact To find your local importer, contact Barco directly or one of Barco’s regional offices via the contact information given on Barco’s web site, www.barco.com.
5.
Index INDEX A I About 3, 5–6, 9 Base Unit 6 Button 9 CSE-800 product User Guide 3 Advanced use 15 Audio control 23 Importer 31 Introduction 3–5 Fonts 4 symbols 4 User Guide 3 5 B Base Unit 6 About 6 Basic Troubleshooting 27 Basic use 14 Button 9, 25 About 9 Pairing 25 Button menu 18, 20, 22–23 Capture more 18 Detailed 18 Fast 18 Moderation 20, 22–23 Full screen 23 Remove content 23 Show content 22 Startup 20 Shared desktop 18 Extended 18 Primary 18 C Capture more 18 Detailed 18 Fast 18 Client softwar