
user manual


112 DX-700 • User’s Guide • Rev 02
4. Operation
Using the Input Management Menu
^ÇàìëíáåÖ=táåÇçï=pÉííáåÖë
For the selected input, Window Setting adjustments enable you to scale the source to
precisely fit the selected output region. Note that this adjustment is the same as the one
performed on the
Window Settings Menu in the Input Wizard.
Use the following steps to adjust window settings:
1. (Optional) If required, use the Preset Management Menu to recall a preset that
includes the input that you wish to adjust. This step “activates” an input. Refer to
the “
Recall a Preset” section on page 104 for details. If the input is already
active, no action is required in this step.
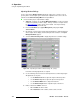
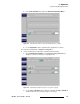
2. From the Home Menu, press {Input Management} to display the Input
Selection Menu
.
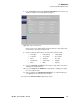
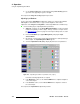
3. On any bank, select the input card (module) that includes the active input that you
wish to adjust. On the display, note that all input cards are buttons. The
Input
Management Menu
appears.
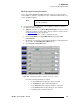
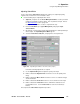
4. Select the Window Settings Tab to display all parameters for window settings.
Figure 4-46. Input Management Menu: Window Settings Tab (sample)
Perform the following adjustments as required:
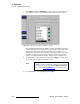
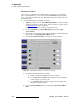
5. Use the following controls to fit the selected input into its associated output region.
All adjustments are in pixels.
~ Use the Window Left slider to adjust the input’s horizontal position.
~ Use the Window Top slider to adjust the input’s vertical position.
~ Use the Window Width slider to adjust horizontal size.
~ Use the Window Height slider to adjust the input’s vertical size.
6. Enable or disable the PIP On check box:
~ When enabled, the PIP is visible.
~ When disabled, the PIP is hidden, and the canvas is visible.