
user manual


DX-700 • User’s Guide • Rev 02 115
4. Operation
Using the Input Management Menu
^ÇàìëíáåÖ=fã~ÖÉ=mêçÅÉëëáåÖ=m~ê~ãÉíÉêë
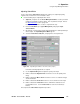
For the selected input, Image Processing adjustments enable you to adjust the input’s
contrast, brightness, sharpness, saturation, hue, clip to sub-black and luma tracking. You
can also set EDID parameters.
Use the following steps to adjust input contrast, brightness, sharpness, saturation,
hue, EDID and cable equalization:
1. (Optional) If required, use the Preset Management Menu to recall a preset that
includes the input that you wish to adjust. This step “activates” an input. Refer to
the “
Recall a Preset” section on page 104.
If the input is
already active, no action is required in this step.
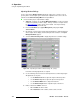
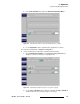
2. From the Home Menu, press {Input Management} to display the Input
Selection Menu
.
3. On any bank, select the input card (module) that includes the active input that you
wish to adjust. The
Input Management Menu appears.
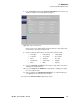
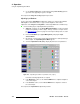
4. Select Image Processing Tab 1 (I.P. 1).
Figure 4-49. Input Management Menu: Image Processing Tab 1 (sample)
Perform the following adjustments as required:
~ Use the Contrast slider to adjust the contrast of the input.
~ Use the Brightness slider to adjust input brightness.
~ Use the Sharpness slider to adjust the sharpness of the input.
~ Use the Saturation slider to adjust the input’s color saturation.
~ Use the Hue slider to adjust the input’s hue.
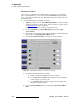
Note
Image processing adjustments are shown on two different
tabs:
I.P. 1 and I.P. 2.