
user manual


78 DX-700 • User’s Guide • Rev 02
4. Operation
Using the Home Menu
rëáåÖ=íÜÉ=eçãÉ=jÉåì
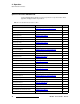
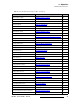
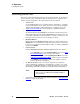
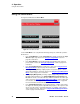
The figure below illustrates the Home Menu.
Figure 4-2. DX-700 Home Menu
Use the Home Menu to run setup wizards and manage all aspects of DX-700 operations.
On this menu:
• Press {Setup Wizard} to run the Setup Wizard for outputs, followed by the Input
Wizard for input setup. Refer to the “Using the Setup Wizard” section on
page 80 for instructions.
• Press {Input Wizard} to run the input wizard, which includes input setup and
preset creation. Refer to the “
Using the Input Wizard” section on page 93 for
instructions.
• Press {Preset Management} to recall presets. Refer to the “Using the Preset
Management Menu” section on page 103 for instructions.
• Press {Input Management} to adjust properties of any active input — such as
wall position, brightness, and effects. Refer to the “
Using the Input Management
Menu” section on page 107 for instructions.
• Press {Display Management} to manage output display (LED) parameters and
Fiberlink module parameters. The
Fiberlink NNI Multi-mode Transmitter and
Receiver are used to connect the DX-700 to NNI-based LED tiles via a fiber optic
cable. Refer to the “
Using the Display Management Menu” section on page 124
for instructions. Refer to Appendix D, “
Fiberlink NNI Installation” on page 205
for more information about the Fiberlink modules.
• Press {DX-700 Management} to view system properties, configure your monitor,
run diagnostics and test patterns, adjust Ethernet properties, save a system “start-
up” file, reset the system, set genlock parameters, or configure “expert” modes
such as delay processing. Refer to the “
Using the DX-700 Management Menu”
section on page 134 for instructions.