
user manual


94 DX-700 • User’s Guide • Rev 02
4. Operation
Using the Input Wizard
fåéìí=táò~êÇ=léÉê~íáçåë
During the output setup procedure (as described in the “Setup Wizard Operations”
section) you set the raster size for each output to match the size of your wall. That
procedure created a specific “pixel space” or output region for each output on the canvas.
The
Input Wizard enables you to place an input inside each output region, and adjust its
size, position, contrast and gamma.
Use the following steps to use the Input Wizard:
1. There are two ways to enter the Input Wizard:
~ From the Home Menu, press {Input Wizard}.
~ From the Setup Wizard, the Input Wizard starts automatically upon
completion of the Setup Wizard’s output setup and grouping steps.
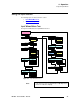
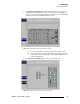
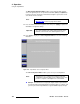
2. Upon entering the Input Wizard, the Output Selection Menu appears.
Figure 4-24. Input Wizard: Output Selection Menu (sample)
The rear panel graphic shows which banks are present, and which outputs (and
groups) have been set up within those banks. Color is significant:
~ Cyan indicates “focus”
~ Gray indicates an output that has been set up, but not grouped.
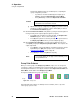
~ Group colors are identical to those in the Setup Wizard. Refer to the
“
Group Color Scheme” section on page 92 for color details.
Select the bank, then select the output (or output group) to which you want to
assign a specific input.
Note
These parameters can also be fine-tuned outside of the Input
Wizard, by using the tools in the
Input Management Menu.
Refer to the “
Using the Input Management Menu” section
on page 107 for details.