
Instructions / Assembly


Page 6 User’s Manual
VW401P
Installation
Introduction
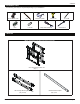
Directional Mounting Arrow
The Directional Mounting Arrow stamped into the
VW401P mount indicates which edge is the top.
Mounting Safety
Two people are recommended to install the
mount.
Step 1
Step 2
Two people are recommended for this step; one
person to level the mount and another person to
mark the wall stud location.
1) Place the mount against the wall in the desired
viewing location.
2) Adjust the mount to align the mount slots in the
mount with the center of the wall studs.
3) Level the mount.
4) Use a pencil to mark the upper right mounting
location along the center of the wall stud.
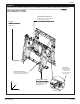
Step 3
1) Insert one (1)
5
/
16
″ x 4″ lag bolt and one (1)
5
/
16
″
washer into each pilot hole
2) Tighten all lag bolts using a socket wrench and ½″
socket.
Do not overtighten the lag bolts when attaching
the mount to the wall. Improper installation may
result in personal injury or property damage.
1)Mounting to Wooden Studs
Two people are recommended for this step; one
person to level the mount and another person to
drill the pilot holes.
Drill a “pilot hole” in the center of each of the marks with
a power drill and a ¼″ drill bit.
Only use ¼″ drill bit when drilling the pilot holes.
K
L