Barnes & Noble, Inc. 122 Fifth Avenue, New York, NY 10011 USA. © 2010-2011 Barnes & Noble, Inc. All rights reserved. NOOK®, NOOK Book™, NOOK Bookstore™, NOOK Developer™, NOOK Friends™, NOOK Kids™, NOOK Magazine™, NOOK Newspaper™, NOOK Newsstand™, NOOK Store™, NOOK Study™, NOOK Tablet™, AliveTouch™, LendMe®, ArticleView™, Daily Shelf™, VividView™, Read and Play™, Read and Record™, Read In Store™, Read to Me™, More In Store™, Free Friday™, PubIt!™, Lifetime Library™, Read What You Love.
Table of Contents Introduction..................................................................................................................................................... 7 Contact Us......................................................................................................................................................................................... 7 Getting to Know Your NOOK ..........................................................................................................
My Files............................................................................................................................................................................................. 73 Using NOOK Friends™................................................................................................................................ 75 Launching the NOOK Friends App.................................................................................................................................
Using NOOK Email™................................................................................................................................. 112 Launching the Email Application.................................................................................................................................................... 112 Managing Email Accounts..........................................................................................................................................................
Using an SD Memory Card........................................................................................................................ 152 Types of Memory Cards Supported............................................................................................................................................. 152 Installing a Memory Card...............................................................................................................................................................
Introduction This User Guide is designed to help you get the most enjoyment out of your NOOK Tablet™. Contact Us If you have questions about your NOOK that this guide doesn’t answer, be sure to visit the NOOK online support center at: http://www.nook.
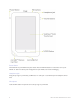
Power Button On the left side of your NOOK is the power button. Press and hold the button for 2 seconds to turn on your NOOK. To learn more about power management for your NOOK, see “Power and Charging”. Headphone Jack Along the top edge of your NOOK, you’ll find a 3.5 mm audio jack—a standard size jack for headphone and ear buds. Microphone You’ll also find a built-in microphone set into the top edge of your NOOK.
Volume Controls Raise or lower the volume of audio by pressing the + or – buttons on the right side of your NOOK. VividView™ Color Touchscreen Your NOOK features a high-resolution 7-inch color touchscreen for easy navigation and page turns. NOOK Button This NOOK symbol on the lower front of your NOOK is called the NOOK button. If you press the NOOK button when your NOOK is sleeping, your NOOK wakes up and turns on.
microSD Memory Card Slot Your NOOK features enough built-in memory to hold thousands of books, along with many magazines, newspapers, photos, and personal files such as PDFs. You can add more storage to your NOOK by installing a standard microSD Memory card. The card fits into a covered slot in the back of your NOOK, next to the curved bar in the corner. A microSD Memory Card can hold up to 32 GB of books, magazines, newspapers, and other files.
Getting Started with Your NOOK The first time you use your NOOK, you’ll need to go through a short set-up process that will take about 5 to 10 minutes. Make sure that you’re in an area that has a Wi-Fi connection (a wireless connection to the Internet), because part of the process is registering your NOOK with your Barnes & Noble account on BN.com. NOTE: You will not be able to set up your NOOK without a Wi-Fi connection. In the set-up process, you will do the following: • Turn on your NOOK.
Registering Your NOOK NOTE: You will need to connect to a Wi-Fi network to complete your registration. 1. Watch the Introductory Video. The first time you turn on your NOOK, it will show a 90-second video that gives you a quick tour of the main features of your NOOK. Tap the button labeled “Play Video” to start playing the video. NOTE: You can re-watch this video and watch other NOOK tutorial videos, as well, once you have completed the registration process.
Tutorial Videos If you would like to re-watch the introductory video, do this: 1. Tap the NOOK button on the front of your NOOK to open the Quick Nav Bar. 2. In the Quick Nav Bar, tap the Apps button. 3. In the Apps window, tap the My Media icon to launch the My Media app. 4. In the My Media app, tap the image of the introductory video to start playing the video. To watch other tutorial videos, do this: 1. Make sure you have an active Wi-Fi connection to the Internet. 2.
Power and Charging Turning Your NOOK On and Off NOTE: If you have set up a passcode to protect your NOOK, you will have to enter the passcode after you turn on your NOOK. See “Using a Device Lock Passcode to Protect Your NOOK”. Turning On Your NOOK To turn on your NOOK, press the power button located on the left edge of your NOOK. Hold the button down for 5 seconds and release it. Your NOOK starts. When it has completed its start-up process, it makes a chiming sound.
Wall Charging To charge your NOOK, use the charging components included with your NOOK. The diagram below shows these components and how they connect. Wall Outlet Charging Indicator Light USB Cable CAUTION: Power Adapter Only use the Barnes & Noble power adapter and custom microUSB cable supplied with your NOOK. Other power adapters might damage your NOOK and its battery. Do not use a power adapter and cable intended for other models of NOOK eReader.
Resetting Your NOOK Performing a Soft Reset If for some reason your NOOK becomes unresponsive, you can perform a soft reset to restart the device. 1. Press and hold the power button for 20 seconds, then release the power button. 2. Press the power button again for 2 seconds to turn on your NOOK. Low Power If you turn on your NOOK when its battery charge is almost depleted, a warning appears on the screen, suggesting that you begin charging your NOOK before trying to use it.
Airplanes When using your NOOK on an airplane, be sure to follow the instructions of the flight crew. To turn your NOOK’s wireless networking on or off, do this: 1. Tap on the right end of the Status Bar to open the Quick Settings dialog box. 2. Slide the Wireless switch on or off. 3. Tap anywhere outside the Quick Settings dialog box to close it. Electronic Equipment If you are around sensitive electronic equipment–for example, if you are in a hospital–ask if you may use your NOOK.
Even on a day that is not very hot, the passenger compartment or trunk of a car can be extremely hot. Do not leave your NOOK in a car. High storage temperatures reduce battery life. For more information, see “Charging Recommendations”. Caring for the Touchscreen You should clean the touchscreen on your NOOK from time to time. Clean the screen with a damp soft cloth, such as a micro-fiber cloth. Micro-fibre cloths are available from Barnes & Noble stores and from partner retailers.
Locking and Unlocking Your NOOK When your NOOK has been idle, your NOOK goes to “sleep.” Your NOOK darkens its screen to conserve power. It also locks the screen so that accidental touches do not perform actions. To wake up your NOOK, do this: 1. Press the NOOK button (the raised NOOK symbol on the lower front panel of your NOOK). 2. Unlock your NOOK. • If you have set up a four-digit passcode to lock your NOOK, enter the passcode. Your NOOK displays the last screen you were viewing.
Using Gestures to Control Your NOOK Your NOOK puts great reading material right at your fingertips. To read that material, to share it, to rate it, and so on, you’ll use your fingers in different ways. Your NOOK recognizes these different gestures: • Tap • Double tap • Press and hold • Swipe • Scroll • Drag • Lift • Pinch Tap A tap on the screen is a quick touch of your fingertip. It’s the same gesture you use when you tap a key on a computer keyboard.
Press and Hold Pressing and holding means touching your finger to the screen and holding it there for 2 seconds. In many situations, pressing and holding causes your NOOK to open a pop-up menu. The pop-up menu—sometimes called a contextual menu—offers you choices about the image your finger is resting on. For example, if you press and hold on a book cover, your NOOK opens a menu offering you choices of things you can do with that book: open the book, recommend it, lend it, and so on.
Scroll Slide your finger up or down the screen to scroll through any list displaying a scrollbar. A scroll gesture is like a vertical swipe. You can scroll up and down through shelves of books and periodicals. Drag To drag is to touch an object and pull it to another location, while keeping your fingertip touching the screen. Once you have moved the object to where you want it to be, lift your finger, leaving the object in its new location. Dragging a book from the Daily Shelf.
Pinch to Zoom You can use two fingers to shrink or enlarge a book cover or a photo. Pinch your fingers together to shrink an image and zoom out. Pull your fingers apart to enlarge an image and zoom in. Pulling your fingers apart this way is sometimes called “pinching out.” Pinching to zoom in or out.
The Quick Nav Bar Tapping the NOOK button on the lower front panel of your NOOK displays the Quick Nav Bar, if it is not already visible. The Quick Nav Bar displays icons that lead you to major features of your NOOK. The Quick Nav Bar looks like this: The Quick Nav Bar. If you don’t see the Quick Nav Bar, tap the NOOK button, and the Quick Nav Bar will appear.
The Status Bar A Status Bar runs along the very bottom of the NOOK display.
The Quick Settings Dialog Box If you tap on the right corner of the Status Bar (where the battery status indicator is), your NOOK opens the Quick Settings dialog box, which looks like this: The Quick Settings Dialog Box The Quick Settings dialog box displays today’s date followed by five convenient controls for your NOOK. You can jump from the Quick Settings dialog box to the main Settings screen on your NOOK by tapping the gear icon in the upper right corner of the dialog box.
Auto-rotate screen By default, when you are using the Web browser or reading certain magazines, your NOOK switches orientation automatically when rotated. That is, if you turn your NOOK so that its left edge becomes the bottom edge of the screen, your NOOK switches to “landscape mode.” Tap the Orientation checkbox to turn this rotation feature on or off. NOTE: Kids Picture Books always open in “landscape mode.
The Home Screen and the Daily Shelf The Home Screen is the default display on your NOOK. You can return to the Home Screen at any time by pressing the NOOK button on the front of your NOOK twice quickly. NOTE: If you’re playing a game, reading a Kids Picture Book, or doing some other activity that fills the entire screen, you’ll need to press the NOOK button twice to return to the Home Screen. In a game, pressing the NOOK button the first time opens a dialog box asking if you want to exit the game.
You can tell which panel you’re viewing by looking at the panel indicator at the top of the screen. The panel indicator is a row of three little circles, each representing a Home Screen panel. One dot will be solid white, and that dot’s position indicates which of the three panels you’re currently viewing: left, center, or right. Swipe your finger left or right across the screen to move from one panel to another.
Changing the Wallpaper from the Home Screen To change the Home Screen wallpaper from the Home Screen, do this: 1. On the Home Screen, press and hold on the wallpaper. A pop-up menu appears. 2. Tap on the menu choice Change wallpaper. Your NOOK displays a dialog box with two tabs. Each tab offers you a collection of images to choose from.
The Daily Shelf runs left to right in chronological order. Newest items appear at the left. Swipe your finger across the Shelf to scroll left and right through its contents. The Daily Shelf holds up to 50 items. Once the Daily Shelf is full, it can still accept new items, but it will automatically remove the oldest item to make room for the newest. NOTE: All the items on the Daily Shelf also appear in your Library.
To clean up the items on a panel of the Home Screen, simply double-tap on any open area of the Home Screen. You can also clean up a panel of the Home Screen by doing this: 1. Press and hold on the wallpaper of the panel you want to clean up. A pop-up menu appears. 2. Tap on the menu choice Clean up this panel. Your NOOK automatically arranges all the items in a grid. Removing Items from a Home Screen Panel You can also remove items from the Home Screen.
Reading Books, Magazines, and Newspapers on Your NOOK You can read books, magazines, and newspapers on your NOOK. You can make notes about what you’re reading, highlight and annotate favorite passages, and share your thoughts and recommendations with friends on social sites such as Facebook. Reading Books Your NOOK makes reading books fun. To start reading, simply tap on a book’s cover. The book opens and fills the page.
NOTE: Tapping along the right or left edge of the screen turns to the next page or the previous page, respectively. To call up the Reading Tools, aim for the center of the page. The Reading Tools. The Reading Tools menu gives you access to these six tools: • Contents - Opens a table of contents for the book. The current chapter is highlighted. Also gives you access to Notes & Highlights and Bookmarks. • Find - Lets you search the book you are reading.
In addition to these tools, there’s a slider (the gray line with a blue dot on it) that shows your current place in the book. To move quickly through a book forward or backward, you can drag the slider right or left. To jump to a specific page in the book, tap the Go to Page button, type the page number using the keypad that appears, and tap Go. To jump back to the page you were reading previously, tap the Go Back button.
Reading Tools: discover Tap the discover icon in the Reading Tools to open a window with additional book recommendations, reviews, and ratings.
Using Bookmarks Adding a Bookmark A bookmark flags a location in a book. In a printed book, a bookmark helps you find the page where you left off reading. Bookmarks work similarly in NOOK Books. You can use bookmarks to jump to specific places in a NOOK Book. You can bookmark as many pages as you like. To set a bookmark on the page you are reading, do this: 1. Tap in the upper right corner of the page. A blue ribbon appears in the corner of the page, indicating that a bookmark has been placed.
Viewing All Bookmarks in a Book To view a list of all the bookmarks in a book, do this: 1. Tap the center of the page to open the Reading Tools. 2. In the Reading Tools, tap the Contents icon. 3. In the Contents pane, tap the Bookmarks tab. Your NOOK displays a list of all the bookmarks in the book. To visit any bookmarked passage, tap on its bookmark in the list. To close the bookmark list without visiting a bookmark, tap anywhere on the page of the book outside the list of bookmarks.
Selecting Text You can select a word or a passage of text. Once you have selected a word, you can look it up in a dictionary or on the Web, or search for other instances of the word in the book you are reading. You can also select words or passages for highlighting, making notes, or sharing through email or social media networks such as Facebook. To select a word or a passage of text, press and hold on a word and then lift your finger.
Changing the Selection from a Word to a Passage To select an entire passage, rather than just a word, drag one of the vertical bars at either end of the word until the two vertical bars encompass the passage you want to select. By dragging with your thumb and forefinger, you can grow or shrink selected text as you like. When you lift your fingers after resizing the text selection, the Text Selection Toolbar re-appears.
Using the Text Selection Toolbar Once you’ve highlighted a word or a passage, the Text Selection Toolbar appears. The Toolbar offers you these choices: • Highlight - lets you highlight the selected text with a colored background. • Notes - opens a dialog box for writing a note about the word or passage you selected. • Share - Lets you share quotes with friends through Facebook, Twitter, and email. • Look Up - Displays a Dictionary definition of a selected word.
3. Tap on the button for the reference you would like to use: Wikipedia or Google. 4. Your NOOK opens a Web browser and searches on the term you selected. For more information about using the Web browser on your NOOK, see “Using the Web Browser”. Sharing Quotes through Social Sites and Email You can share a highlighted passage with friends through email, Facebook, or Twitter. NOTE: Before you can share quotes through Facebook or Twitter, you need to link your NOOK to your Facebook or Twitter account.
3. Tap the Notes icon in the toolbar. An “Add Note” window appears with a keyboard for typing notes. 4. Type the text of the note. 5. Tap the Post button to close the editing window and post the Note. The Note window with the keyboard disappears. In your book, an icon now appears in the margin, indicating that a note has been written about this passage. Viewing a Note To open a note and read it, tap the Note icon in the margin.
NOTE: If you tap on the word, and a bubble opens above it, showing the word in larger type, then you’re holding your finger on the screen too long. To open the pop-up menu for a note, tap quickly on the word. Viewing All Notes To view all notes, do this: 1. Tap the page to display the Reading Tools. 2. Tap the Contents icon. 3. Tap the tab labeled “Notes & Highlights.
Adjusting the Appearance of the Page In most books, you can adjust the features described below.
The picture below shows the Text controls available for books. The text control tools. Adjusting the Brightness of the Screen It’s easy to adjust the brightness of the screen while you’re reading a book. Just do this: 1. Tap the center of the page to make the Reading Tools appear. 2. Tap the brightness icon. Your NOOK displays a brightness control that features a slider for dimming or brightening the screen. 3. Use the slider to adjust the brightness of the screen.
Discovering Recommendations and Similar Books Tap the discover icon in the Reading Tools to find: • Links for recommending the book you are reading. • A list of other books that may be of interest to you. Zooming In and Out on Images To zoom in on an image in a book, double-tap it. To zoom out, double-tap again. Reading in Landscape Mode or Portrait Mode If you rotate your NOOK so its longest side is down, the book you are reading switches to landscape mode.
To display the video in full-screen mode, tap the icon with four outward-pointing arrows. To return to the page you were reading, tap the Back button in the upper left of the screen. You can try out the video features of your NOOK by opening The Good Housekeeping Cookbook sample included in your Library. Opening DRM-protected Files DRM stands for Digital Rights Management. DRM software protects books from being illegally copied, sold, or distributed.
Reading a PDF You can read PDF files, including trade PDF editions of books, on your NOOK. The features for reading a PDF are similar to those for NOOK Books, but with these differences: • You can zoom in on an entire page by double-tapping it. Double-tap again to zoom out. • Because PDF files do not have reflowable text, you cannot changes their fonts or page formats. • The Reading Tools for PDFs include a thumbnail viewer that shows miniature representations of pages.
Reading a NOOK Kids Book Your NOOK supports NOOK Kids picture books, specially designed for young children and formatted for rich-color, touch-screen displays. These books open in landscape orientation in order to best present the illustrations in picture books’ two-page spreads. NOOK Kids books display as two-page spreads.
A NOOK Kids book with the thumbnails panel open. Choosing a Way of Reading There are various ways you can enjoy a NOOK Kids book. Some books include narration (a built-in audio track that reads the text aloud as you move from page to page). Some books also include animation and interactive activities. NOOK Kids books include a Read and Record feature that lets you record your own narration of the book.
Options for reading are displayed next to the front cover of a NOOK Kids book. Reading a Book by Yourself To read a book by yourself, simply tap on the blue Read by Myself button to open. Then turn the pages as you would with any other NOOK Book. In Read by Myself mode, the picture book will not play an audio track or play any animations. You can trigger activities, if available, by tapping the white star when it appears at the top of the screen.
Enlarging Text & Images If text on the page of a NOOK Kids book is too small to read, double-tap on the text area to enlarge it. In books with audio tracks, enlarged text will also display a Play button (an orange triangle) at the top left corner. To play the audio associated with the enlarged text, tap once on the Play button. To close the text box, double-tap it again, or tap anywhere else on the page. To zoom in on text and images, simply pinch out to stretch the image on screen.
Hearing a Book Read Aloud Read to Me and Read and Play books feature an audio track. Tap the orange Read to Me or the purple Read and Play buttons to hear the story read aloud as you turn the pages. The NOOK Kids book will play the audio track by default if you open the front cover of one of these books. Choosing Read to Me in this NOOK Kids book will play the audio track automatically as you turn pages.
Read and Play Books If a NOOK Kids book displays the purple Read and Play button with a star symbol on its first screen, that book includes special activities that enable readers to interact with the book’s content. Pages with activities display an Activity button with a white star at the top of the page. Tap the Activity button to start or stop the activity. The front cover of a Read and Play book. A page of a Read and Play book displaying the Activity button at the top of the page.
NOTE: When you’re engaged in a Read and Play activity, use the right arrow and left arrow onscreen to turn pages. When an activity is live, gestures like tapping and swiping interact with the activity; they don’t turn pages. Left- and right-page-turn arrows display when an activity is live. Some activities end automatically. Other activities continue until you stop them.
The Record button. If the button is blocking the text you want to read, press the move button and drag the buttons to another part of the screen. When a recording is in progress, the Record button changes to a Stop button. 4. When you have finished reading the spread, tap Stop or turn the page. • If you would like to hear the spread you have recorded, press the Play button. Press the Pause button when you have finished listening.
The Play and Re-record buttons. 5. To continue recording, swipe or tap to turn to the next page and tap Record. 6. Continue recording and turning pages until you have finished the book. 7. At the end of the book, next to the back cover, press the blue Done button at the top of the screen. Your NOOK opens a dialog box for giving your recording a title and labeling it with a picture. Choose a picture and type a title for your recording. 8. Tap the picture you want to use as a label. 9.
NOTE: Your NOOK stores your recordings as audio files in the My Files area. The recordings are not part of the NOOK Kids books themselves. If you are planning to erase and deregister your NOOK, you can back up these audio files to your personal computer to preserve them. NOTE: Your NOOK saves audio files for Read and Record books on its internal file system. You cannot record audio files directly onto an SD Memory Card. Playing a Recording To play a recording you made of a NOOK Kids book, do this: 1.
The Edit menu offers choices for editing or deleting a recording. 4. Tap the menu choice for the change you want to make. 5. 60 • If you tapped Edit Recording, the NOOK Kids book opens to the first page and displays the Re-record and Play buttons. Record the pages you want to change. The Re-record and Play buttons work just like they did when you first made the recording.
Reading a NOOK Comics Book Your NOOK supports NOOK Comics books, specially formatted for rich-color, touch-screen displays. You can view these books in portrait mode or landscape mode (a two-page spread) based on your preference. To open a NOOK Comics book, tap on its cover.
Reading a Magazine Magazine Formats Your NOOK displays magazines published in a variety of digital formats. The format determines a magazine’s interactive features, including its navigation. Some formats are more interactive than others. This section describes the interface and features available in the most popular format for magazines. You may occasionally encounter magazines with different interfaces and features.
An example of Page View with the Reader Tools open, displaying thumbnails and a slider for navigating from page to page. Once you’re viewing a page without the thumbnail images, you can turn the page and view the next page by tapping on the right side of the screen. You can flip back to a previous page by tapping on the left side of the screen. In Page View, you can bookmark a page by tapping the + icon in the upper right corner of the screen.
Reading a Newspaper Reading a newspaper is just as easy as reading a book. You even have access to the same Reading Tools that you use when reading books. Recent issues of newspapers appear on your Daily Shelf, as well as in the Newspapers section of your Library. Opening a Newspaper To open a newspaper, tap on its cover. Reading a Newspaper When you first open a newspaper, it displays its Front Page, a long scrollable page that includes headlines and a paragraph or two from each major article.
Your Library on Your NOOK Your library is where you keep everything you want to read on NOOK. In your library, you will find: • Books, magazines, newspapers, comics, graphic novels, and apps you have purchased from the NOOK Store. • Free books you have downloaded from the NOOK Store. • Computer files you have transferred onto NOOK using a USB connection from your PC or Mac. Computer files can include EPUB files, PDF files, and Microsoft Office files, such as Word files and Excel spreadsheets.
The Media Bar When you display the Library, your NOOK displays the Media Bar: a row of icons along the top of the screen. Each icon gives you access to a different area of your content. The Media Bar books like this: The Media Bar, along with controls for viewing and sorting the Library.
The image below shows the My Stuff submenu open. The My Stuff pull-down menu. The Sync Button In the lower left corner of the Library is a button with two curved arrows forming a circle. This is the Sync button. Sync’ing your NOOK downloads any books and periodicals that you have purchased from other devices, such as a smartphone or a personal computer.
Memory Card If you have an SD Memory Card installed in your NOOK, you’ll also see two links appears appear at the top of the Library screen when you click the My Files icon: • My NOOK • Memory Card You can tap on these links to switch between viewing files stored on NOOK and files content stored on your SD Memory Card. Viewing and Sorting the Contents of Your Library Your Library allows you to view and sort your books and periodicals in different ways.
Sorting and Viewing Newspapers You can sort newspapers by: • Most Recent • Title You can view newspapers in these arrangements: • a grid • shelves (long, scrollable rows) • a detailed list, which includes front pages and short descriptions • a list, which includes just covers, titles, and publication dates Opening Books, Magazines, and Newspapers You can tap on any cover you see to open it. If you tap on a book or periodical that you have already downloaded, the book opens.
• Recommended: A friend has recommended this book or periodical to you. • LendMe: You can lend this book to a friend. • Lent: This book has been lent to you. The number on the cover indicates the number of days left on the loan. When a book, magazine, or newspaper is being downloaded, a striped bar appears across its cover, indicating that the download is in progress.
Renaming a Shelf To rename a shelf, do this: 1. Tap the Edit button to the right of the shelf ’s name. A window opens, displaying a list of your books and periodicals. The window also includes buttons for renaming or removing the shelf. 2. Tap the Rename button. A dialog box with a text field appears. 3. Tap in the text field in the dialog box. When a keyboard appears, edit the shelf ’s name as you like. Tap Save.
4. Press and hold on the cover of the book or periodical you want to unarchive. A pop-up menu appears. 5. Tap the Unarchive menu choice. Your NOOK unarchives the item, restores its contents, and removes it from the Archived shelf. Deleting Books or Periodicals Archiving removes the local copy of a book or periodical from your NOOK, while preserving a copy in your B&N Lifetime Library. Deleting permanently removes all copies of a book or periodical from your NOOK and from your B&N Lifetime Library.
2. When you connect your NOOK to your personal computer, your NOOK will appear as a new disk drive called “MyNOOK” on your personal computer. Drag the files you want to transfer onto the “MyNOOK” drive. NOTE: If you connect your NOOK to a Windows PC, the PC might display a dialog box asking if you want to install a driver for a “Nook.” Click Cancel to close this dialog box. You do not need to install a special driver to transfer files to your NOOK. 3. To organize the files, open the “MyNOOK” drive.
• Plain Text (txt) • HTML (htm, html, xhtml) • Comic Book Archive (.cbz) Music Files Your NOOK can play the following types of music files: • aac • amr • mid • midi • mp3 • m4a • ogg • wav Video Files Your NOOK can play the following types of video files: • Adobe® Flash® • 3gp • 3g2 • mkv • mp4 • m4v Your NOOK supports: • MPEG-4 Simple/Advanced Profile up to 1920x1080 • H.263 up to 352x288 • H.
Using NOOK Friends™ NOOK Friends™ is an application that lets you connect to friends, lend and borrow books, share comments and recommendations, and more. The NOOK Friends app makes it easy for you to interact with your NOOK Friends. A NOOK Friend is a friend who has a Barnes & Noble account and an email address in your contacts list, and who has accepted your invitation to connect as a NOOK Friend. Friendship is reciprocal. When someone becomes your NOOK Friend, you also become his or her NOOK Friend.
Friends’ Activities The Friends’ Activities screen shows a scrollable list of recent activities of your NOOK friends.
The picture below shows the Friends’ Activities page. The Friends’ Activities page. To learn more about a book, periodical, or app mentioned in these activities, tap its cover or icon. To purchase an item, tap the green button listing the item’s price and then tap Confirm to complete your purchase.
NOOK Friends Tap the All Friends button in the NOOK Friends nav bar to access your list of NOOK Friends. The NOOK friends screen features two pages, which you can toggle between by tapping the buttons near the top of the screen.
All Friends Tap the All Friends button in the upper right corner of the NOOK Friends app to see an alphabetical list of all your NOOK Friends. A list of NOOK Friends. Slide your finger up or down the screen to scroll through the list if it extends off the screen. Tap the photo or photo place-holder of a friend to see that friend’s recent activities, such as shared quotes and recommendations. Tap the LendMe button next to a friend’s name to learn about that friend’s lendable books.
Pending Tap the Pending button to see lists of pending NOOK Friends requests. The Pending page is divided into two sections: • Awaiting Confirmation • Sent Invitations Awaiting Confirmation The Awaiting Confirmation section shows a list of the invitations you have received to become a NOOK Friend of other people.
• You can only lend a book one time. It only counts as the one-time lending if your friend accepts the lending offer. If the lending offer expires or your friend rejects the offer, you can still lend the book. • When you offer to lend a book, the offer lasts for up to 7 days. The offer ends when your friend accepts the offer or when 7 days have passed. • Once you have offered to lend the book, you cannot retract your offer.
Viewing Books in Your Library You can also view a list of lendable books in your Library. Tap the My Stuff icon in the Media Bar of your Library to open the My Stuff menu. Tap the LendMe menu choice. Your NOOK displays three shelves of books: • A shelf of books that you have borrowed. If a book is still on loan, a number appears on its cover, indicating the number of days remaining before the book returns to its owner. • A shelf of books that you own and that are eligible for lending.
Keeping Your List of Lendable Books Private By default, all your NOOK Friends can see all your lendable books. Your NOOK offers two ways to control the privacy of your lendable books. • You can control whether or not your list of lendable books is visible to your NOOK Friends. • If you choose to leave your list of lendable books visible to NOOK Friends, you can choose to show or hide individual titles in the list. To adjust your privacy settings for lendable books, do this: 1.
The image below shows the privacy controls for a list of lendable books. A privacy settings window for the LendMe program and NOOK Friends.
Lending a Book To lend a book to a NOOK Friend, do this: 1. Open the NOOK Friends application for the book you want to lend. To open the application, do any of the following: • In the Quick Nav Bar, tap Apps to display the apps on your NOOK. Tap the NOOK Friends app to launch it. In the NOOK Friends application, tap the LendMe button in the main nav bar. If the LendMe button isn’t selected in the row of buttons beneath the main bar, tap the LendMe button.
4. Tap on the menu choice you for the communication channel you want to use: Contacts or Facebook. • • If you selected Contacts, a dialog box opens that lets you select a friend from your Contacts list and send that friend a message. • Tap the Select a Contact button. A window opens, listing your contacts. Tap on the name of the friend to whom you want to lend the book. • Tap in the Message field. When a keyboard appears, type a message to your friend.
page slider to open a page of extras, and then tap on the Buy button to purchase the book using your Barnes & Noble account. To view a list of lendable books belonging to a specific NOOK Friend, do this: 1. In the NOOK Friends app, tap the All friends button to display a list of your NOOK Friends. 2. Tap the LendMe button next to the name of the friend whose lendable books you want to see. A window opens listing any lendable books that belong to that friend. 3.
Viewing a List of Pending Requests from NOOK Friends To view a list of books that friends would like to borrow from you, do this: 1. Tap the LendMe button in the NOOK Friends app. 2. Scroll down the LendMe screen of bookshelves to the Requests shelf. • If the shelf is empty, none of your friends has requested to borrow a book from you. • If a book appears on the shelf, a friend has requested to borrow that book from you.
The NOOK Friends app opens a dialog box presenting details about the LendMe request, along with buttons for lending the book or declining the request. A LendMe Request dialog box. To lend your friend the book, tap Yes, Lend this Book. To decline, tap Decline. If you decline this request, you can still lend this book to another friend who requests it. If you lend a book, it appears on the Lent to others shelf in the LendMe section of the Library until the loan is over.
About Me The About Me page in the NOOK Friends app is a summary of information about you as a NOOK Friend.
Shopping on Your NOOK Introduction NOTE: To access the Shop on your NOOK, you must be connected to a Wi-Fi network. If you are not connected to a network but you are in an area with Wi-Fi access, your NOOK will guide you through the process of connecting to a network. You can buy books, magazines, newspapers, and apps on your NOOK. To begin shopping, tap on the Shop icon in the Quick Nav Bar. The Shop page displays icons for different categories of items, such as books, magazines, and so on.
The picture below shows a typical home screen in the Shop. The home screen in the Shop. Searching for Titles, Authors, or Topics To search for a book or periodical, tap the search field at the bottom of the screen. When a keyboard appears, type the title, author’s name, or topic you’re looking for, then tap the Search button. When the Shop search engine displays its results, tap on the item you’re interested in to see more details about it.
Buying a Book Once you’re in the Shop, you can buy any book you see that has a green button displaying the book’s price. (If you don’t see a green button with a price next to a particular book, it’s because you’ve already purchased the book. A gray label reading Purchased appears where the price button used to be.) To buy a book, do this: 1. To buy a book, tap on the green button displaying a price next to the book’s cover or title. The Shop replaces the price button with a button labeled Confirm. 2.
Buying a Subscription to a Magazine or Newspaper Your NOOK offers free 14-day trials of magazines and newspapers. You are eligible for one free trial for each newspaper and magazine. To start your free 14-day trial, do this: 1. Open the details page for the magazine or newspaper you want. 2. Tap the Free Trial button. A dialog button opens, asking you to confirm your order. 3. Tap the Start My Free Trial. NOTE: All first-time subscribers receive a FREE 14-day trial.
Using Your Wishlist Your Wishlist is like a shopping cart on your NOOK. You can add books, magazines, newspapers, and apps to your Wishlist so you can buy them later. NOTE: The Wishlist on your NOOK is separate from the Wishlist on the BN.com Web site. Your Wishlist on BN.com can include paper books and other items, as well as NOOK books, magazines, and newspapers for your NOOK.
Using Your NOOK in a Barnes & Noble Store When you turn on your NOOK in a Barnes & Noble store, your NOOK automatically detects the Wi-Fi network running in the store. Your NOOK displays a special window, asking if you would like to connect to the InStore network. • To connect to the store’s network, tap the Connect button. • To use your NOOK without connecting to the store’s network, tap the Dismiss button.
Searching Your NOOK Your NOOK includes a search tool to help you quickly find what you’re looking for. To access the search tool, tap the NOOK button, then tap the Search icon in the Quick Nav Bar. To provide you with the most relevant results possible, the Search customizes its searching according to what you were doing when you started the search. Searching in Your Library If you search while you’re in your Library, the Search tool initially limits its search to your Library.
As shown below, a pull-down menu in the Search tool lets you select specific types of information to search. The Show pull-down menu in the Search tool.
Exploring Search Results Once the Search tool displays a list of results, tap on any result to see more information about it. Search results may include options to search the Web or Wikipedia for information on a topic. The image below shows an example of search results. An example of search results, which include links for exploring further on the Web and in Wikipedia.
Using the Web Browser Your NOOK features a Web browser that you can use to visit Web sites. NOTE: The browser supports Adobe® Flash® Player®, so you can watch Flash videos on sites like YouTube. To access the Web browser, do this: 1. Tap the NOOK button to call up the Quick Nav Bar. 2. In the Quick Nav Bar, tap the Web icon. Your NOOK launches a Web browser.
When the Web browser opens, it displays the browser home page. By default, this is set to a page with information about NOOK. You can change your home page, if you like. (See below.) A Web browser displaying the NOOK home page. As shown above, the Web browser includes these features: Address Bar: Displays the URL (Web address) of the current page.
• Displaying a list of additional options for adding a bookmark, searching on a page, displaying Page Info (the title and URL of the current page), displaying a list of Downloads, and jumping to the Settings screen for configuring your browser. The Options Menu in the Browser.
Navigating to a Web Site To navigate to a different page, do this: 1. Tap in the Address Bar. Then do one of the following: • In the list of Web addresses that appears below the Address Bar, tap on the address you want. • If the address does not appear in the list, use the online keyboard to type the address in the Address Bar. Tap Go. Opening a New Window in Your Web Browser To open a new window, do this: 1. Tap the Options menu. The Options menu opens. 2. Tap the menu choice New window.
To bookmark the current page from the Options menu, do this: 1. Tap the Options menu. The Options menu opens. 2. Tap the Bookmarks menu item. The browser opens a window with three tabs: Bookmarks, Most visited, and History. The Bookmarks tab will be open, displaying rows of thumbnails of bookmarked Web pages. 3. To add a bookmark for the current page, tap the thumbnail labeled Add+ in the upper left of the window. To visit a bookmarked page, do this: 1. Tap the star icon at the top of the browser.
Zooming In and Out on a Web Page To zoom in on a region on a Web page, tap twice quickly or pinch and zoom. Once you have zoomed in, you can swipe left, right, up, or down to move about the page. When you move around the page, a pair of magnifying glass icons appears in the lower left corner of the screen. Tap the magnifying glass with a plus sign (+) to zoom in further. Tap the magnifying glass with a minus sign (-) to zoom out. You can also zoom out by tapping twice.
Disabling and Re-enabling Your Web Browser If you want to prevent anyone from using the Web browser, you can disable the Web browser. Disabling the Web browser renders the Web button in the Quick Nav Bar inactive. The button will be grayed out and labeled with a banner reading “Disabled.” The Quick Nav Bar with the Web browser disabled.
The Restrictions Settings screen. 4. Tap the Restrictions menu choice. Your NOOK displays a keypad for setting up a 4-digit passcode you will enter whenever you want to disable or re-enable the Web browser. NOTE: This passcode is independent of the Device lock passcode you can set up to protect your NOOK from being used by people who do not know the Device lock passcode. For more information about the Device lock passcode, see “Using a Device Lock Passcode to Protect Your NOOK””.
The keypad screen for entering a restrictions keypad. 5. Type a 4-digit number into the keypad. Your NOOK records the number and clears the keypad. It asks you to re-type the number to confirm that you have entered it correctly. 6. Type the 4-digit number a second time. Your NOOK accepts the 4-digit number as your passcode for controlling access to the Web browser. The Restrictions screen appears again, this time with the Restrictions checkbox checked, and the Browser checkbox no longer grayed out.
The Restrictions Settings screen after you have set up restrictions passcode. 7. Tap the Browser checkbox. Once the Browser checkbox is checked, the browser is disabled. NOTE: If you leave this screen and try to return to it, you will be prompted for the restrictions passcode. Once you have entered the passcode, you will be able to check or uncheck the checkbox as you like. Re-enabling the Web Browser To re-enable the Web browser after you have disabled it, do this: 1.
3. Tap the Restrictions menu choice. Your NOOK displays a keypad so you can enter the restrictions passcode. NOTE: If you do not know the restrictions passcode for the NOOK you are using, ask the owner or administrator of your NOOK for help. 4. Enter the 4-digit restrictions passcode on the keypad. Your NOOK displays the Restrictions setting screen. 5. Tap the Browser checkbox so it is unchecked. Your NOOK re-enables the Web browser.
Configuring Security Settings for Your Web Browser The Settings screen of your Web browser also includes a list of security settings. The security settings include: • Remember passwords (saves usernames and passwords for Web sites) • Clear passwords • Show security warnings (shows a warning if there is a problem with a site’s security) (turned on by default) The settings marked with an asterisk above open a dialog box to confirm that you want to perform an action.
Using NOOK Email™ Your NOOK lets you send and receive email from one or more of your email accounts, such as your Gmail account, your Yahoo! account, or your email account for work. NOTE: Your NOOK must be connected to a Wi-Fi network in order to send and receive email. NOTE: Your NOOK lets you use email accounts that you already have, such as a Gmail account. Barnes & Noble does not provide email accounts.
Letting Your NOOK Set up Your Account To let your NOOK automatically configure your email account, do this: 1. On the email account set-up screen, enter the email address of the account you want to configure. This should be an account you already have set up with your ISP or with an email service provider such as Google. 2. Enter the password for the account. If you would like to see the password as you type it, check the Show Password box below the password field. 3.
NOTE: SSL, which stands for Secure Socket Layer, is a widely-used technology for encrypting Internet so it cannot be intercepted or tampered with. 8. To accept all SSL certificates from email servers, check the box labeled Accept all SSL certificates. 9. Tap Next. Your NOOK connects to the email account and set up a connection. If your NOOK connected successfully, it displays a new screen with a congratulatory message at the top. The screen features these two fields: • Account name • Your name 10.
To delete an email account, do this: 1. On the main Email screen, tap the checkbox next to the name of the account you want to delete. 2. Once the checkbox is checked, tap the Delete icon (a trash can) in the upper right corner of the screen. 3. A dialog box appears, asking you to confirm that you want to delete the account. 4. Tap OK. Composing and Sending a Message To send a new message, do this: 1. On the main Email screen, tap the pencil icon in the upper left corner.
Reading a Message To read a message, tap on its title in an Inbox. A new window opens displaying the contents of the message. Reading an email message. If the message is long, you might see a Get More button in the lower right corner of the message. Tap this button to download the remainder of the message. To display any images embedded in the message, tap the Show Pictures button. Viewing and Saving Attachments To view a list of attachments included with the message, tap the View Attachments button.
• Reply All • Forward To reply just to the sender of the message, tap Reply, compose your response in the window that opens, and tap Send. To reply to the sender as well as to everyone else who received the message, tap Reply All, compose your response in the window that opens, and tap Send. To forward a message to someone else, tap the forward button, compose an introduction to the message being forwarded, and tap Send.
Configuring Email Settings To edit the configuration settings for an email account, do this: 1. In the NOOK Email app, display the list of your email accounts. To view the account list, pull down the menu at the top of the screen and select the menu choice Accounts. 2. Tap the gear icon to the right of the name of the account you want to configure. Your NOOK displays the email configuration screen for that account. The screen looks like this: The Email Account Settings screen.
General Settings The General settings area of the Email Settings screen includes the following settings: • Account name - a name you have given the account to keep it distinct from other accounts • Your name - your name as you would like it to appear automatically in the From field of the email messages you send from this account • Signature - a line of text that appears at the bottom of the email messages you send from this account on your NOOK; by default, the signature reads, “Sent from my NOOK.
Using Apps on Your NOOK Your NOOK includes many applications or “apps,” including music players, a photo gallery and media application, a contact management application for storing addresses and phone numbers, and games such as Chess and Sudoku.
Launching an Application To launch an application, tap on its icon on the Apps screen. Quitting an Application To leave an application and return to other activities, do any of the following: • Press the NOOK button twice to return to the Home Screen. • Tap the NOOK button to call up the Quick Nav Bar, then select an icon such as Shop from the menu. • Tap the Resume Reading icon (the outline of an open book) in the Status Bar.
• Newspapers • Photos • Wallpapers You can put music files such as MP3 files in the Music folder. When you have finished arranging files, eject the “MyNOOK” drive from your personal computer to unmount the NOOK file system. Disconnect the microUSB cable. Playing an Audio File from the Library To play an audio file from the Library, do this: 1. Tap the My Files icon in the Media Bar. 2. Navigate through the folders in your My Files area to find the Music folder with audio files. 3.
• Search (a magnifying glass) – search the list of songs or tracks for a particular title or artist Creating a Playlist To create a playlist, do this: 1. Press and hold on a track that you want to include in the playlist. A pop-up menu opens. 2. Tap on the menu choice Add to playlist. A new popup menu appears, offering you a choice of playlists. 3. Tap the menu choice New. A dialog box opens for entering a name for the playlist. 4. Tap in the text field for the playlist name.
Watching Netflix If you have a Netflix account and your NOOK is connected to a Wi-Fi network, you can watch streaming movies and TV shows through the Netflix app on your NOOK. To launch the app, open the Apps screen and tap the Netflix icon. When the Netflix app launches, it presents a login screen. If you already have a Netflix account, log in with your email address and password. If you do not yet have a Netflix account, tap the netflix.com link to visit the Netflix Web site and set up an account.
Configuring Your NOOK Your NOOK gives you full control over many areas of its operations, from Wi-Fi connections to font sizes to browser settings to audio controls. To adjust the configuration of your NOOK, you’ll often work with the Settings tool. To call up Settings, do this: 1. Tap the NOOK button to open the Quick Nav Bar. 2. In the Quick Nav Bar, tap the Settings icon. Your NOOK opens the Settings Screen.
Viewing Device Information The Device Info settings screen displays useful information about your device, including your battery status (how much of a charge remains) and the amount of storage available on your NOOK. It also reports your NOOK’s serial number and the version number of your NOOK software. The Device Info feature also includes a button for restoring your NOOK to its factory settings. Displaying Basic Device Information To display device information, do this: 1.
when you first set up your NOOK. Once you have registered, your complete Library is once again available on your NOOK. NOTE: Erasing and deregistering does delete any files you have transferred to your NOOK from your personal computer. Be sure to back up these files before erasing and deregistering, if you want to have access to them after deregistering your NOOK. NOTE: You will probably never need to use this feature unless instructed to do so by Customer Support.
Configuring Wireless Settings The Wireless settings screen provides: • a switch for turning on and off Wi-Fi networking • a list of all the Wi-Fi networks your NOOK has detected Turning Wi-Fi Networking On or Off On the Wireless settings page, tap the Wi-Fi button to change its status from On to Off or from Off to On.
Configuring Screen Settings On the Screen settings page, you can: • Control whether or not your NOOK should switch its screen orientation to “landscape mode” when you rotate your NOOK so its longest side is down. • Adjust the brightness of the screen. • Change the amount of time your NOOK should wait when no activity is taking place before turning off the screen. To display the Screen settings page, tap the Screen button on the main Settings screen.
Controlling Screen Orientation The Auto-rotate screen option affects the Web browser, books, magazines, and the photo gallery. By default, these features will switch to “landscape mode” when you rotate your NOOK. You can turn this rotation feature on or off by checking or unchecking on the Orientation checkbox. To change the setting of the Auto-rotate screen option, do this: 1. On the Settings screen, tap Screen. 2.
3. Tap on the menu choice listing the amount of time you want your NOOK to wait. The dialog box closes. Your change takes effect right away.
Configuring Sound Settings On the Sounds settings page, you can mute or unmute your NOOK. You can also set the speaker volume for media such as music and video and for notifications, such as low-battery warnings. NOTE: You can control the speaker volume for your NOOK overall by pressing the + and - volume buttons on the right edge of your NOOK. The volume controls on the Sounds settings page control volume within the range allowed by the volume buttons. To configure sounds on your NOOK, do this: 1.
Muting or Unmuting Your NOOK Muting your NOOK makes it no longer play sounds used as alerts by system notification. Muting also turns off keyboard clicks, if you have turned keyboard clicks on. By default, the Mute option is turned off. To change the setting of the Mute option, tap in the checkbox on the Mute menu choice. • When the checkbox is checked, the option is turned on. • When the checkbox is unchecked, the option is turned off.
Configuring Time Settings On the Time settings page, you can control whether your NOOK uses a 12-hour clock or a 24-hour clock. You can also select a Time Zone for your NOOK. To display the Time settings page, tap the Time button on the Settings screen. Your NOOK displays the Time settings page, which looks like this: The Time settings page. By default, the list of time zones includes only time zones in the United States.
Configuring Security Settings On the Security settings page you can: • control whether or not someone must enter a 4-digit passcode to gain access to your NOOK once the device has gone to sleep or been turned off • define a 4-digit passcode for enabling or disabling the Web browser or for enabling or disabling social features such as sharing quotes and recommendations through Facebook and Twitter For information about disabling or re-enabling the Web browser, see “Disabling and Re-enabling Your Web Br
Using a Device Lock Passcode to Protect Your NOOK You can configure your NOOK to lock the screen after a certain number of minutes and then require a four-digit passcode to be entered before any features can be accessed. This passcode is called the device lock passcode. To set an unlock passcode, do this: 1. On the Settings screen, tap Security. Your NOOK displays the Security settings screen. 2. Tap the Device lock passcode menu choice. A window labeled “Enter passcode” appears.
Re-enabling Social Features If you have disabled social features, you can re-enable them. To re-enable social features, do this: 1. On the Security settings screen, tap Restrictions. Your NOOK displays a numerical keypad. 2. Enter the passcode you created for the restrictions feature. Your NOOK displays the Restrictions setting screen. 3. Tap the checkbox labeled Social. Leave the checkbox unchecked to re-enable social features.
Configuring Power Settings Your NOOK features a PowerSave Mode that fine-tunes your NOOK’s performance to save power and extend its battery charge. By default, PowerSave Mode is turned off. To turn on PowerSave Mode, do this: 1. On the Settings screen, tap Power Save. Your NOOK displays the Power Save settings page. 2. Tap the PowerSave mode checkbox. Leave the checkbox checked.
Configuring Keyboard Settings On the Keyboard settings page, you can configure the behavior of your NOOK’s online keyboard. To configure the keyboard, do this: 1. On the Settings screen, tap Keyboard. Your NOOK displays the Keyboard settings page, which lists five options that you can turn on or off. The keyboard options are: • Keyboard sounds, which controls whether or not your NOOK should play clicking sounds when you tap the keys on a keyboard.
2. Tap on the checkbox of any keyboard configuration option you want to change. • When a checkbox is checked, the option is turned on. • When a checkbox is unchecked, the option is turned off. Your configuration changes take effect right away.
Customizing the Home Screen You can make the following changes to the Home Screen: • You can change the wallpaper image that appears on the Home Screen. • You can clear the Keep Reading list, which lists the books, magazines, newspapers, and files you have recently opened. Changing the Wallpaper on the Home Screen To change the wallpaper displayed on the Home Screen, do this: 1. On the Settings Screen, tap Home. The Home configuration page displays a swatch of the current wallpaper. 2.
Clearing the Daily Shelf To clear your NOOK’s Daily Shelf, do this: 1. On the Settings Screen, tap Home. 2. Tap on the line that says Clear Daily Shelf. A dialog box appears, asking if you really want to clear the Daily Shelf 3. Tap Yes. Showing or Hiding Media Shortcuts Media Shortcuts are small icons that appear below that Daily Shelf. There are five shortcuts: books, newsstand, video, music, and apps.
5. To control how many issues of each magazine you subscribe to should appear on the Daily Shelf, tap the Recent issues of each Magazine. A dialog box opens. Tap the number of issues you would like to have appear. Your choices are: • none • 1 (default) • 2 • 3 • all Configuring the Shop Requiring Your Account Password for Purchases By default, your NOOK asks you to confirm all purchases by tapping a Confirm button.
Configuring Social Features You can use the Social settings screen modify the behavior of the NOOK Friends app and to link your NOOK to your Facebook and Twitter accounts. You can also import all your contacts from your Google™ Gmail account. Once you have linked to Facebook and Twitter and set up email contacts, you can share favorite quotes, book recommendations, and reading status updates with your friends.
Automatically Adding Facebook Friends as NOOK Friends. If any of your Facebook friends have BN.com accounts, your NOOK can automatically add them as NOOK Friends. To enable this feature, tap the checkbox labeled Add Facebook friends as NOOK Friends™. Make sure you leave the checkbox checked. To disable this feature, tap the checkbox and leave it unchecked. For more information about NOOK Friends, see “Using NOOK Friends™”.
Linking Your NOOK to Your Facebook Account You can import your friends on Facebook as contacts for lending books, sharing quotations, and other social activities. You can post a LendMe offer, a quotation, and a recommendation on the wall of a friend. You can also post a quote, a recommendation, and reading status on your own wall. To link your NOOK to your Facebook account, do this: 1. On the Manage your Accounts screen, tap the Link Your Account button under the Facebook logo.
Linking Your NOOK to Your Twitter Account You can share quotes, recommendations, and reading status by posting a message to your Twitter account. If you post while reading a book, your NOOK will automatically embed a shortened link to the book you’re writing about. NOTE: If you don’t have a Twitter account and would like to set one up, tap the NOOK button to call up the Quick Nav Bar, tap the Web icon to launch a Web browser, and navigate to www.twitter.com.
Configuring the Reader The Reader is the built-in app that lets you read eBooks on your NOOK. The Reader settings page presents a checkbox you can select to animate eBook page turns. Tapping on the checkbox toggles its status from unchecked to checked or from checked to unchecked. If the box is checked, pages will slide across the screen when you turn pages in an eBook.
Clearing Search Shortcuts When you search for items and select search results, your NOOK stores the search results you select as shortcuts for future searches. To clear the list of search-result shortcuts, do this: 1. On the Settings screen, tap Search. 2. Tap the menu choice Clear search shortcuts. A dialog box appears, explaining that this will clear shortcuts to recently searched items. 3. Tap OK.
Using Your NOOK at Wi-Fi Hotspots In addition to connecting to your Wi-Fi network in your home or office, you can use your NOOK to connect to WiFi hot spots in stores, restaurants, and hotels. This section summarizes how your NOOK works with various types of Wi-Fi hotspots. Wi-Fi Networks in Barnes & Noble Stores Your NOOK will automatically detect a Wi-Fi network in a Barnes & Noble store and ask if you want to connect to it.
Updating the Software on Your NOOK From time to time Barnes & Noble will release software updates for your NOOK. Your NOOK will automatically install these updates. NOTE: Updating software does not delete any of your books, magazines, or newspapers, nor does it delete any of the files you have transferred onto your NOOK from your personal computer. The software update simply installs new NOOK software to give you the latest features available from Barnes & Noble.
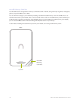
Using an SD Memory Card You can install an SD Memory Card in your NOOK to add up to 32 GB of memory to your NOOK—enough for many thousand more books, along with periodicals, music, and personal files. SD Memory Cards will hold about 1,000 books per gigabyte. The number of periodicals you can store on card depends on the size of the periodicals and the amount of storage on the card. Digital magazines and newspapers vary dramatically in size. Some highly interactive, photo-rich magazines can reach 1 GB each.
5. Close the small gray lid and snap it into place. Opening the microSD slot on the back of your NOOK. Positioning the microSD card in the slot.
Pushing the microSD card into place. Formatting a New Card If you have installed a new, never-before-used microSD Memory Card into your NOOK, a dialog box appears, reporting that the SD Memory Card is unformatted and that it needs to be formatted. To format the memory card, do this: 1. Tap the Format Now button to format the memory card. Your NOOK displays a warning that formatting the memory card will erase its contents. 2.
3. With the tip of your finger, push in the memory card, then release it. The card will pop partly out. 4. Slide the card the rest of the way out of the slot, and remove the cover.
Tips and Troubleshooting Solving Problems The screen is acting as though I’m tapping on it, even though I am not. If your screen is dirty, it might detect touches when none are occurring. This problem can occur on any touchscreen device. Wait until your NOOK has timed out and the screen is dark. Then wipe the screen clean with a soft, dry cloth. I’m trying to lend a book through Facebook, but the Post button doesn’t seem to be working.
Appendix A: Page Numbering and File Formats When you read a book or periodical on your NOOK, you’re reading the same words that appear in the paper edition of the book or periodical. In most books, the page number that shows in the upper right corner of your NOOK screen shows the page number that would appear if you were reading the printed version of the same book.
Appendix B: International Use and Languages This chapter summarizes information about using your NOOK outside of the United States and explains your NOOK’s support of languages. Using Your NOOK Abroad Your NOOK is designed for use in the United States and United States territories. You can use it to read anything already on your NOOK when travelling anywhere in the world.
Appendix C: One Year Limited Warranty THE FOLLOWING WARRANTY TERMS WERE IN EFFECT AS OF THE DATE YOUR DEVICE WAS MANUFACTURED, AND ARE PROVIDED FOR YOUR REFERENCE ONLY. THE ACTUAL TERMS OF YOUR WARRANTY ARE THE TERMS THAT WERE IN EFFECT AS OF THE DATE OF YOUR PURCHASE, WHICH MAY BE DIFFERENT THAN THE TERMS SET FORTH HEREIN. TO FIND THE EXACT TERMS OF YOUR WARRANTY, PLEASE GO TO NOOK.COM/TABLET/WARRANTY AND REVIEW THE TERMS APPLICABLE AS OF THE DATE OF YOUR PURCHASE.
HOW DO I RETURN MY NOOK TO B&N? When you contact B&N at one of the numbers above, B&N will provide instructions to you as to how and where to return your NOOK. Your NOOK must be shipped, prepaid and insured, in appropriate protective packaging, together with proof of purchase and the Return Authorization Number provided by B&N, to the address specified by B&N. You must return your NOOK within the timeframe provided by B&N.
This Limited Warranty also does not cover cosmetic damage or normal wear and tear. This Limited Warranty does not apply to NOOKs sold as used, refurbished or reconditioned, except to the extent that such NOOK is a certified pre-owned NOOK that was purchased directly from B&N or from a B&N authorized reseller of certified pre-owned NOOKs.
Appendix D: Trademarks and Copyrights Adobe Your NOOK contains Adobe® Reader® Mobile software under license from Adobe Systems Incorporated, Copyright © 1995-2010 Adobe Systems Incorporated. All rights reserved. Adobe and Reader are trademarks of Adobe Systems Incorporated. Adobe, the Flash logo, and Flash are either registered trademarks or trademarks of Adobe Systems Incorporated in the United States and/or other countries.
Netflix Netflix is a registered trademark of Netflix. The Netflix logo, Netflix.com, Profiles, and CineMatch are trademarks or service marks of Netflix. Wi-Fi Wi-Fi and Wi-Fi Alliance are registered trademarks of the Wi-Fi Alliance. Additional Information Additional copyright, trademark, and other notices may be found in the NOOK™ Terms of Service: http://www.nook.
Appendix E: FCC Notices FCC IDs NOOK WI-FI: XHHBNTV250-A MODEL: BNTV250 This device complies with Part 15 of the FCC Rules. Operation is subject to the following two conditions: (1) this device may not cause harmful interference, and (2) this device must accept any interference received, including interference that may cause undesired operation.
• Your NOOK has a Wi-Fi setting that turns off the radio. Wi-Fi networking should be turned off on airplanes. For more information, see “Airplanes”. • When around sensitive electronic equipment, ask whether you can use your NOOK. You might need to turn Wi-Fi networking off. In some places, for example in a hospital, you might be asked to not use your device. For more information, see “Electronic Equipment”. • For information about wireless configuration settings, see “Configuring Wireless Settings”.
Appendix F: Industry Canada Notice The term “IC” before the equipment certification number only signifies that the Industry Canada technical specifications were met. IC: 8961A-BNTV250A Operation is subject to the following two conditions: (1) This device may not cause harmful interference, and (2) this device must accept any interference received, including interference that may cause undesired operation. This Class B digital apparatus complies with Canadian ICES-003.
Appendix G: NOOK® Terms of Service The NOOK® Terms of Service are located here: http://www.nook.
Appendix H: AT&T Terms of Service & Acceptable Use Policy These Terms of Service & Acceptable Use Policy (the “Terms”) govern your use of AT&T Internet Services’ AT&T Wi-Fi service (“Service”) and the AT&T Internet Services network (“Network”).
intellectual property laws) or a violation of these Terms, or any applicable policies or guidelines. Your Service may be suspended or terminated if your payment is past due and such condition continues un-remedied for thirty (30) days. Termination or suspension by AT&T of Service also constitutes termination or suspension (as applicable) of your license to use any Software.
maintained by AT&T. AT&T is not responsible for the content of those sites. AT&T is providing these links to you only as a convenience, and the inclusion of any link to such sites does not imply endorsement by AT&T of those sites. Privacy Policy Registration data and certain other information about you is subject to the AT&T Wi-Fi Privacy Policy. For more information see: http://secure.sbc.com/privacy_statement.adp.
Disclaimer of Warranties UNLESS OTHERWISE EXPLICITY STATED, THE MATERIALS AND THE SERVICE ARE PROVIDED “AS IS”, AND ARE FOR PERSONAL USE ONLY. ALL EXPRESS OR IMPLIED CONDITIONS, REPRESENTATIONS AND WARRANTIES, INCLUDING ANY IMPLIED WARRANTY OF MERCHANTABILITY, FITNESS FOR A PARTICULAR PURPOSE, OR NON-INFRINGEMENT, ARE DISCLAIMED, EXCEPT TO THE EXTENT THAT SUCH DISCLAIMERS ARE HELD TO BE LEGALLY INVALID.
Kingdom and Australia. You acknowledge and agree that Materials are subject to the U.S. Export Administration Laws and Regulations. Diversion of such Materials contrary to U.S. law is prohibited.
Customers are responsible for avoiding the prohibited activities and strictly following the AUP terms set forth herein. AUP Coverage The AT&T Acceptable Use Policy (“AUP”) applies to the services that provide (or include) access to the Internet, services provided over the Internet, and Hosting services (collectively “IP Services”). Customer is responsible for the actions of others who may be using the IP Service(s) under Customer’s account.
it may terminate your Service without further notice. In such case, you are responsible for any applicable early termination charges. AT&T will not issue any refunds, credits or other forms of compensation for the period when IP Service(s) have been suspended as a result of violation(s) or alleged violation(s) of this AUP. AT&T shall not be liable for any damages of any nature suffered by any Customer, User, or third party resulting in whole or in part from AT&T’s exercise of its rights under this AUP.
damage or security breaches to AT&T’s network or to the network of any other IP Service provider. Customer shall not create or attempt to utilize a domain name that is fraudulent, indecent, offensive, deceptive, threatening, abusive or harassing. Interaction with Minors AT&T has a zero tolerance policy regarding use of its Service to engage in inappropriate conduct with a minor (anyone under 18 years of age).
posting messages to or canceling or superseding messages on an online forum or newsgroup in a manner that violates the rules of the forum or newsgroup or that contain forged header information.
unauthorized monitoring of data or traffic on any network or system without express authorization of the owner of the system or network; this would include use of sniffers or SNMP tools; falsifying packet header, sender, or User information whether in whole or in part to mask the identity of the sender, originator or point of origin; knowingly uploading or distributing files that contain viruses, Trojan horses, worms, time bombs, cancel bots, corrupted files, or any other similar software or programs
Customer agrees to indemnify and hold AT&T harmless from any claim, action, demand, loss, or damage (including attorneys’ fees) made by any third party against AT&T as a provider of the IP Service(s) arising out of or relating to any violation(s) of this AUP by Customer (or its Users). Incident Reporting Any complaints (other than claims of copyright or trademark infringement) regarding violation of this AUP by an AT&T Customer (or its User) should be directed to abuse@att.net.
Index A apps 13 apps for playing music 121 buying an app in the Shop 94 list of standard apps 120 archiving books or periodicals 71 Article View of a magazine 63 AT&T Terms of Service & Acceptable Use Policy 168 audio audio track in a Kids Picture Book configuring sound settings launching the Music application 122 playing audio files 121 streaming music with Pandora Internet Radio 123 volume controls 9 audio jack 8 Auto-rotate screen setting 27, 47 B back swiping left to move to a previous activity 21 tapp
files transferring files to or from a personal computer 72 finger motions.
NOOK buton 9 NOOK button 32 NOOK Friend defined 75 NOOK Friends app About Me 90 canceling an invitation 80 Friends 78 LendMe program for borrowing and lending books 80 navbar 75 Privacy Settings 83 removing a friend from your list of NOOK Friends 79 Requests list Sent list 80 NOOK Terms of Service 167 O open book icon in Status Bar 25 opening a book 33 P page numbering in eBooks 157 Page View of a magazine 62 Pandora Internet Radio 123 passcode entering a passcode to unlock your screen 19 setting up a pas
searching for titles, authors, or topics 92 searching the Shop 92 WishList 94 sideloading (transferring files from a personal computer to your NOOK) 72 Signature for email 119 Social features configuring 144 disabling 136 software updates 151 software version 126 sorting Library items 68 sound settings 132 Status Bar 25 email notification 119 list of icons and meanings 25 subscribing to a magazine or newspaper 94 Sudoku 120 swipe 21 Sync button in the Library 67 T tap 20 Terms of Service AT&T 168 NOOK 167