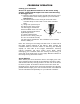
RC-150 “Veloci-Speed” Synthetic Harness Systems O W N E R ’ S M A N U A L Manual Includes the Following: Safety Guidelines General Information Assembly Guides Warranty Information Trouble Shooting Care and Maintenance
C ongratulations, you are the proud owner of the finest production crossbow in the world! Please follow all safety, assembly and trouble shooting instructions contained in the manual. It is extremely important to read and follow the instructions before attempting to use your crossbow. Serious injuries to yourself or others, damage to your crossbow or poor performance from your crossbow could result from failure to thoroughly read and understand these instructions.
SPECIFICATIONS RC-150 260 9.5 150 35” 16055 “Veloci-Speed” System Feet per Second Power Stroke Draw Weight String Length String Stock No. For teardrop model built prior to 2001 please refer to the following: RC-150 240 9.5 150 16” 16077 Feet per Second Power Stroke Draw Weight String Length String Stock No. PARTS LIST Before beginning to assemble your crossbow, take a moment to organize these parts and ensure you have everything you need.
Safety Guidelines RC-150 Barnett RC-150 crossbows are equipped with an automatic safety, which engages every time the crossbow is cocked. The safety must be released before each shot. This, as with any other mechanical device, does not guarantee total safety, as no safety device is a substitute for common sense and safe handling. The crossbow trigger is only to be pulled when the safety is in "fire" position and NEVER when it is in the "safe" position or anywhere between "safe" and "fire.
BREAKDOWN OF CROSSBOW PARTS 1. 2. 3. 4. 5. 6. BODY BOLT RETAINER CABLES FLIGHT TRACK FOOT STIRRUP FRONT SIGHT BRACKET- ONLY INCLUDED IF BOW ONLY IS PURCHASED. 7. LIMBS 8. PEEP SIGHT- ONLY INCLUDED IF BOW ONLY IS PURCHASED. 9. QUIVER- ONLY INCLUDED IF THE KIT OR PACKAGE IS PURCHASED. 10. 11. 12. 13. 14. RED DOT SIGHT- ONLY INCLUDED IF PACKAGE IS PURCHASED.
ASSEMBLY GUIDE Mounting the Front Sight 1.) Attach the front sight bracket by attaching it to the bow limb housing using the two lock washers and socket head screws provided. 2.) Insert the sight pin into bracket by unscrewing the threaded lock nut from the pin and inserting it through the side of the front sight so that the point of the pin is in the center of the front sight. 3.) Replace threaded lock nut on sight pin and tighten. Install the second pin in the same manner facing first pin.
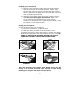
CROSSBOW OPERATION Cocking your Crossbow Be sure to apply Barnett lubewax to the center string serving, cables and the flight track area from the string to the trigger area. 1.) Place the foot stirrup on the ground with one foot in the stirrup and the stock resting against your mid section. See figure 2 2.) Place both hands on the string at each side of the crossbow body no more than ½ inch from crossbow body. 3.
Loading your Crossbow 1.) Place the arrow forward under the front sight bracket and lay the arrow on the flight surface. When using arrows with moon nocks, be sure that the odd colored fletch is placed in the flight grove and that the concaved nock is parallel to the string. 2.) Slide the arrow back under the arrow retaining spring and fully into the trigger mechanism.
Unloading your Crossbow By far, the easiest way to un-cock a cocked crossbow is to fire an arrow into a target or into the ground away from debris, loose rocks or other people. Sighting-In the Crossbow Using the rear peep sight and front sight pins: 1.) Place the first sight pin near the top of the front sight bracket. 2.) Shooting at a target from 10 yards, aim for the bullseye. If the first shot is above the bullseye, move the pin up (or down if the shot is below the bullseye). 3.
IMPORTANT DISCLAIMER Because of the power of the Barnett Crossbow and the inconsistent properties of wooden shafts, which have a tendency to warp, vary in spine stiffness; density; moisture absorption, all of which result in inaccuracy. Barnett International does not recommend their use under any circumstance. Possible injury could result from shaft breakage, ect., we accept no responsibility or liability arising from the use of wooded shaft arrows.
6. When cocking your crossbow make a conscious effort to hold the string on the flight track so as not to lift over the arrow retainer. 7. Are you putting one fletching down in the flight groove? 8. When using broadheads, line up the blades with the fletches on the arrow (using o-ring). 9. Have you checked the tiller to see if any adjustments should be made? See Figure 3 Tiller is the measurement between the base of the limb and the bowstring.
CARE AND MAINTENANCE Care of String The owners kit contains a tube of lube wax that should be applied to the center serving and flight track every 5 – 10 shots. Lubewax should also be applied anywhere the cables make contact with the Teflon tape or flight track every 20 – 30 shots. To extend the life of your cables it is important to apply ARCHERY STRING WAX to all areas of the cables and string every 30 - 50 shots or when white fuzz begins to appear.
WARRANTY INFORMATION The stock, trigger mechanism and limbs are covered under a limited lifetime warranty. Our liability extends to parts, labor and return transportation to the consumer. Not covered are: strings, cables, arrows, transportation of product to our Service Center; damage caused by abuse, modification or failure to perform normal maintenance; or any other expense, consequential damages, coincidental damages, or incidental expenses including damage to property or person.
Cut out and mail immediately to: Barnett International, Inc. P.O.